
Kupu Whakataki
This manual provides comprehensive instructions for the proper installation and use of the Metra 70-2001 Radio Wiring Harness. This harness is specifically designed to facilitate the installation of an aftermarket car stereo into compatible General Motors vehicles, ensuring a secure and reliable electrical connection without cutting factory wiring.
Nga korero haumaru
- Always disconnect the vehicle's negative battery terminal before beginning any electrical installation to prevent short circuits and electrical shock.
- Ensure all wiring connections are secure and properly insulated using electrical tape, crimp connectors, or heat shrink tubing. Loose connections can lead to electrical malfunctions or fire hazards.
- Mena kāore koe i te tino mōhio ki tētahi wāhanga o te tukanga tāutanga, whakapā atu ki tētahi tohunga hangarau motuka ngaio.
- Do not modify the wiring harness. Any alterations may void the product warranty and could cause damage to your vehicle's electrical system.
- Me mau ngā taputapu tiaki whaiaro e tika ana, pērā i ngā mōhiti haumaru, i te wā e tāuta ana.
Waka Hototahi
The Metra 70-2001 Radio Wiring Harness is compatible with select General Motors vehicles manufactured between 1994 and 2004. This includes various models from Buick, Cadillac, Chevrolet, GMC, Oldsmobile, and Pontiac within this year range.
Hiranga: Always verify that your vehicle's factory wiring harness connector physically matches the Metra 70-2001 connector before proceeding with installation. Vehicle models and trim levels can vary, and some vehicles within the specified range may use a different connector.
Ihirangi mokete
I te whakatuwheratanga o te kete, me whakarite kei te noho nga waahanga katoa me te kore e pakaru:
- Metra 70-2001 Radio Wiring Harness (GM 32-Pin Connector)

Image: The Metra 70-2001 Radio Wiring Harness shown in its retail packaging, indicating the product model and compatibility.
Ngā Tohutohu Tāutanga (Tatūnga)
Utauta e hiahiatia ana
- Nga Kaipupuri Waea
- Wire Crimpers
- Riipene Hiko, Heat Shrink Tubing ranei
- Mita maha (whiringa kore, hei manatoko i ngā hononga)
- Panel Removal Tools (for vehicle interior trim)
Nga Mahi i mua i te whakaurunga
- Momotu Pūhiko: Locate your vehicle's battery and disconnect the negative (-) terminal to prevent electrical hazards.
- Tango irirangi wheketere: Carefully remove the factory radio from the dashboard. This typically involves removing trim panels and unscrewing the radio unit.
- Identify Factory Harness: Locate the factory wiring harness that was connected to the original radio.
Hononga Waea
The Metra 70-2001 harness is designed to connect directly to your aftermarket radio's wiring. Match the wires from your aftermarket radio to the corresponding wires on the Metra 70-2001 harness. Refer to the wiring diagram section below for standard color codes. Ensure each connection is secure and properly insulated.
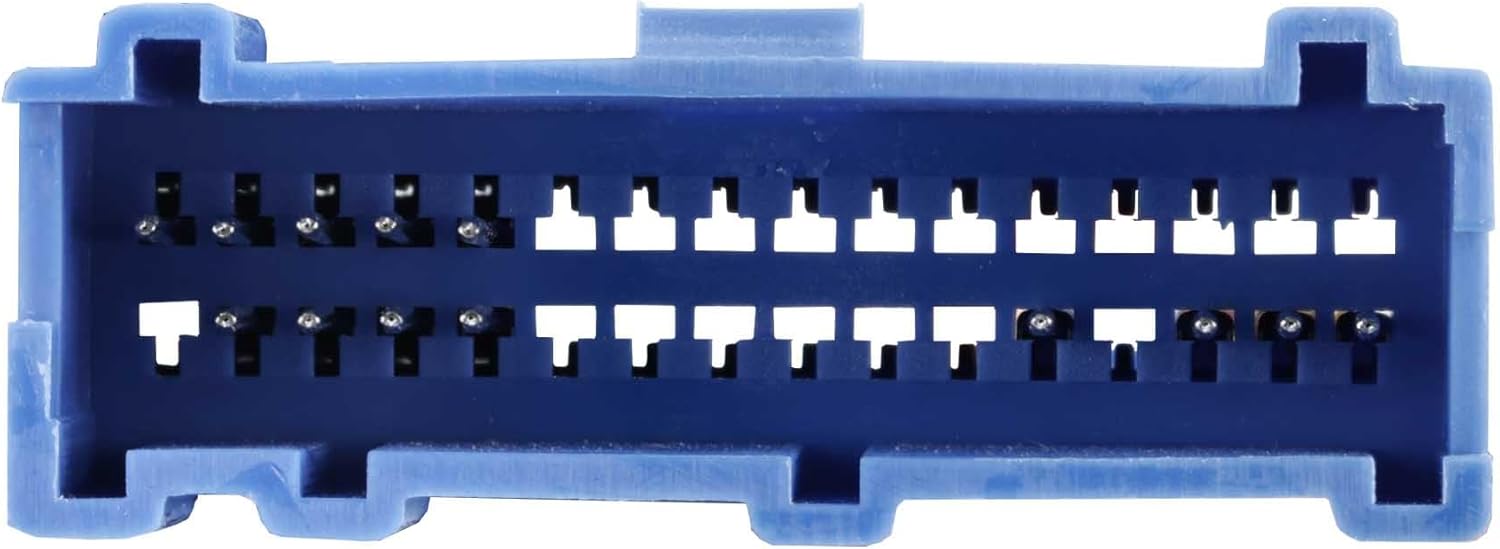
Image: The Metra 70-2001 Radio Wiring Harness showing the multi-colored wires ready for connection to an aftermarket radio.
Nga Mahi Whakamutunga
- Honoa te Here: Plug the Metra 70-2001 harness into the vehicle's factory radio connector.
- Taumahinga Whakamatau: Reconnect the vehicle's negative battery terminal. Turn on the ignition and test the aftermarket radio's power, sound, and other functions.
- Whakapūmautia, ā, Huihui Anō: Once confirmed working, carefully tuck away excess wiring, mount the aftermarket radio, and reassemble any removed dashboard trim panels.
Hoahoa Waea
The following table outlines the standard wire color codes for the Metra 70-2001 harness. It is crucial to cross-reference these with the wiring diagram provided with your specific aftermarket radio, as color codes can vary between manufacturers.

Whakaahua: He taipitopito view of the 32-pin connector on the Metra 70-2001 harness, showing the pin configuration.
| Tae Waea | Mahi |
|---|---|
| Kōwhai | Mana Pūmau 12V |
| Whero | 12V Mana Hoko |
| Pango | Papa whenua |
| Karaka | Whakamaramatanga |
| Kahurangi | Antenna Mana / Amplifier Tahuri-A |
| Mā | Tukuoro Mauī Mua (+) |
| Ma/Ma pango | Tukuoro Mauī o Mua (-) |
| Kerei | Tuhinga o mua Matau (+) |
| Hina/Pango | Tuhinga o mua Matau (-) |
| Kakariki | Tukuoro Whakamuri Mauī (+) |
| Kakariki/Pango | Tukuoro Whakamuri Mauī (-) |
| Waiporoporo | Tukuoro Whakamuri Matau (+) |
| Waiporoporo/pango | Tukuoro Whakamuri Matau (-) |
Mahi
Once correctly installed, the Metra 70-2001 Radio Wiring Harness functions as a direct interface between your aftermarket radio and the vehicle's existing electrical system. It provides the necessary power, ground, accessory, and speaker connections, allowing your new radio to operate as intended, delivering audio to the vehicle's speakers and receiving power from the ignition and constant battery sources.
Te tiaki
The Metra 70-2001 Radio Wiring Harness is a passive electrical component and requires no routine maintenance. It is designed for a long service life once properly installed. Periodically, if you experience audio issues, you may check the harness connections to ensure they remain secure and free from corrosion or damage.
Raparongoā
- Kāore he Mana ki te Reo Irirangi:
- Tirohia te pouaka fiusi o te waka mēnā he fiusi kua pā mai e pā ana ki te mana o te reo irirangi, o te taputapu rānei.
- Ensure the yellow (constant power) and red (accessory power) wires are correctly connected and receiving voltage.
- Verify the black (ground) wire has a solid connection to chassis ground.
- Kāore he Oro mai i ngā Kaikōrero:
- Confirm all speaker wires (white, gray, green, purple and their black-striped counterparts) are correctly matched and connected between the radio and the harness.
- Check the radio's fader and balance settings.
- Ensure the radio's amplifier turn-on wire (if applicable, usually blue) is connected.
- Ngā Take Wā-poto:
- Recheck all wire connections for looseness or poor contact. Ensure all crimps or solder joints are solid.
- Inspect the harness for any pinched or damaged wires.
Whakatakotoranga
- Waitohu: Metra
- Tauira: 70-2001
- Momo Tuhono: IDC (32-pin GM connector)
- Rauemi: ABS, Kirihou
- Nga Waahanga Kei roto: 1994–2005 GM 32-Pin into Car Harness
- Momo taura: Power & Speaker
- Rahi Tūemi (L x W x H): Tata ki te 8 x 0.12 x 0.5 inihi
- Taumaha Tūemi: Tata ki te 22.68 karamu
Pūtāhui me te Tautoko
Pūtāhui: This product comes with a 1-Year Limited Warranty from the date of purchase. This warranty covers defects in materials and workmanship under normal use. It does not cover damage resulting from improper installation, accident, abuse, or unauthorized modifications.
Tautoko Kiritaki: For technical assistance, troubleshooting, or warranty claims, please contact Metra Electronics customer service directly. You can find contact information and additional resources on the official Metra webpae.
Whaimana Webpae: metroonline.com