
1. Kupu Whakataki
The AVerMedia AM310 is a plug-and-play USB microphone designed for high-quality audio recording. It is suitable for various applications including podcasting, streaming, gaming, and vocal performances. This manual provides detailed instructions for setting up, operating, and maintaining your AM310 microphone to ensure optimal performance.

Figure 1: AVerMedia AM310 USB Microphone
2. Hua Neke Atuview
2.1 Nga waahanga matua
- Driver-Free and Plug-and-Play: Easy setup on PC or Mac without additional driver installation.
- Cardioid Condenser Microphone: Records sound sources directly in front of the microphone, providing detailed and clear audio.
- 3.5mm Jack Paneoro: Allows real-time audio monitoring or playback of computer audio.
- Mana Whakakotahi: Features a volume knob and mute button for convenient audio management.
2.2 Waehanga
Familiarize yourself with the main components of your AM310 microphone:

Figure 2: Labeled components of the AM310 USB Microphone
- Tohu LED: Displays microphone status (Blue: Powered on, Red: Muted).
- Puoro Rōrahi Puoro: Adjusts the volume for the connected headphones.
- Maunga: Connects the microphone to the base or other compatible stands.
- Base and Shaft: Provides stable support for the microphone.
- Headphone Mode Switch: Toggles between PC Audio Playback and Microphone Monitoring.
- 3.5mm Jack Paneoro: Output for connecting headphones.
3. Tatūnga
The AVerMedia AM310 is designed for quick and easy setup. Follow these steps to get started:
- Huihuia te Hopuoro: Attach the microphone unit to the provided base and shaft. Ensure it is securely fastened.
- Hono ki Rorohiko: Plug the USB cable from the AM310 microphone into an available USB port on your PC or Mac. The microphone is driver-free and will be automatically recognized by your operating system.
- Tūhono Pūoro (Kōwhiringa): If you wish to monitor your audio, plug your 3.5mm headphones into the headphone jack on the microphone.
- Tīpakohia hei Pūrere Tāuru: In your computer's sound settings, select the AVerMedia AM310 as your default audio input device.

Figure 3: Connection diagram for AM310 USB Microphone

Figure 4: AM310 compatibility with Mac and Windows operating systems
3.1 Aratohu Ataata Tatūnga
For a visual guide on setting up and using your AVerMedia AM310 microphone, please watch the official product video below.
Video 1: AVerMedia AM310 USB Microphone Overview me te Tatūnga
4. Nga Tohutohu Whakahaere
4.1 Adjusting Volume and Muting
The AM310 features an integrated volume knob and mute button for easy control:
- Matapihi Rōrahi: Rotate the knob to adjust the headphone output volume.
- Patene Whakakore: Press the knob to mute or unmute the microphone. The LED indicator will change from blue (powered on) to red (muted) when activated.

Figure 5: Volume knob and LED indicator
4.2 Aroturuki Puoro
The 3.5mm headphone jack allows you to monitor your audio in two modes:
- PC Audio Playback: Slide the switch to the 'PC' position to hear audio playing from your computer through your headphones.
- Microphone Monitoring: Slide the switch to the 'MONITOR' position to hear your own voice in real-time through your headphones, which is useful for adjusting your speaking volume and clarity.

Figure 6: Headphone mode switch (PC/Monitor)

Figure 7: User utilizing the AM310 for streaming with headphones
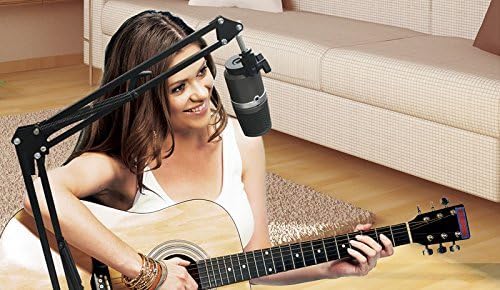
Figure 8: User recording music with the AM310 microphone
5. Whakatakotoranga
Below are the technical specifications for the AVerMedia AM310 USB Microphone:
| Āhuahira | Whakatakotoranga |
|---|---|
| Momo | Uni-directional Condenser Microphone |
| Tauira Poara | Cardioid |
| Sample Reiti | 48 kHz |
| Auau Moka | 16-bit |
| Hiahia Hiahia | USB (5V DC) |
| Te tairongo | -60 ± 5 dB (at 1 kHz) |
| Whakautu auau | 20–20,000 Hz |
| Rongorongo ororongo | 60 Decibels |
| Te aukati | 600 Ohm |
| Tohu Waitohu-ki-Toi | 80 dB |
| Pūmārō Pūmārō | PC |
| Te maha o nga hongere | 1 |
| Hangarau Hononga | USB |
| Momo Tuhono | USB |
| Taumaha Tūemi | 1.03 Pauna |
| Hunga Hua | 10 x 4 x 6 inihi |
| Rauemi | Konumohe |
6. Te Raru
If you encounter issues with your AVerMedia AM310 microphone, please refer to the following common troubleshooting steps:
- Kāore he Tāuru Oro:
- Ensure the microphone is securely plugged into a USB port.
- Verify that the AM310 is selected as the default input device in your computer's sound settings.
- Check if the microphone is muted (red LED indicator). Press the volume knob to unmute.
- Try a different USB port or a different computer to isolate the issue.
- Rōrahi Iti:
- Adjust the input gain for the microphone in your computer's sound settings or recording software.
- Ensure you are speaking directly into the front of the microphone, as it has a cardioid polar pattern.
- Haruru Pūmau, Haruru rānei:
- Ensure the USB cable is not damaged and is properly connected.
- Avoid placing the microphone near sources of electromagnetic interference (e.g., power cables, unshielded electronics).
- Consider using a pop filter to reduce plosive sounds and a shock mount to minimize vibrations.
- Ngā Take Aroturuki Paneoro:
- Check the headphone volume knob on the microphone.
- Verify the Headphone Mode Switch is set to the desired position (PC or MONITOR).
- Ensure your headphones are fully plugged into the 3.5mm jack.
7. Tiaki
To ensure the longevity and optimal performance of your AVerMedia AM310 USB Microphone, follow these maintenance guidelines:
- Te horoi: Use a soft, dry cloth to clean the exterior of the microphone. Avoid using liquid cleaners or solvents, as they may damage the finish or internal components.
- Rokiroki: Ki te kore e whakamahia, penapenahia te hopuoro ki te waahi makariri, maroke kia matara atu i te ra tika me te wera nui.
- Te whakahaere: Handle the microphone with care. Avoid dropping it or subjecting it to strong impacts, which can damage the sensitive internal components.
- Tiaki taura: Kaua e piko rawa, kaua hoki e whakapiko i te taura USB. Kia mau tonu ki te mono, kaua ki te taura, ina momotu ana.
8. Pūtāhui me te Tautoko
For warranty information, technical support, or further assistance with your AVerMedia AM310 USB Microphone, please visit the official AVerMedia webpaetukutuku, whakapā atu ranei ki a raatau tautoko kaihoko.
Ka kitea e koe etahi atu korero me nga rauemi tautoko i te AVerMedia Store.