
1. Kupu Whakataki
The Sena SF1 Bluetooth Communication System is designed to provide essential communication features for motorcycle riders. This system facilitates 2-way intercom communication with a passenger, allowing for clear conversations up to 100 meters (110 yards) in open terrain. It also enables seamless connectivity with your mobile device for streaming music, managing phone calls, and receiving turn-by-turn GPS directions. Key features include VOX Phone commands, Audio Overlay, Quick Charging, and microphone mute options, enhancing your riding experience with convenience and safety.
2. Ihirangi mokete
The Sena SF1 package includes the following components:
- Sena SF1 Main Unit
- potae Clamp Kete
- Kaikōrero
- Waea Waea Roopuoro
- Hopuoro waea
- USB Power & Data Cable (USB-C type)
- Velcro Pads mo nga Kaikorero
- Velcro Pad for Wired Boom Microphone
- Velcro Pad for Wired Microphone
- Ngā Papa Kaikōrero (matotoru)
- Ko Allen Wrench
Note: The specific component "Sena 843-01297" refers to the main unit or a specific part number within the kit.
3. Hua Neke Atuview
The Sena SF1 unit features a sleek, low-profile design with intuitive controls for easy operation while riding.

Whakaahua 3.1: Runga View of Sena SF1 Main Unit. This image displays the top of the Sena SF1 communication system, highlighting the central control button and the plus (+) and minus (-) buttons for volume and navigation. A blue indicator light is visible at the top center.

Whakaahua 3.2: Koki View of Sena SF1 Main Unit. An angled perspective of the SF1 unit, showing its compact form factor and the arrangement of its primary control buttons. The blue indicator light is also visible.
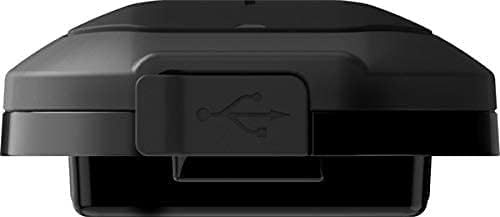
Figure 3.3: Sena SF1 USB Charging Port. This image focuses on the USB charging port, typically located on the side or bottom of the unit, protected by a rubber flap to ensure water resistance.

Figure 3.4: Sena SF1 Side View with Helmet Clamp. He taha view of the SF1 unit attached to a helmet clamp, illustrating how the unit integrates with the helmet and the connection points for speakers and microphone cables.
3.1 Mana me nga Tohu
- Pātene Pokapū: Multi-functional button for power, pairing, and call management.
- (+) Pātene: Increases volume, navigates forward through menus or tracks.
- (-) Pātene: Decreases volume, navigates backward through menus or tracks.
- Tohu LED: Displays device status (power, charging, Bluetooth connection).
4. Tāutanga
Proper installation ensures optimal performance and comfort. The SF1 is designed to fit on almost any helmet.
4.1 Te Whakamau i te Wāhanga Matua
- Choose a suitable location on the left side of your helmet for the clamp wae.
- Loosen the screws on the helmet clamp and slide it between the outer shell and the inner padding of the helmet. Tighten the screws securely.
- Alternatively, use the adhesive mount if the clamp unit is not suitable for your helmet type. Ensure the surface is clean and dry before applying.
- Slide the SF1 main unit onto the mounted clamp kia pao noa ki te waahi.
4.2 Installing Speakers and Microphone
- Attach the speakers to the Velcro pads inside the helmet's ear pockets. Use the thick speaker pads if needed for better fit and audio quality.
- Connect the speaker cables to the main unit.
- For full-face helmets, attach the wired microphone to the inside of the chin bar using the Velcro pad. Position it close to your mouth.
- For open-face or modular helmets, attach the wired boom microphone to the inside of the helmet, ensuring it is positioned correctly for clear voice pickup.
- Whakatakotoria ngā taura katoa ki raro i te whakapuru potae kia kore ai e pokanoa, kia pai ai hoki te noho.
5. Tatūnga
5.1 Kei te Hiko / Weto
- Whakahiko: Patohia me te pupuri i te Pātene Pokapū me te (+) Pihi mo te 1 hēkona.
- Weto Whakakore: Patohia me te pupuri i te Pātene Pokapū me te (+) Pihi mo te 5 hēkona.
5.2 Bluetooth Pairing with Mobile Phone
- With the SF1 powered off, press and hold the Pātene Pokapū for 5 seconds until the LED flashes red and blue alternately, indicating pairing mode.
- I runga i to waea pukoro, whakaahei i te Nihokikorangi me te rapu taputapu.
- Select "Sena SF1" from the list of detected devices.
- If prompted, enter PIN "0000". The LED will turn blue when pairing is successful.
5.3 Intercom Pairing (2-Way)
- Ensure both SF1 units are powered on.
- On one unit, press and hold the Pātene Pokapū for 5 seconds until the LED flashes red.
- On the second unit, press and hold the Pātene Pokapū for 5 seconds until the LED flashes red.
- The units will automatically pair and connect. The LED on both units will turn blue.
5.4 Sena Taputapu App
For advanced configuration and firmware updates, download the Sena Utility App from your smartphone's app store. The app allows you to customize settings, manage speed dial presets, and access a quick guide.
6. Nga Tohutohu Whakahaere
6.1 Mana Rōrahi
- Whakanuia te Volume: Tap te (+) Pihi.
- Whakaheke Rahi: Tap te (-) Pihi.
6.2 Nga Mahi Waiata
- Purei/Tatari Puoro: Pehia te Pātene Pokapū mo te 1 hēkona.
- Riu Panuku: Pehia te (+) Pihi mo te 1 hēkona.
- Riu o mua: Pehia te (-) Pihi mo te 1 hēkona.
6.3 Ngā Mahi Waea
- Whakautu Waea: Tap te Pātene Pokapū.
- Whakamutu Waea: Pehia te Pātene Pokapū mo te 2 hēkona.
- Whakakore Waea: Pehia te Pātene Pokapū for 2 seconds when a call is incoming.
- Voice Dial (VOX Phone): Pehia te Pātene Pokapū mo te 3 hēkona.
- Wahangu hopuoro: Pehia te (+) Pihi a (-) Pihi simultaneously for 1 second during a call.
6.4 Whakawhitiwhiti Kōrero ā-Ipurangi
- Timata/Whakamutu Waeawhiti: Tap te Pātene Pokapū.
- Audio Overlay: The SF1 supports Audio Overlay, allowing you to listen to music or GPS instructions while engaged in intercom conversation. The audio levels will adjust automatically.
6.5 GPS Navigation
Once paired with your smartphone, turn-by-turn GPS directions from your navigation app will be transmitted directly to your SF1 speakers. Audio Overlay ensures that navigation prompts are heard even during other audio activities.
7. Tiaki
7.1 Te Whakataki i te Pūhiko
- Connect the SF1 to a USB power source using the provided USB Power & Data Cable.
- The LED indicator will turn red during charging and blue when fully charged.
- Ko te utunga katoa e hiahiatia ana i te nuinga o te wā 1.5 haora.
- The SF1 offers a talk time of up to 13 haora i runga i te utu katoa.
- The Quick Charging feature allows for faster charging when time is limited.
7.2 Te horoi me te Penapena
- Horoia te waahanga ki te ngohengohe, damp kakahu. Kaua e whakamahia nga matū kino, nga whakarewa ranei.
- Ensure the USB port cover is securely closed to maintain water resistance.
- Store the SF1 in a cool, dry place when not in use.
8. Te Raru
8.1 Tautuhi Tautuhi
If the SF1 is not functioning correctly, a factory reset may resolve the issue. To perform a factory reset, press and hold the Pātene Pokapū for 12 seconds until the LED flashes red rapidly. Then, tap the Pātene Pokapū to confirm. The unit will power off and reset to default settings.
8.2 Nga take noa
- Kore Mana: Ensure the battery is charged. Connect to a charger and check the LED indicator.
- Kore Ororongo: Check speaker connections. Ensure volume is not at minimum. Re-pair with your device.
- Te Momotu o te Waea Pūkoro: Ensure both units are within range (100 meters in open terrain) and re-initiate intercom connection.
- Nga Take Takirua Nihokikorangi: Ensure the SF1 is in pairing mode (red and blue flashing LED) and your phone's Bluetooth is enabled. Try restarting both devices.
9. Whakatakotoranga
| Āhuahira | Taipitopito |
|---|---|
| Ingoa Tauira | SF1 |
| Putanga Nihokikorangi | 4.1 |
| Awhe Nihokikorangi | Tae atu ki te 100 mita (110 iāri) i te whenua tuwhera |
| Intercom | 2-ara |
| Te Wa Korero | Tae atu ki te 13 haora |
| Waa Whakatau | 1.5 haora |
| Mana Haruru | Advanced Noise Cancellation |
| Ātete wai | Wai Atete |
| Taumaha | 3.52 hekere (0.1 Kirokaramu) |
| Ahu (L x W x H) | 3.94 x 1.57 x 2.36 inihi |
| Rauemi | Kirihou |
| Tikanga Mana | Paa |
| Momo Pūhiko | Lithium Polymer (kei roto) |
| Pūrere Hototahi | Electronic devices with Bluetooth capabilities |
10. Pūtāhui me te Tautoko
10.1 Nga Korero Whakaputanga
Sena products are covered by a limited warranty against manufacturing defects. The EU Spare Part Availability Duration is 2 years. For specific warranty terms and conditions, please refer to the official Sena webpaetukutuku, whakapā atu rānei ki te tautoko kiritaki. Puritia tō taunakitanga hoko mō ngā kereme pūtāhui.
10.2 Tautoko Kiritaki
For technical assistance, troubleshooting, or general inquiries, please visit the official Sena website for support resources, FAQs, and contact information. You can also utilize the Sena Utility App for quick access to support and product information.


