1. Hua Neke Atuview
The OOYCYOO 100 Amp MPPT Solar Charge Controller, Model KP60 100, is designed for efficient management of solar power systems. It automatically identifies 12V or 24V battery systems and is compatible with various battery types, including AGM, Sealed, Gel, Flooded, and Lithium. This controller features advanced Maximum Power Point Tracking (MPPT) technology to maximize energy harvest from solar panels, ensuring optimal charging for your battery bank.
Key features include a backlit LCD display for real-time monitoring, enhanced safety protections, and a high DC/DC transfer efficiency of up to 98.7%.

Whakaahua 1: Mua view of the OOYCYOO 100 Amp MPPT Solar Charge Controller, showing the LCD display and connection terminals.
2. Nga Tohutohu Haumaru
Please read all instructions and warnings carefully before installation and operation. Failure to follow these instructions may result in electric shock, fire, or severe injury.
- Ensure all wiring is correctly polarized and securely connected to prevent damage to the controller and connected devices.
- Always disconnect the solar panel array and battery before installing or adjusting the controller.
- Tāutahia te pūmana ki tētahi wāhi whai hā pai, kei tawhiti atu i ngā rawa muramura me te rā tika.
- Do not disassemble or attempt to repair the controller. Refer to qualified personnel for service.
- Use appropriate circuit breakers or fuses for all connections to protect against overcurrent.
- Wear appropriate personal protective equipment, including eye protection and insulated gloves, during installation.
3. Nga Waahanga Hua me nga Hononga
The controller features clearly labeled terminals for solar panel input, battery connection, and load output. It also includes a remote temperature sensor port and USB charging ports.

Whakaatu 2: Taipitopito view of the controller's LCD display, 5S Reset button, Solar Panel Terminal, Battery Terminal, Load Terminal, USB 5V2A ports, Remote Temp Sensor port, and RS485 Communication Port.
Ihirangi mōkī:
- 1 x OOYCYOO 100A MPPT Solar Charge Controller (Model K2500W)
- 1 x Pūoko Temperature
- 1 x Pukapuka Kaiwhakamahi (Ingarihi)
4. Whakatakotoranga Hangarau
The following table outlines the technical specifications for the OOYCYOO 100 Amp MPPT Solar Charge Controller (Model KP60 100).
| Tawhā | Whakatakotoranga |
|---|---|
| Utu Whakataunga o naianei | 100A |
| Pūnaha Nominal Voltage | 12V/24VDC Auto Identifying |
| 12V System Max. PV Input Power | 1300W |
| 24V System Max. PV Input Power | 2600W |
| Max. PV Open Circuit Voltage (Voc) | 100VDC |
| Pūhiko Voltage Awhe | 9V ~ 32V |
| Power Terminal Wire Gauge | 10 AWG |
| Ahu (L x W x H) | 12 x 7.8 x 3.2 inihi (30.5 x 19.8 x 8.1 cm) |
| Taumaha | 8.84 pauna (4 kg) |
| Momo Whakaatu | LCD |
| Te Waahi Mahi | Tae atu ki te 45°C (113°F) |
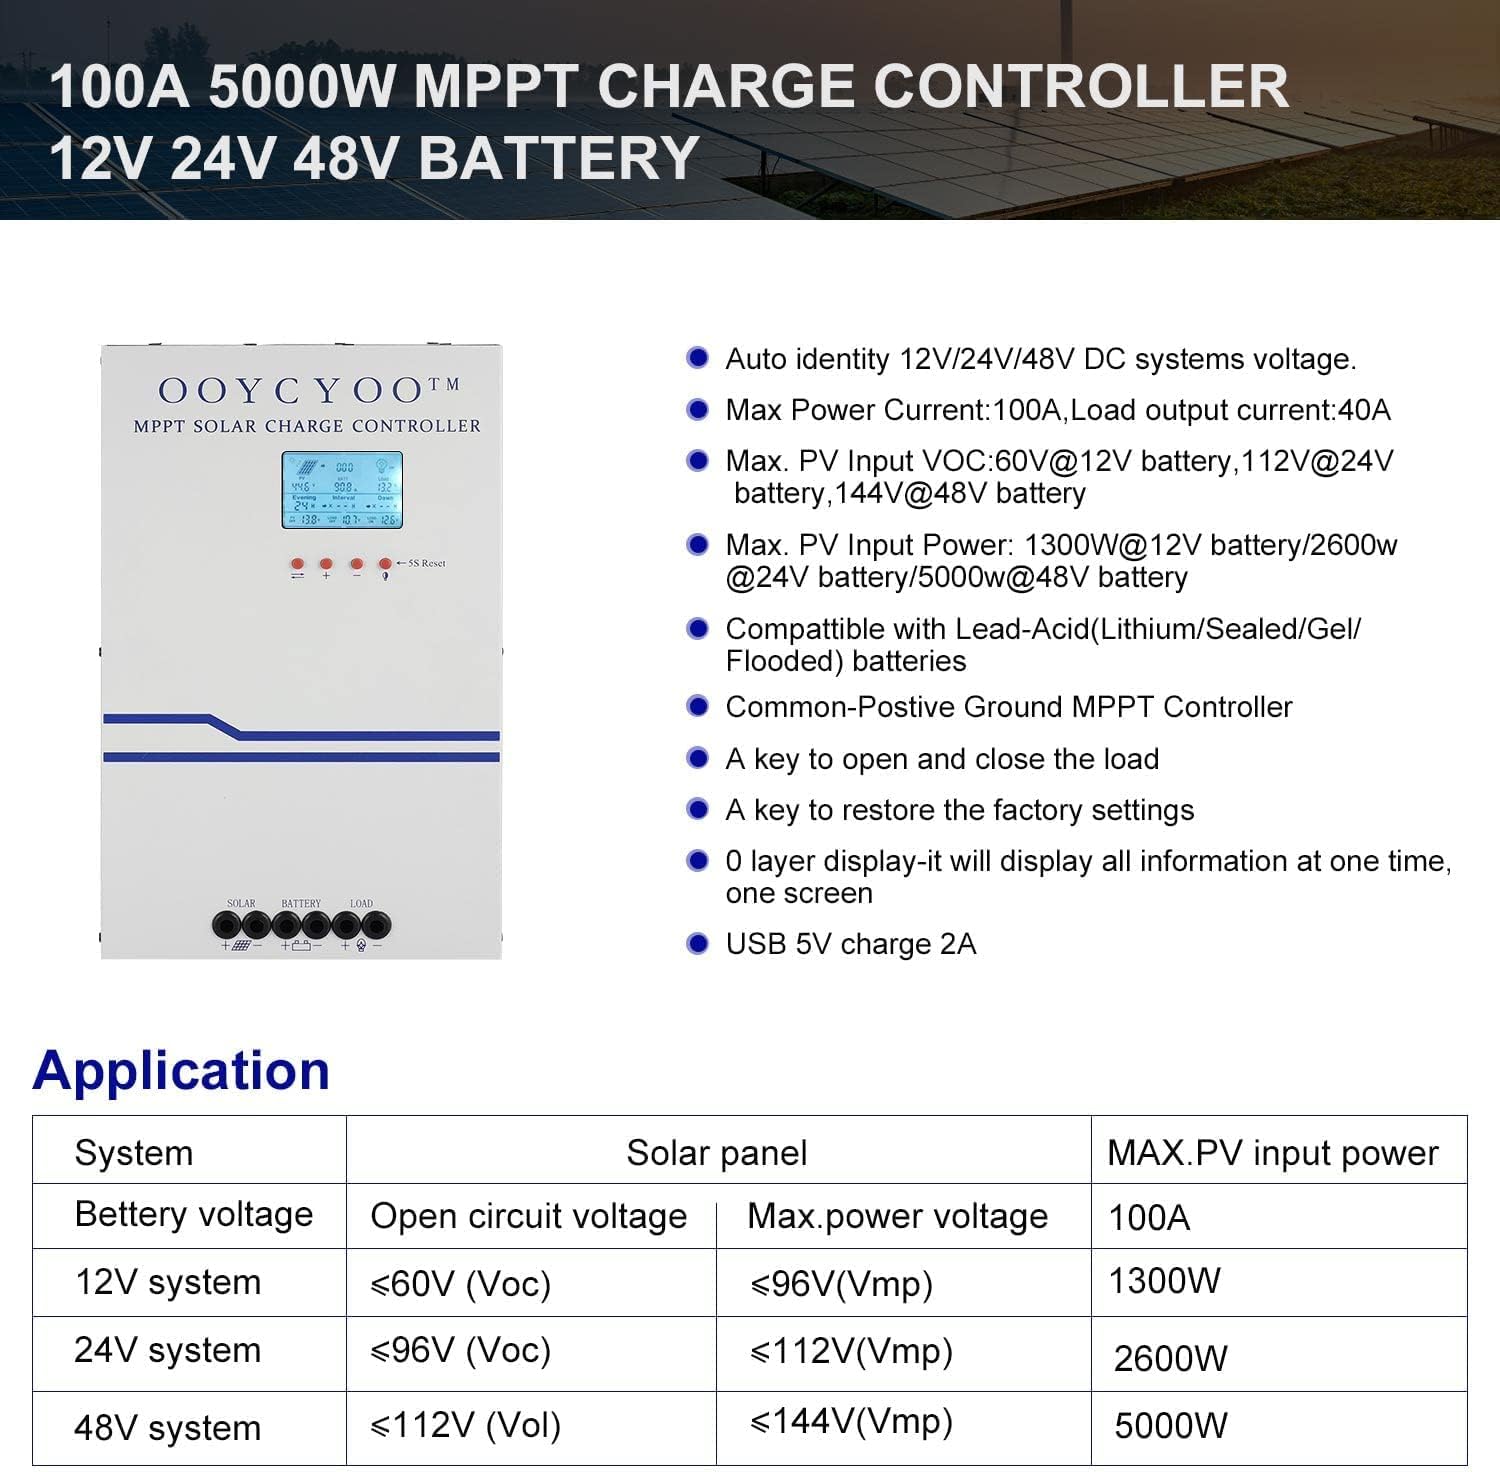
Figure 3: Application table detailing maximum PV input power and voltage for 12V, 24V, and 48V systems.
5. Aratohu Whakauru
He mea nui te tāutanga tika mō te haumaru me te whai hua o te whakahaere o tō pūmana hiko pūngao rā. Āta whai i ēnei mahi:
5.1 Whakapiki i te Kaiwhakahaere
- Choose a dry, well-ventilated location, protected from direct sunlight, high temperatures, and moisture.
- Ensure sufficient clearance around the controller for proper airflow, especially around the cooling vents.
- Mount the controller vertically on a non-flammable surface using appropriate fasteners.
5.2 Hononga Waea
Connect the components in the following order: Battery > Solar Panel > Load. Always ensure correct polarity.
- Tūhono te Pūhiko: Connect the battery cables to the battery terminals on the controller. Ensure the positive (+) and negative (-) terminals are correctly matched. The controller will automatically detect the battery voltage (12V, 24V ranei).
- Honoa te Paewhiri Solar: Connect the solar panel cables to the PV input terminals on the controller. Verify correct polarity. Ensure the open circuit voltage (Voc) of your solar array does not exceed 100VDC.
- Honoa te Uta: Connect your DC load to the load output terminals. Ensure the load current does not exceed the controller's rated load current.
- Honoa te Pūoko Mahana: Plug the remote temperature sensor into its designated port. This sensor helps the controller optimize charging based on battery temperature.
The controller is compatible with various battery types:

Figure 4: The controller supports AGM, Sealed, Gel, Flooded, and Lithium-Iron phosphate batteries for 12V/24V/48V systems.
6. Aratohu Mahi
Once installed, the controller will begin operation. The LCD display provides real-time system status and allows for configuration.
6.1 Whakaaturanga LCD
The backlit LCD display shows various parameters such as battery voltage, charging current, solar panel voltage, load status, and accumulated energy (KWH). Use the buttons below the display to navigate through the different screens and access settings.
6.2 Tautuhinga Taketake
The controller allows users to set parameters for different battery types (Lithium, LiFePO4, Li(NiCoMn)O2, Flooded, Sealed, Gel). Refer to the on-screen menu for specific adjustments to absorption voltage, mānu voltage, me te iti voltage disconnect settings. A load timer function is also available for controlling DC loads.
6.3 Te Mahi a te Pā Whakamatao
The built-in cooling fan activates automatically when the internal temperature exceeds 45°C (113°F) and turns off when the temperature drops below 40°C (104°F). This mechanism ensures optimal performance and extends the lifespan of the controller.
7. Tiaki
Regular maintenance helps ensure the longevity and optimal performance of your solar charge controller.
- Te horoi: Periodically clean the controller's exterior with a dry cloth. Ensure cooling vents are free from dust and debris.
- Hononga: Tirohia ngā hononga waea katoa i ia tau mō te piripono me te waikura. Ka wera rawa, ka pakaru hoki ngā hononga wetekina.
- Taiao: Verify that the installation environment remains dry and well-ventilated.
8. Te Raru
The controller incorporates multiple protection functions to safeguard your system. If an issue arises, check the LCD display for error codes or indicators.
8.1 Nga Mahi Tiaki
- PV Over Current/Power Protection
- Te Parenga Porowhita Poto PV
- PV Whakamuri Polarity Parenga
- Night Reverse Charging Protection
- Pūhiko Whakamuri Polarity Parenga
- Pūhiko Neke Atu i Voltage Tiaki
- Pūhiko Neke atu i te Whakaoranga Parenga
- Battery Overheating, Controller Overheating Protection
- Lithium Battery Low Temperature Protection
- Utahia te Tiaki Whakawhiti Poto
- Utu Whakahaumaru Whakahaumaru
- TVS High Voltage Parenga Whakawhiti
8.2 Nga take noa
- Karekau he utu: Check solar panel connections, ensure sufficient sunlight, and verify battery voltagkei roto i te awhe whakahaere.
- Uta Kaore i te Mahi: Check load connections, ensure battery voltagkei runga ake i te vol ititage disconnect setting, and verify load timer settings.
- Te wera nui: Ensure adequate ventilation around the controller and that cooling vents are clear.
- Hē Voltage Pānuitanga: Verify all connections are secure and the temperature sensor is properly installed.
If issues persist after checking these points, please contact customer support.
9. Pūtāhui me te Tautoko
The OOYCYOO 100 Amp MPPT Solar Charge Controller is a professional product. For any questions or technical assistance, please contact us directly via email. We are committed to providing prompt support and ensuring your satisfaction.
Tirohia ngā tuhinga mō tō hoko mō ngā tikanga me ngā herenga motuhake mō te pūtāhui.