1. Kupu Whakataki
The Apitor STEM Robot Toy 6-in-1 Building Kit, Model Robot J, provides an engaging platform for learning robotics, engineering, and coding. This kit allows users to construct six different robot models using 480 building blocks, a control module with two high-speed motors, and two multicolor LED lights. The robot can be controlled via a dedicated application, offering various modes and graphical coding functionalities.

Image 1.1: Apitor Robot J, showcasing its primary form and five other possible configurations, alongside the app interface.
2. Nga korero haumaru
This product contains small parts and is not suitable for children under 3 years of age or any individuals who may place inedible objects in their mouths. Adult supervision is recommended during assembly and play.
3. He aha kei roto i te Pouaka
Manatokohia kei te noho nga waahanga katoa i mua i te tiimata o te huihuinga:
- 480 x Building Blocks
- 1 x Control Module (with 2 built-in high-speed motors)
- 2 x Multicolor LED Lights
- 1 x Building Instructions Manual
- 1 x Aratohu Kaiwhakamahi
- 1 x Sorting Tray

Whakaahua 3.1: Ka mutuview of the kit contents, including the control module, sorting tray, and manuals.
4. Tatūnga
4.1. Building Your Robot
The kit includes 480 colorful blocks that snap together without the need for screws or additional tools. You can build any of the six available models. The primary model, Robot J, has dedicated paper instructions. For other models, detailed step-by-step instructions are available within the Apitor Kit application.
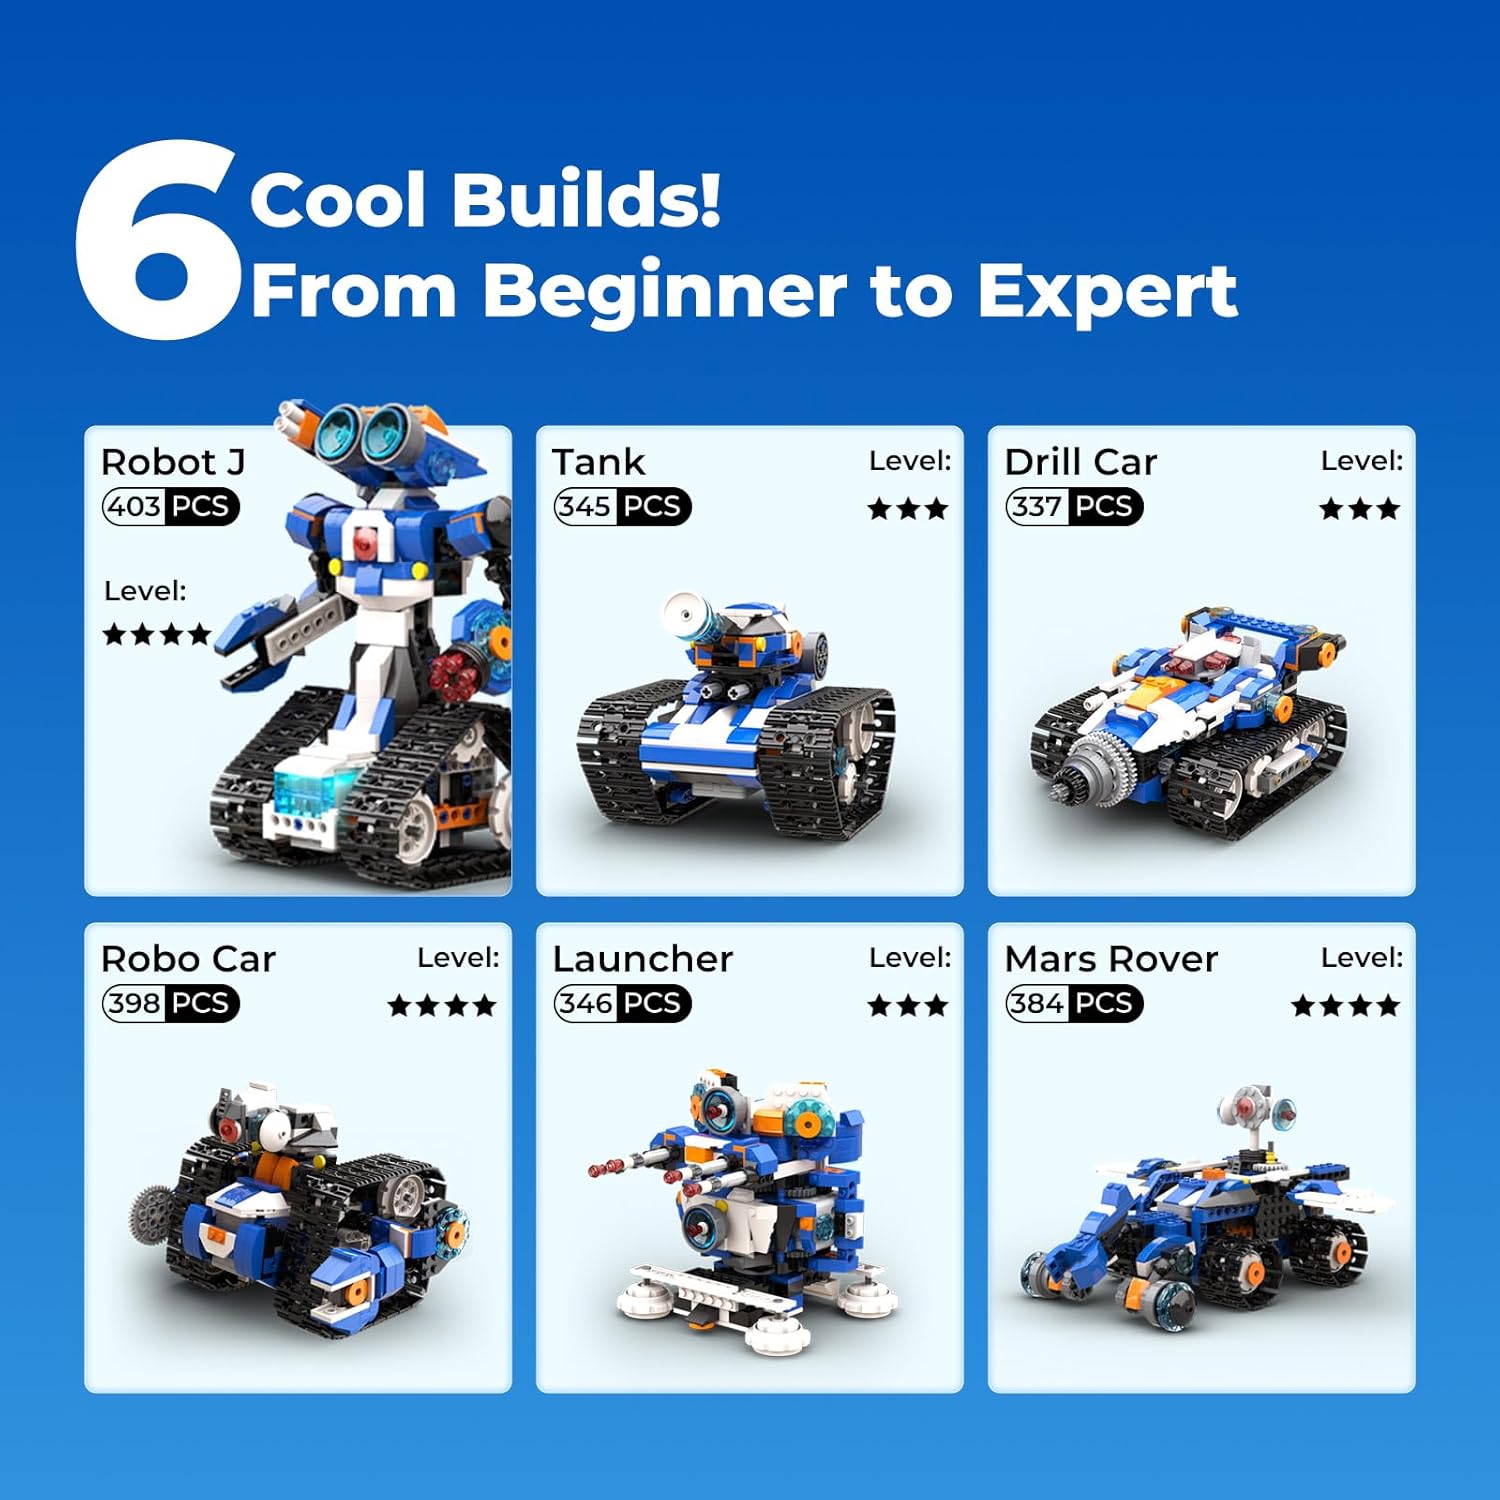
Image 4.1: Six distinct robot models achievable with the Apitor kit.

Image 4.2: The Apitor Kit app provides easy-to-follow assembly instructions.
4.2. Tāuta Pūhiko
The control module requires 3 pākahiko AA (not included). Carefully open the battery compartment on the control module and insert the batteries, ensuring correct polarity. Close the compartment securely.
4.3. Taupānga Tikiake me te Hononga
Tikiake i te kore utu Apitor Kit application from your device's app store. The app is compatible with both iOS and Android devices. Once installed, open the app and follow the on-screen prompts to connect your robot via Bluetooth. Ensure the robot's control module is powered on during the connection process.
Video 4.1: A preview of the Apitor Robot J in action, demonstrating its dynamic capabilities and app control.
This video showcases the robot's movement and interaction, providing a visual guide to its functionality.
5. Te Whakahaere i tō Rōpoti
5.1. App Control Modes
The Apitor Kit app offers four user-friendly control modes:
- Dual-Motor Mode: Control each motor independently for precise movement.
- Single-Motor Mode: Simplified control for basic forward/backward movement.
- Gyro Mode: Use your device's gyroscope to steer the robot.
- Aratau Ara: Draw a path on your screen for the robot to follow.

Image 5.1: The four distinct app control modes for the Apitor robot.
5.2. Dynamic Movement
The robot is designed for dynamic movement, capable of moving in all directions (left, right, forward, backward) and performing 360-degree stunts. Its lively LED eyes and flexible hand joints enhance interactive play.
5.3. Learning Coding Through Play
The Apitor Kit app features an intuitive, icon-based graphical coding interface. Users can drag and drop coding blocks to create sequences, explore concepts like loops and variables, and solve problems. This approach develops critical thinking and logical skills.

Image 5.2: The intuitive icon-based coding interface within the Apitor Kit app.

Image 5.3: Developing logical thinking skills by programming the robot's actions.
Video 5.1: A child demonstrates building and controlling the Apitor Robot J, highlighting the ease of assembly and app-based remote control.
This video illustrates the hands-on building process and the functionality of the app for controlling the robot.
Video 5.2: A parent and child assemble and program the Apitor Robot J, showcasing the educational and engaging aspects of the kit.
This video demonstrates the collaborative building experience and the graphical coding interface for creating custom robot movements.
6. Tiaki
To ensure the longevity and optimal performance of your Apitor robot, follow these maintenance guidelines:
- Te horoi: Use a soft, dry cloth to wipe down the blocks and control module. Avoid using harsh chemicals or abrasive materials.
- Rokiroki: Store the robot and its components in the provided sorting tray or a similar container to prevent loss and damage. Keep it in a cool, dry place away from direct sunlight.
- Tiaki Pūhiko: Remove batteries from the control module if the robot will not be used for an extended period to prevent leakage.
7. Te Raru
If you encounter issues with your Apitor robot, consider the following:
- Karetao Kaore e neke: Check if the batteries are correctly installed and charged. Ensure the control module is powered on and properly connected via Bluetooth to the app.
- Nga Take Hononga Taupānga: Verify that Bluetooth is enabled on your device and the robot is within range. Try restarting both the app and the robot's control module.
- Incorrect Movement: Review your coding sequence in the app for any errors. Ensure all blocks are securely connected.
- Nga Waahanga Ngaro: Refer to the 'What's in the Box' section and contact Apitor customer support if any essential parts are missing.
8. Whakatakotoranga
| Āhuahira | Taipitopito |
|---|---|
| Waitohu | Apitor |
| Tau tauira | Robot J |
| Hunga Hua | 12.01 x 8.27 x 2.48 inihi |
| Taumaha Tūemi | 1.76 pauna |
| Te maha o nga wahi | 480 |
| Te Tau Manakohia | 7 - 12 tau |
| Puna Mana | 3 pākahiko AA (kaore i whakauruhia) |
| Tikanga Mana | APP Remote Control (Bluetooth) |
9. Pūtāhui me te Tautoko
For warranty information, technical support, or assistance with missing parts, please visit the official Apitor website or contact Apitor customer service directly. Contact details can typically be found on the product packaging or the Apitor brand store online.