MERCUSYS MR50G
Mercusys MR50G AC1900 Dual-Band Wi-Fi 5 Router User Manual
Model: MR50G
Kupu Whakataki
This manual provides comprehensive instructions for setting up, operating, maintaining, and troubleshooting your Mercusys MR50G AC1900 Dual-Band Wi-Fi 5 Router. The MR50G is designed to deliver high-speed wireless connectivity with AC1900 speeds, Gigabit Ethernet ports, and advanced features like MU-MIMO and Beamforming.

Whakaahua: Mua view of the Mercusys MR50G router, illustrating its dual-band capabilities with 5GHz (1300 Mbps) and 2.4GHz (600 Mbps) speeds.
Aratohu Tatūnga
1. Ihirangi mokete
Manatokohia kei roto i to kete nga mea e whai ake nei:
- Mercusys MR50G AC1900 Dual-Band Wi-Fi 5 Router
- Pūurutau Hiko
- Tauira Itarangi
- Quick Installation Guide (User Guide)
2. Hononga Tinana
A pee i enei taahiraa hei hono i to pouara:
- Weto Whakakore: Momotuhia te hiko mai i to pouwhanga me to pouara (mehemea e tika ana).
- Honoa te Pouwhanga ki te Pouara: Connect one end of the provided Ethernet cable to the WAN port (usually blue) on your MR50G router and the other end to your modem's Ethernet port.
- Tūhono Pūrere (Kōwhiringa): For wired connections, connect your computer or other devices to the LAN ports (yellow) on the MR50G router using Ethernet cables.
- Whakahiko: Connect the power adapter to the router's power port and plug it into a power outlet. Power on your modem, then power on the MR50G router.
- Tatari mo nga Tohu: Wait for the router's LED indicators to stabilize. The Power LED should be solid green.
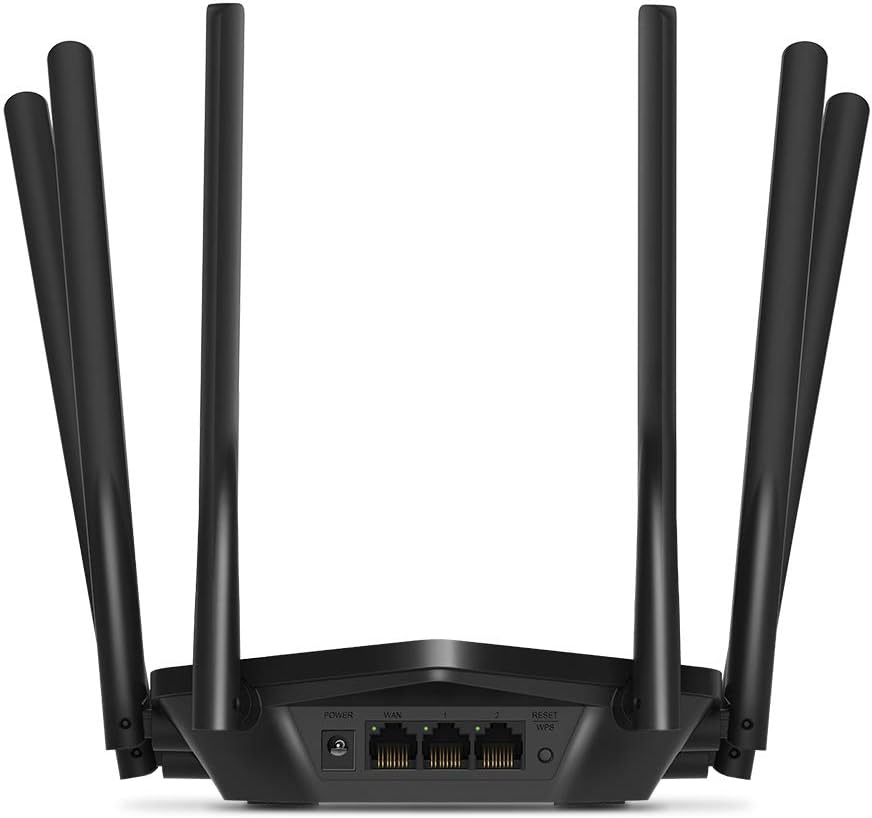
Whakaahua: Rear view of the Mercusys MR50G router, illustrating the power input, WAN port (blue), and three LAN ports (yellow) for wired connections, along with the Reset/WPS button.
3. Whirihoranga Tuatahi
Hei whirihora i to pouara mo te wa tuatahi:
- Tūhono ki Wi-Fi: Connect your computer or mobile device to the router's default Wi-Fi network (SSID and password are typically printed on a label on the bottom of the router).
- Urunga Web Atanga: Tuwhera a web pūtirotiro me te momo
mwlogin.netor192.168.1.1ki te pae wāhitau. - Create Login Password: Follow the on-screen instructions to create a login password for the router's management page.
- Whaia te Tatūnga Tere: The Quick Setup wizard will guide you through basic internet and wireless settings.
Nga Tohutohu Whakahaere
1. Basic Wi-Fi Settings
I muri i te takiuru ki te web atanga:
- Ingoa Whatunga (SSID): Navigate to the Wireless settings to change your Wi-Fi network names (SSIDs) for both 2.4 GHz and 5 GHz bands.
- Kupuhipa: Set a strong, unique password for your Wi-Fi networks. The MR50G supports WPA3 for enhanced security.
- Momo Haumarutanga: It is recommended to use WPA2-PSK/WPA3-Personal for optimal security.
2. Dual-Band Operation
The MR50G operates on two frequency bands:
- 2.4 GHz: He whānui ake te kapinga, he pai ake hoki te uru atu mā roto i ngā pakitara, he pai mō te whakamahi whānui i te ipurangi me ngā taputapu tawhito.
- 5 GHz: Offers faster speeds and less interference, ideal for bandwidth-intensive activities like 4K streaming and online gaming, but with a shorter range.
You can configure separate SSIDs for each band or use Smart Connect to combine them into a single SSID, allowing the router to automatically assign devices to the optimal band.
3. Aratau Pūwāhi Uru
To use the MR50G as an Access Point (AP) to extend an existing wired network:
- Tūhono: Connect an Ethernet cable from your existing router's LAN port to one of the MR50G's LAN ports (not the WAN port).
- Whirihora: Log into the MR50G's web interface, navigate to the Operation Mode settings, and select "Access Point Mode". Follow the prompts to complete the setup.
4. Āhuatanga Arā
- MU-MIMO: Mā te hangarau Maha-Kaiwhakamahi, Maha-Tāuru, Maha-Putanga ka taea e te pouara te kōrero ki ngā pūrere maha i te wā kotahi, ka whakapai ake i te whai huatanga o te whatunga.
- Te hanga kurupae: Focuses Wi-Fi signals towards connected devices, enhancing signal strength and range.
- Tautoko VPN: The router supports VPN functionality, allowing for secure remote access or connection to VPN services. Refer to the router's web interface for specific VPN client/server configurations.
- Mana Mātua: Manage and restrict internet access for specific devices or users.
- Whatunga Manuhiri: Waihangatia he whatunga Wi-Fi motuhake mo nga manuhiri, kia noho haumaru to whatunga matua.
Te tiaki
1. Whakahoutanga Firmware
Regularly check for and install firmware updates to ensure optimal performance, security, and access to new features. Firmware updates can typically be found in the router's web interface under System Tools or Advanced settings.
2. Te tautuhi i te Pouara
If you encounter persistent issues or forget your login password, you may need to reset the router to its factory default settings:
- With the router powered on, press and hold the Reset/WPS button on the back panel for approximately 5-10 seconds until the LED indicators flash.
- Release the button and wait for the router to restart. All settings will be restored to factory defaults.
3. Te Whakaritenga Pai
For the best Wi-Fi coverage and performance:
- Place the router in a central location in your home or office.
- Avoid placing it near obstructions like thick walls, metal objects, or large appliances (microwaves, refrigerators) that can interfere with Wi-Fi signals.
- Elevate the router if possible, as Wi-Fi signals tend to spread downwards.

Image: Mercusys MR50G router positioned on a table, demonstrating a typical placement for optimal signal distribution within a living space.
Raparongoā
1. Kāore he urunga ki te ipurangi
- Taki Hononga: Me whakarite kei te hono tika ngā taura Ethernet katoa ki ngā tauranga tika (WAN ki te pouwhanga, LAN ki ngā pūrere).
- Tīmataria anō ngā Pūrere: Hurihuri hiko to pouwhanga, katahi ko te pouara, katahi ko o taputapu hono.
- Tirohia te rama WAN: Verify that the WAN LED on the router is lit, indicating a connection to the modem.
- Tūnga ISP: Whakapā atu ki tō Kaiwhakarato Ratonga Ipurangi (ISP) hei whakaū kāore he ratonga e wātea anatagkei to rohe.
2. Ngā Tere Wi-Fi Pōturi
- Tauranga Pouara: Ensure the router is placed optimally (refer to "Optimal Placement" section).
- pokanoa: Move the router away from other electronic devices that may cause interference.
- Tīpakonga Band: For speed-critical applications, ensure your device is connected to the 5 GHz band.
- Arotautanga Hongere: I roto i te pouara web interface, try changing the Wi-Fi channel for both 2.4 GHz and 5 GHz bands to a less congested one.
- Pūmanawa: Me mohio kei te hou tonu te firmware o to pouara.
3. Cannot Access Router Management Page
- Wāhitau IP: Ensure you are using the correct address (
mwlogin.netor192.168.1.1). - Hononga Waea: Try accessing the page from a computer connected directly to the router via an Ethernet cable.
- Ūkui Keteroki Pūtirotiro: Whakamamahia to web te keteroki me nga pihikete o te kaitirotiro, me whakamatau ranei i tetahi atu tirotiro.
- Pātūahi/Pawetiori: Monokia mo te wa poto tetahi papangaahi, rorohiko wheori ranei i runga i to rorohiko e aukati ana i te uru.
- Tautuhi Anō i te Pouara: If all else fails, perform a factory reset (refer to "Resetting the Router" section).
Whakatakotoranga
| Tauira | MR50G (EU) |
| Paerewa Ahokore | IEEE 802.11a / b / g / n / ac |
| Auautanga | 2.4 GHz me te 5 GHz (Rohe-Rua) |
| Reiti Raraunga | AC1900 (600 Mbps i runga i te 2.4 GHz, 1300 Mbps i te 5 GHz) |
| Tauranga Itarangi | 1x Gigabit WAN Tauranga, 3x Gigabit LAN Tauranga |
| Antenna | 6x Fixed Omni-Directional Antennas |
| Haumarutanga | WPA-PSK / WPA2-PSK / WPA3-Personal |
| Ahu (W x D x H) | 15.72 x 17.56 x 4.5 cm |
| Taumaha | 450 g |
| Nga waahanga motuhake | MU-MIMO, Beamforming, Access Point Mode, VPN Support, Parental Controls, Guest Network |
| Whakauru Mana | 100-240V ~ 50/60Hz |
Pūtāhui me te Tautoko
Mercusys products come with a limited warranty. For detailed warranty information, please refer to the warranty card included with your product or visit the official Mercusys webpae.
For technical support, firmware updates, and additional resources, please visit the Mercusys support website. You can typically find contact information and FAQs there.
Official Mercusys Webpae: www.mercusys.com
Ask a question about this manual
Ask about setup, troubleshooting, compatibility, parts, safety, or missing instructions. Manuals+ will review the question and use this page’s manual context to help answer it.