
1. Kupu Whakataki
Thank you for choosing the IROAD X5 Dash Cam. This device is designed to record your driving journey in Full HD, providing crucial evidence in case of an incident. It features front and rear cameras, Wi-Fi connectivity for smartphone access, a G-Sensor for impact detection, and advanced driver assistance systems (ADAS). Please read this manual carefully before installation and operation to ensure proper use and optimal performance.

Figure 1: IROAD X5 Dash Cam (Front and Rear Units)
2. Hua Neke Atuview
2.1 Ihirangi mokete
- Wāhanga Matua (Kāmera o Mua)
- Kāmera Whakamuri
- Wi-Fi Dongle
- IROAD Genuine 16GB MicroSD Card
- Maunga Paetahi
- Constant Power Cable (3m)
- Rear Camera Connection Cable (6m)
- Pukapuka Tohutohu (tenei tuhinga)
- Spare Double-sided Tape
2.2 Nga waahanga matua
- Dual Full HD Recording: Front and rear cameras record in 1920x1080P at 30fps.
- Whānui Viewing Koki: 140° mara o view for both front and rear cameras.
- G-Sensor: 3-axis acceleration sensor for automatic impact detection and event recording.
- Hononga Wi-Fi: Connect to your smartphone via Wi-Fi for live view, playback, and settings adjustment.
- ADAS (Pūnaha Āwhina Taraiwa Matatau): Includes Lane Departure Warning, Front Vehicle Departure Warning, and Forward Collision Warning.
- Various Recording Modes: Continuous, Impact, Parking, and Motion Detection recording.
- Matakitenga po: Enhanced recording quality in low-light conditions.
- Hopu Ororongo: On/Off selectable.
3. Tatūnga
3.1 Te Whakaurunga Kāri MicroSD
- Me whakaweto te mana o te kāmera papaaho.
- Locate the MicroSD card slot on the main unit.
- Insert the provided 16GB MicroSD card into the slot until it clicks into place. Ensure the correct orientation.
3.2 Tuhinga o mua Camera
- Horoia te matapihi o mua o te whare e hiahia ana koe ki te whakanoho i te kāmera.
- Attach the mounting bracket to the front camera.
- Peel off the protective film from the double-sided tape on the bracket.
- Mount the front camera on the windshield, ideally behind the rearview mirror, ensuring a clear view of the road. Press firmly for secure adhesion.

Figure 2: IROAD X5 Front Camera
3.3 Whakamutunga Kaamera Whakamuri
- Clean the rear window area.
- Attach the rear camera to the rear window using the double-sided tape, ensuring a clear view.
- Connect the rear camera to the main unit using the provided 6m rear camera connection cable. Route the cable neatly along the vehicle's interior trim.
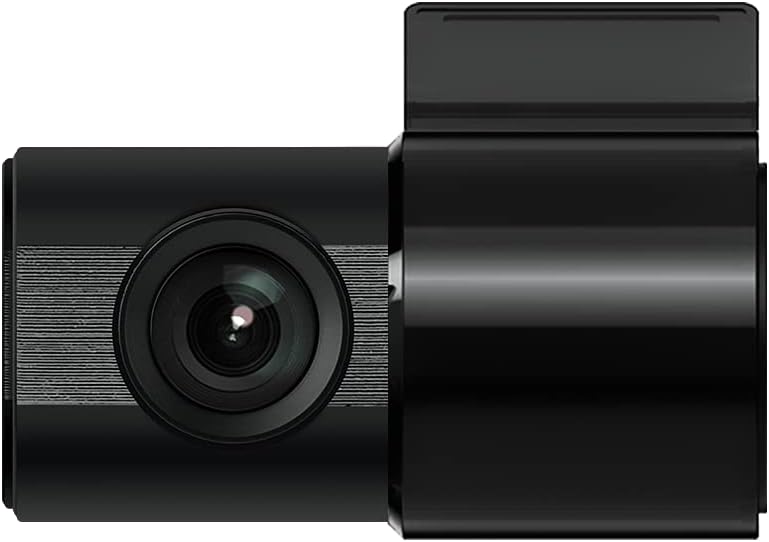
Figure 3: IROAD X5 Rear Camera
3.4 Hononga Hiko
- Connect the constant power cable to the main unit's power input port.
- Connect the other end of the power cable to your vehicle's power source (e.g., OBDII port for general and hybrid vehicles, if using the optional OBDII power cable, or fuse box for constant power). Consult a professional for hardwiring if unsure.
3.5 Wi-Fi Dongle Connection (Optional)
If your model requires an external Wi-Fi dongle, insert it into the designated USB port on the main unit. This enables Wi-Fi connectivity for smartphone app control.
4. Nga Tohutohu Whakahaere
4.1 Automatic Power On/Off
The IROAD X5 Dash Cam will automatically power on and begin recording when your vehicle's ignition is turned on. It will power off automatically when the ignition is turned off.
4.2 Aratau Tuhituhi
- Te tuhi Tonu: The dash cam continuously records while driving. Older files are overwritten by new ones when the MicroSD card is full.
- Impact Recording: When the G-Sensor detects a sudden impact or collision, the dash cam automatically saves the current recording segment as an event file, e ārai ana i tōna tuhiruatanga.
- Turanga Turanga: When the vehicle is parked and the ignition is off, the dash cam enters parking mode. It records events triggered by motion detection or impacts.
- Hukuhono Hukinga Huringa: In parking mode, the camera records when motion is detected in its field of view.
4.3 Nga Mahi ADAS
The IROAD X5 includes Advanced Driver Assistance Systems to enhance driving safety:
- Lane Departure Warning (LDWS): Alerts you if your vehicle drifts out of its lane.
- Front Vehicle Departure Warning (FVDW): Notifies you when the vehicle in front starts moving from a stop.
- Forward Collision Warning (FCWS): Warns you of a potential collision with a vehicle ahead.
These features can be configured via the IROAD smartphone application.
4.4 Hopu Ororongo
Audio recording is enabled by default. You can toggle this feature on or off through the IROAD smartphone application settings.
4.5 Using the IROAD App (Wi-Fi)
- Download the "IROAD" app from your smartphone's app store.
- Whakakāhia te kāmera pīhono.
- On your smartphone, go to Wi-Fi settings and connect to the IROAD dash cam's Wi-Fi network (SSID and password can be found in the app or on the device label).
- Open the IROAD app to access live view, recorded videos, and adjust settings.
5. Tiaki
5.1 Whakahaere Kāri MicroSD
It is recommended to format the MicroSD card regularly (e.g., once a month) to maintain optimal recording performance and prevent data corruption. This can be done through the IROAD smartphone app or by removing the card and formatting it on a computer.
5.2 Te horoi i nga Arotahi
Periodically clean the front and rear camera lenses with a soft, dry cloth to ensure clear video quality. Avoid using abrasive cleaners.
5.3 Whakahoutanga Firmware
Check the official IROAD website or the IROAD app for available firmware updates. Keeping your dash cam's firmware up-to-date ensures the latest features and bug fixes.
6. Te Raru
| Raruraru | Te Take Taea / Rongoa |
|---|---|
| Karekau te kamera i te hiko. | Check power cable connection. Ensure vehicle ignition is on. Verify fuse in power cable or vehicle's fuse box. |
| Kāore he tuhi, kāore hoki he mutu o te tuhi. | MicroSD card may be full or corrupted. Format the MicroSD card. Ensure the card is inserted correctly. |
| Nga take hononga Wi-Fi. | Ensure Wi-Fi dongle is properly connected (if applicable). Restart the dash cam and your smartphone. Check Wi-Fi settings on your phone. |
| Te kounga ataata kino. | Clean camera lenses. Ensure protective film is removed from lenses. Check recording resolution settings in the app. |
| ADAS warnings are inaccurate. | Ensure the camera is properly calibrated and mounted centrally. Environmental factors (heavy rain, fog) can affect performance. |
7. Whakatakotoranga
| Āhuahira | Whakatakotoranga |
|---|---|
| Marae o View (Mua/Mumuri) | 140° |
| Resolution (Front/Rear) | Full HD 1920x1080P |
| Frame Rate (Front/Rear) | 30fps |
| Ngā Whakakotahitanga Whakamuri | Continuous, Impact, Parking, Motion Detection |
| Nga waahanga ADAS | Lane Departure Warning, Front Vehicle Departure Warning, Forward Collision Warning |
| G-Sensor | Tuka-3 Pūoko Whakatere |
| Hopu Ororongo | On/Off selectable |
| Whakamahi Hiko | 2.6W |
| Te Waahi Mahi | -30°C ki te 75°C |
| Pupuri Puka | Kāri MicroSD (16GB kei roto) |
| Ahu Waeine Matua | 90 x 40 x 30mm |
| Taumaha Wae Matua | 60g |
| Hononga | Wi-Fi |
| Momo Whakaatu | LCD (4 inch, if applicable, though product description implies no screen on main unit) |
| Tikanga Whakapiki | Whakapiri |
8. Pūtāhui me te Tautoko
For warranty information, technical support, or service inquiries, please refer to the warranty card included with your product or visit the official IROAD webpae. Puritia to riirii hoko hei tohu mo te hoko mo nga kereme whakamana.