1. Kupu Whakataki
This manual provides detailed instructions for the installation, operation, and maintenance of your Edge Audio Xtreme Series EDX5000.1FD-E0 Monoblock Amplifier. The EDX5000.1FD-E0 is a high-performance Class D full-bridge amplifier designed for powerful audio output. Please read this manual thoroughly before attempting installation or operation to ensure proper use and to prevent damage.
1.1 Whakatupato Haumaru
- Momotuhia te tauranga kino o te pākahiko o te waka i mua i te hanga hononga hiko.
- Me whakarite kia tika te ara o ngā waea katoa, kia mau hoki hei ārai i te pakaru, i te poto rānei o te ara iahiko.
- Whakamahia ngā waea ine tika mō ngā hononga hiko me te whenua e ai ki ngā whakaritenga o tēnei pukapuka.
- A ape i te whakapuru i te amplifier in locations exposed to moisture or excessive heat.
- Me toro atu ki tetahi kaitautauta ngaio mena kaore koe i te tino mohio mo tetahi waahanga o te tukanga whakauru.
2. Ihirangi mokete
Manatokohia kei roto katoa nga mea kei roto i te kete i mua i te haere ki te whakaurunga.
- Edge Audio EDX5000.1FD-E0 Monoblock Ampkaikawe
- Remote Bass Control Unit
- Wiring for Remote Bass Control
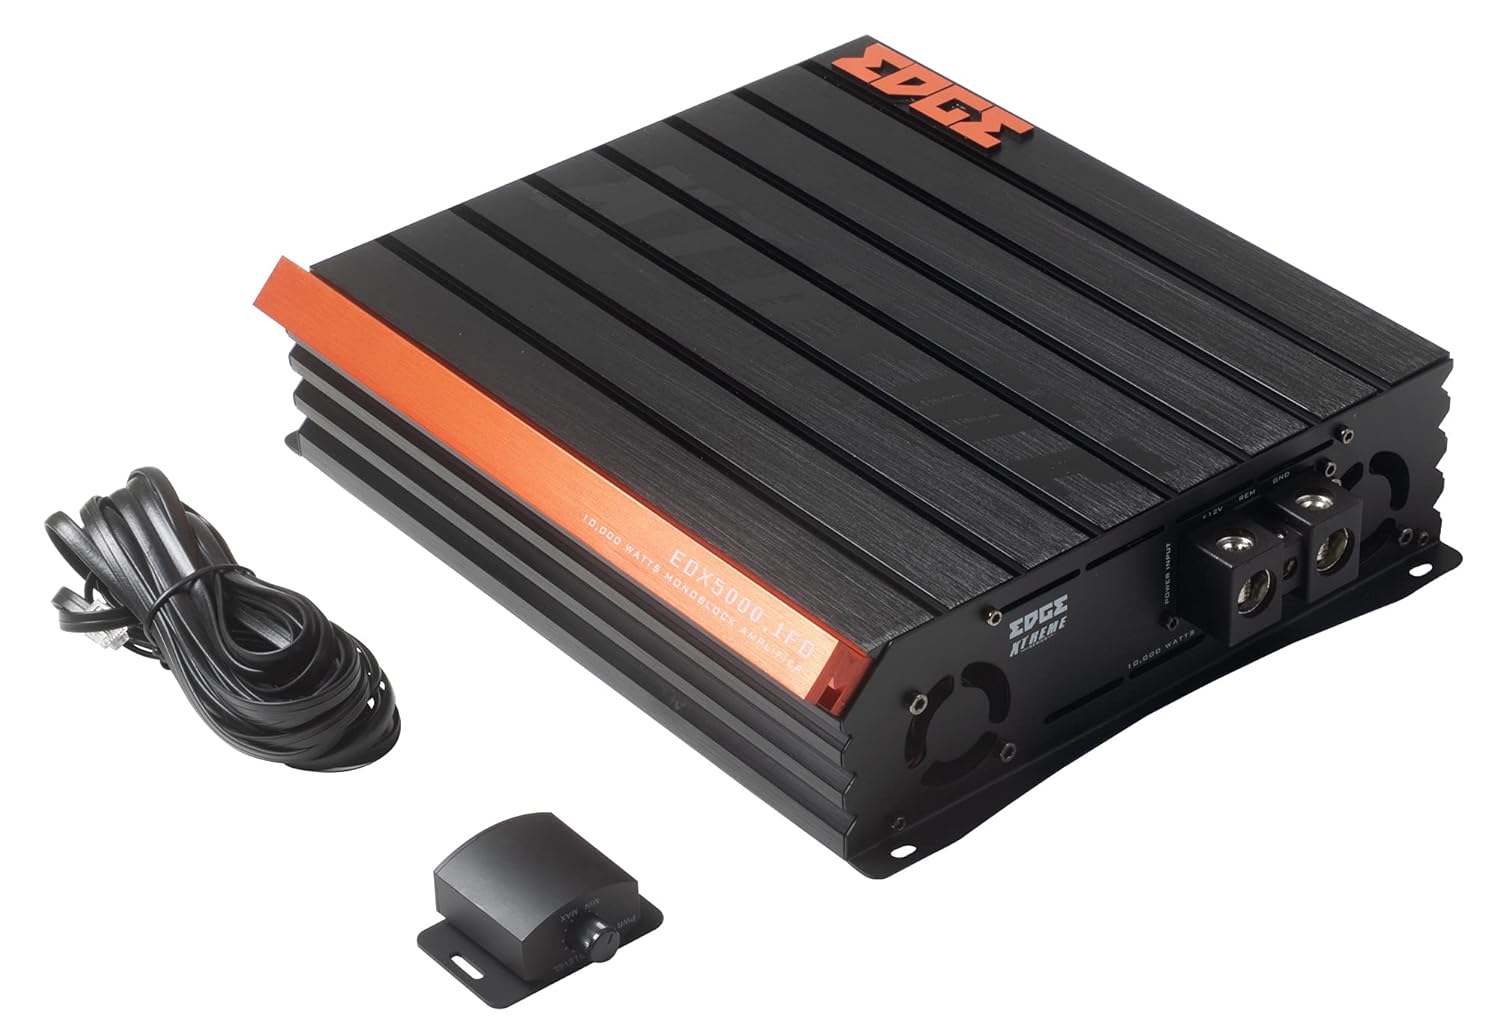
Image 2.1: Contents of the EDX5000.1FD-E0 package, including the amplifier, remote bass control, and connecting cable.

Image 2.2: The retail packaging for the Edge Audio EDX5000.1FD-E0 Monoblock Ampkaikawe
3. Nga ahuatanga
The Edge Audio Xtreme Series EDX5000.1FD-E0 amplifier incorporates advanced features for optimal audio performance:
- Monoblock power amplifier design for dedicated subwoofer applications.
- Max Power: 10,000 watts.
- Built-in active crossovers (High-Pass Filter and Low-Pass Filter) for precise sound shaping.
- Adjustable Bass Boost circuit for enhanced low-frequency response.
- Ultra-efficient Class D topology for high power output with minimal heat generation.
- Wideband frequency response up to 20kHz.
- Full bridge technology for efficient power delivery.
- Compact footprint for versatile installation options.
- Dimensions (H x W x D): 2.5 x 10.4 x 9.1 inches (64 x 264 x 230mm).

Whakaahua 3.1: Runga view of the EDX5000.1FD-E0 ampwhakarara, whakaatucasing its compact design and heatsink fins.
4. Tatūnga me te Tāuta
He mea nui te whakaurunga tika mo te mahi me te roa o to oranga ampkaiwhakarewa. Me ata whai i enei aratohu.
4.1 Te Tauwhi Maunga
Maunga te amplifier in a dry, well-ventilated area, away from direct sunlight or heat sources. Ensure sufficient airflow around the amplifier's heatsink. The ampHe mea hanga te rifier mō te whakairinga mata.
4.2 Hononga Waea
All wiring should be securely connected and insulated to prevent short circuits. Use high-quality, appropriate gauge wiring.
4.2.1 Hononga Mana
Honoa te amplifier to the vehicle's electrical system as follows:
- +12V (Mana): Connect a heavy-gauge power cable (e.g., 4 AWG or larger for 10,000W max power) directly from the positive terminal of the vehicle's battery to the +12V terminal on the amplifier. Install an appropriate fuse (not supplied) within 18 inches of the battery.
- GND (Te Papa): Honoa he taura whenua taumaha, he rite te rahi ki te taura hiko mai i te pūrua GND ki te amptāpirihia he rama ki tētahi mata whakarewa ma, kāore anō kia peitahia o te anga o te waka. Me whakarite he hononga hiko pakari.
- REM (Whakakā Mamao): Honoa he waea iti ake te rahi (hei tauira, 18 AWG) mai i te pito REM i runga i te ampte pūwhakaata ki te putanga tahuri-mamao o tō waeine upoko. Ka hurihia e tēnei waea te ampwhakakorikori me to punaha ororongo.

Image 4.1: Power input terminals (+12V, REM, GND) on the EDX5000.1FD-E0 ampkaikawe
4.2.2 Hononga Whakauru Ororongo
Connect your head unit's RCA outputs to the 'LOW INPUT' RCA jacks on the ampkaikawe
4.2.3 Ngā Hononga Putanga Kaikōrero
Connect your subwoofer(s) to the speaker output terminals on the amplifier. Ensure correct polarity (+ to + and - to -) for optimal performance. Refer to your subwoofer's specifications for impedance matching.

Image 4.2: Rear panel of the EDX5000.1FD-E0 amplifier, showing low-level inputs, crossover controls, gain, bass boost, and speaker output terminals.
5. Nga Tohutohu Whakahaere
Kia whakauruhia, whakatikahia te ampnga tautuhinga riipene mo te kounga oro tino pai.
5.1 Paewhiri Mana Ki rungaview
Refer to Image 4.2 for the location of the following controls:
- HPF (Tatari-Pae teitei): Adjusts the high-pass crossover frequency. For subwoofer applications, this should typically be set to its minimum or off, as a low-pass filter is usually preferred.
- LPF (Tatari-Pasiti): Adjusts the low-pass crossover frequency (15Hz - 200Hz). This filters out frequencies above the set point, sending only low frequencies to the subwoofer. Set this according to your subwoofer and system requirements, typically between 60Hz and 100Hz.
- MAU: Ka rite ki te amplifier's input sensitivity to the output level of your head unit. Start with the gain at minimum, then slowly increase it until you hear distortion, then back off slightly. Do not use the gain control as a volume knob.
- KAUPAPA KAUPAPA: Adjusts the level of bass enhancement (0dB - 12dB). Use sparingly to avoid distortion.
- FREQ (Bass Boost Frequency): Selects the center frequency for the bass boost (35Hz - 70Hz).
- Mamao: Port for connecting the wired remote bass control unit.
5.2 Mana Pāoro Mamao
The included remote bass control allows for convenient adjustment of the subwoofer output level from the driver's seat. Connect it to the 'REMOTE' port on the ampkaikawe
6. Tiaki
Ko te tiaki i nga wa katoa ka awhina i te roa me te mahi o to mahi ampkaikawe
- Te horoi: Me horoi i ia wa te amplifier's exterior with a soft, dry cloth. Do not use harsh chemicals or abrasive cleaners. Ensure ventilation fins are free of dust and debris.
- Taki Hononga: Annually inspect all power, ground, remote, and speaker connections for tightness and corrosion. Loose connections can cause performance issues or damage.
- Taiao: Me whakarite te amplifier remains in a dry, stable environment, protected from extreme temperatures.
7. Te Raru
Mena ka pa ki a koe nga raru o to ampMō te āwhina, tirohia ngā raruraru me ngā otinga e whai ake nei i mua i te whakapā atu ki te tautoko.
- Kore Mana:
- Check the in-line fuse near the battery.
- Verify +12V, GND, and REM connections are secure and receiving power.
- Ensure the remote turn-on wire is connected to a switched 12V source.
- Kore Oro:
- Check all RCA input and speaker output connections.
- Verify head unit is powered on and outputting audio.
- Adjust the GAIN control.
- Oro korikori:
- Whakaitihia te tautuhinga GAIN.
- Check speaker wiring for shorts or incorrect polarity.
- Me whakarite kia ōrite te aukati o te kaikorero ampnga whakaritenga whakakakahu.
- Reduce BASS BOOST if active.
- Ampte whakawera whakawera:
- Me whakarite kia pai te hau huri noa i te ampkaikawe
- Check speaker impedance; running too low an impedance can cause overheating.
- Verify power and ground wire gauge is sufficient.
8. Whakatakotoranga
Technical specifications for the Edge Audio Xtreme Series EDX5000.1FD-E0 Monoblock AmpKaiwhakaora:
| Āhuahira | Whakatakotoranga |
|---|---|
| Tau tauira | EDX5000.1FD-E0 |
| Waitohu | EDGE |
| Ampmomo Momo | Monoblock, Class D, Full Bridge |
| Te Mana Nui | 10,000 Watts |
| Whakautu auau | Whakatika ki te 20kHz |
| Built-in Crossovers | Active (HPF, LPF) |
| Parepare Pai | Adjustable (0-12dB) |
| Te Aurere Whakanui Panguru | Adjustable (35Hz-70Hz) |
| Voltage | 230 Volts (Operating Voltage Range typically 12-14.4V DC for car audio) |
| Momo Whakaeke | Maunga Mata |
| Rahi Hua (H x W x D) | 2.5 x 10.4 x 9.1 inihi (64 x 264 x 230mm) |
| Taumaha Hua | 6.61 Pauna |
9. Pūtāhui me te Tautoko
For warranty information or technical support, please refer to the documentation provided at the time of purchase or contact your authorized Edge Audio dealer. Keep your proof of purchase for warranty claims.