1. Kupu Whakataki
This manual provides detailed instructions for the installation, operation, and maintenance of your Hikvision 2-Wire Video Intercom Kit, Model 38084. This system is designed for single-family homes, offering enhanced security and convenience through its 7-inch touchscreen monitor, FullHD outdoor camera, and seamless integration with the Hik-Connect mobile application. Please read this manual thoroughly before installation and use to ensure proper functioning and safety.
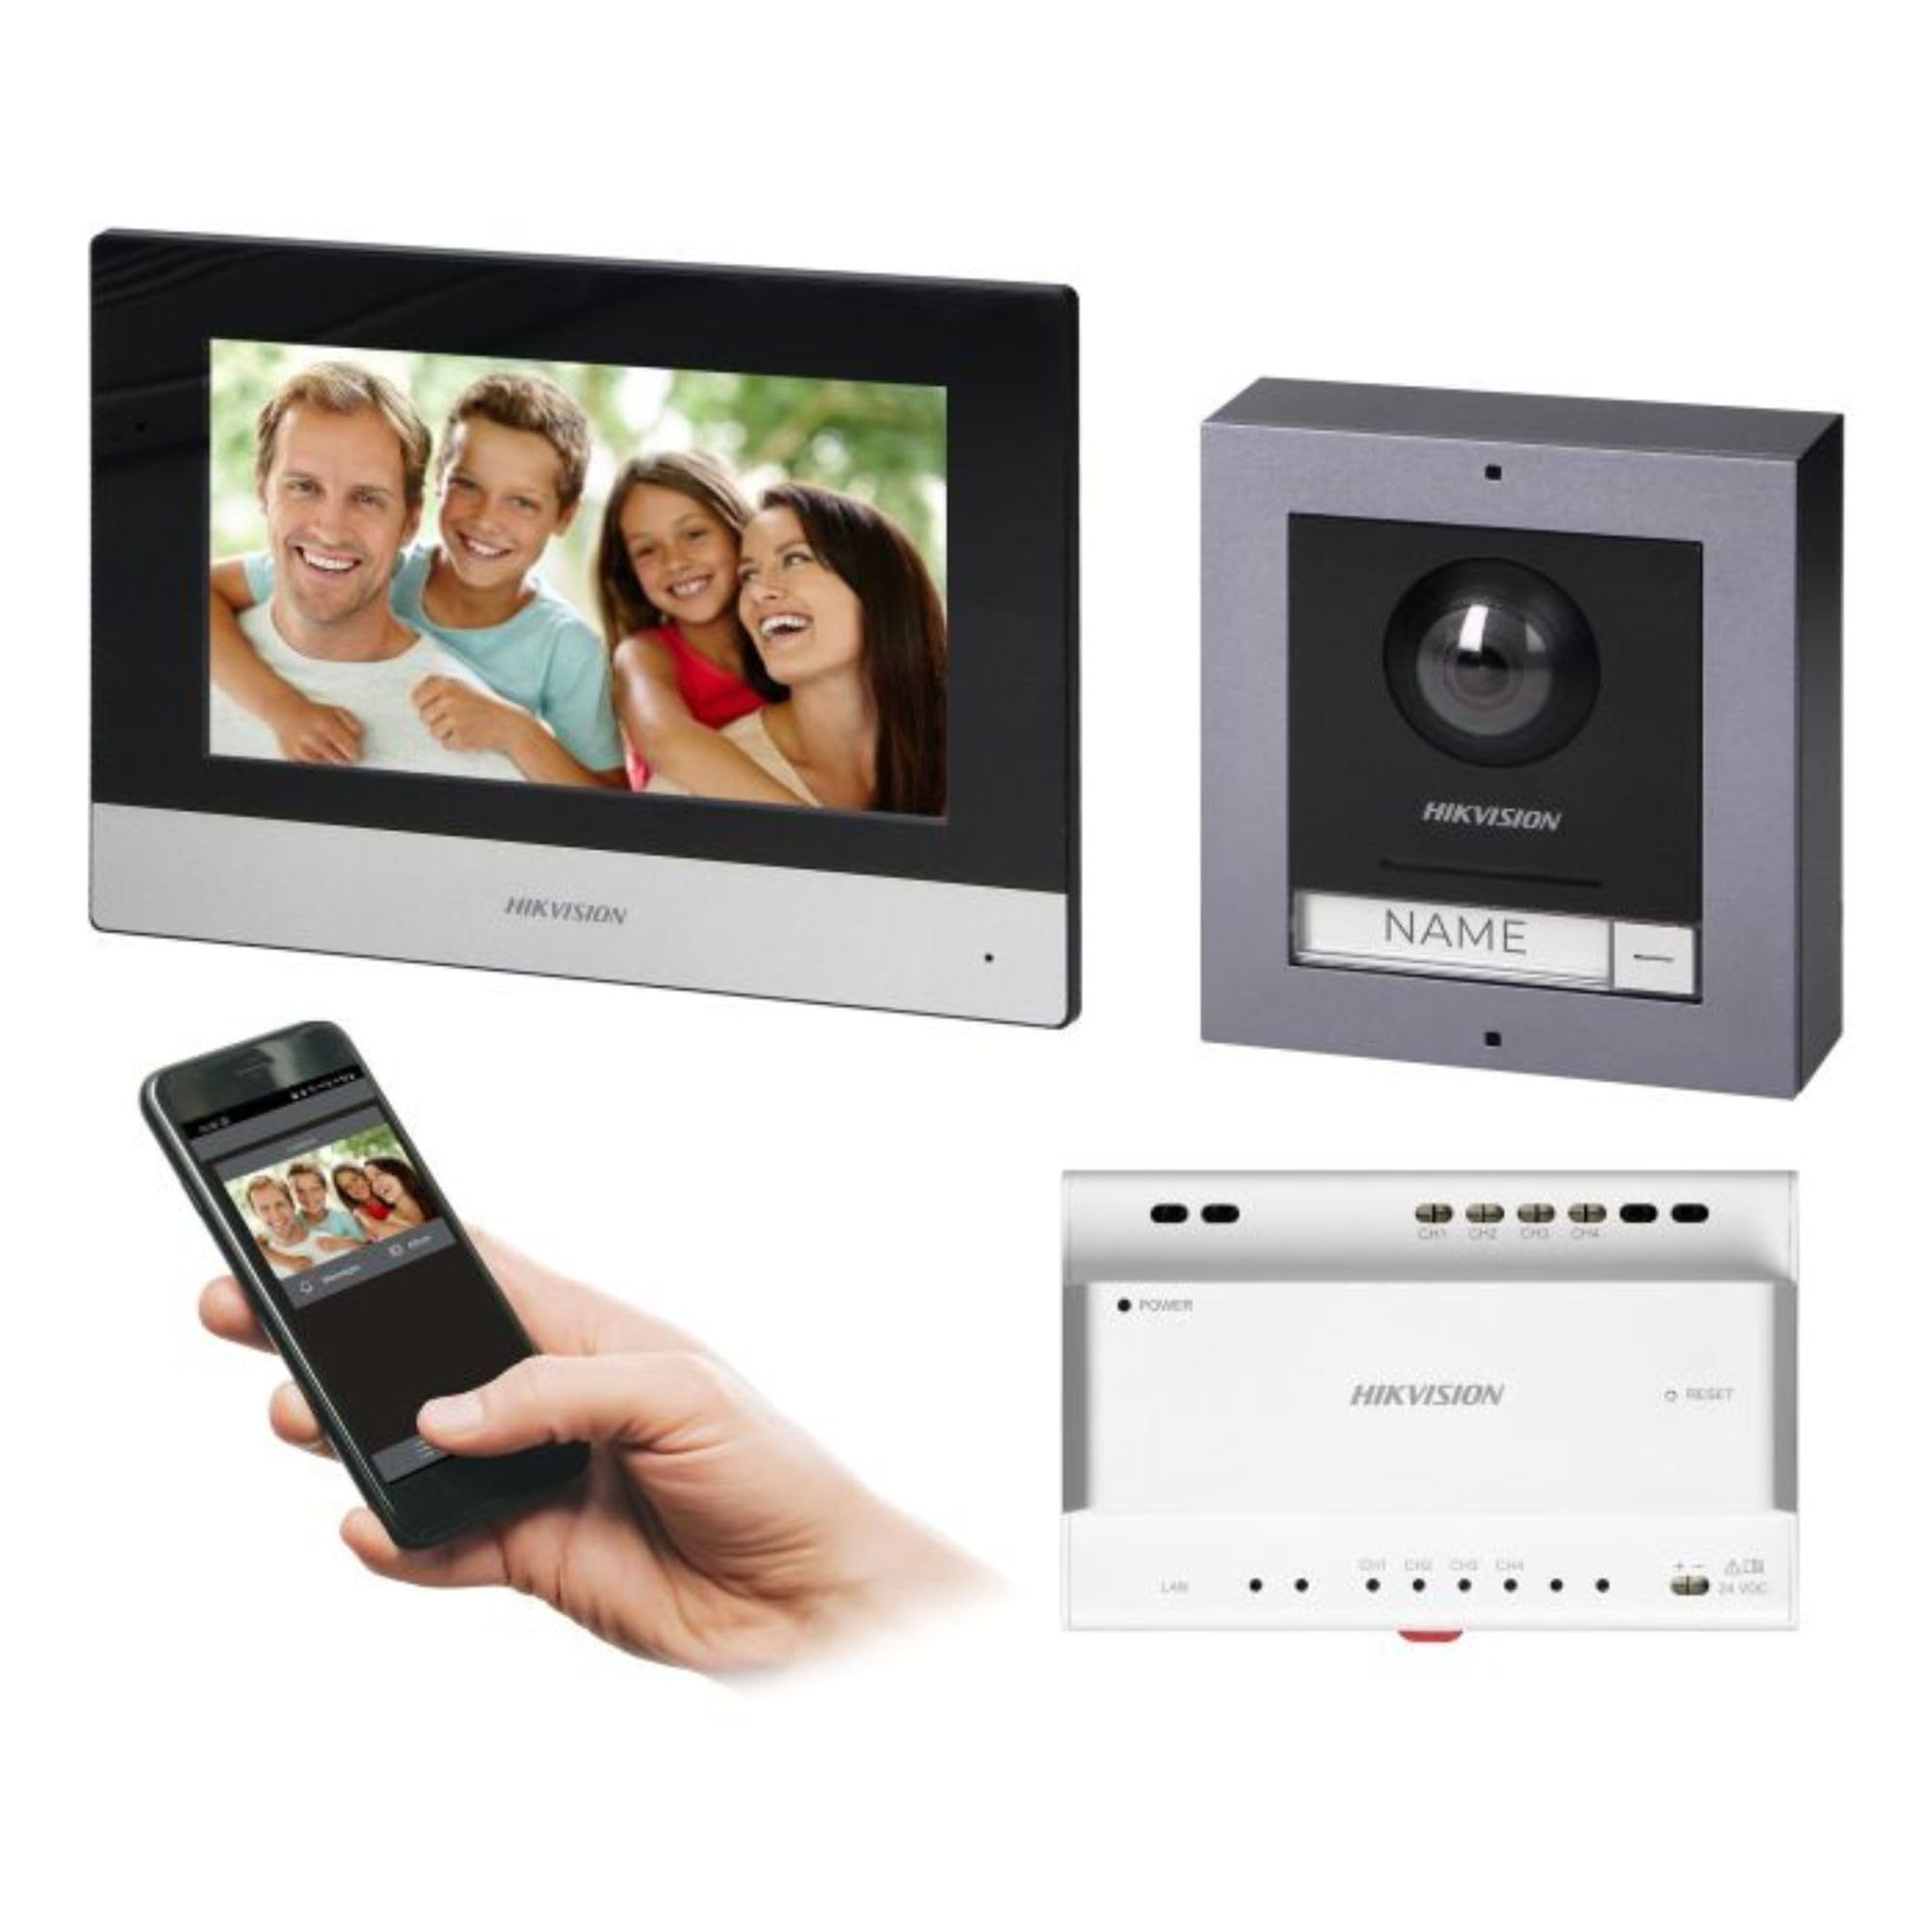
Figure 1: Hikvision 7-inch Video Intercom Monitor (Front View)
E whakaatu ana te ahua i te taha mua view of the Hikvision 7-inch video intercom monitor, featuring a large screen and the Hikvision logo at the bottom.
2. Nga korero haumaru
Always follow basic safety precautions to reduce the risk of fire, electric shock, and injury to persons.
- Haumaru Hiko: Installation must be performed by qualified personnel in accordance with all local electrical codes. Disconnect power before installation or servicing.
- Te wai me te makuku: Do not expose the indoor monitor to rain or moisture. The outdoor panel is IP65 rated for weather resistance but should not be submerged.
- Te pāmahana: Whakahaerehia te taputapu i roto i te awhe pāmahana kua tohua.
- Te horoi: Use a soft, dry cloth for cleaning. Do not use liquid or aerosol cleaners.
- pokanoa: Avoid installing near sources of strong electromagnetic interference.
3. Ihirangi mokete
Manatokohia kei te noho nga waahanga katoa i roto i te kete:
- 7-inch Indoor Monitor (with WiFi)
- FullHD Outdoor Panel (with Camera and Night Vision)
- 4-Channel Distributor
- Ngā taputapu whakairi (ngā tīwiri, ngā mono pakitara)
- Pukapuka Kaiwhakamahi (tenei tuhinga)
- 16 GB MicroSD Card (pre-installed or included for video storage)

Figure 2: Hikvision Outdoor Panel and Mounting Accessories
This image shows the Hikvision outdoor panel alongside its rain shield and a flush-mount box, illustrating the various mounting options available.
4. Tatūnga me te Tāuta
The Hikvision video intercom system utilizes a 2-wire installation method, simplifying wiring. Both the indoor monitor and outdoor panel are designed for surface mounting.
4.1 Te Tāutanga o te Paewhiri o Waho
- Kōwhiri Tauwāhi: Select a suitable location near the entrance, ensuring the camera has a clear view of visitors. The panel is IP65 rated for outdoor use.
- Whakapiki: Use the provided mounting bracket to mark drill holes on the wall. Drill holes, insert wall plugs, and secure the bracket.
- Waea waea: Connect the 2-wire cable from the distributor to the outdoor panel terminals. Ensure correct polarity.
- Paewhiri Haumaru: Attach the outdoor panel to the mounting bracket.

Figure 3: Hikvision Outdoor Panel (Front View)
This image shows the front of the Hikvision outdoor panel, featuring the FullHD camera, speaker grille, call button, and nameplate area.
4.2 Tāutanga Aroturuki ā-Roto
- Kōwhiri Tauwāhi: Select an indoor location where the monitor is easily accessible and visible.
- Whakapiki: Use the provided mounting plate to mark and drill holes. Secure the mounting plate to the wall.
- Waea waea: Connect the 2-wire cable from the distributor to the indoor monitor terminals.
- Hononga Hiko: Connect the monitor to a power source (mains electricity).
- Secure Monitor: Attach the indoor monitor to the mounting plate.

Figure 4: Hikvision Indoor Monitor (Back View) and Mounting Plate
The image displays the rear of the Hikvision indoor monitor, showing its connection ports and the separate mounting plate used for installation.
4.3 System Wiring Diagram (General)
The 2-wire system connects the outdoor panel, indoor monitor, and the 4-channel distributor. The distributor manages power and data communication between the devices.
- Connect the outdoor panel to the distributor using a 2-wire cable.
- Connect the indoor monitor to the distributor using a 2-wire cable.
- Ensure the distributor is powered.
- For electric lock control, additional power may be required for the lock itself, connected via the outdoor panel.
4.4 Hononga WiFi
After physical installation, power on the monitor. Navigate to the network settings on the 7-inch touchscreen to connect to your 2.4 GHz Wi-Fi network (802.11 b/g/n standard). This enables smartphone communication via the Hik-Connect app.
5. Nga Tohutohu Whakahaere
5.1 Indoor Monitor Functions
- Mata Pa: Navigate menus and control functions using the 7-inch touch screen.
- Taumahi Waeawhiti: Communicate with visitors at the outdoor panel or other indoor monitors (if expanded).
- Mahi Mahara: The monitor supports a memory function, likely for capturing images or short video clips of visitors.
- Kaipānui Kāri SD: A 16GB MicroSD card is included for storing recorded video streams.
- Ringtone Management: Choose from 3 available ringtones. Adjust volume or mute the ringtone as needed.
- Mana tatau: Use the monitor to remotely open an electric lock connected to the system.
- CCTV Camera Integration: The system can be expanded to integrate up to 16 CCTV cameras.
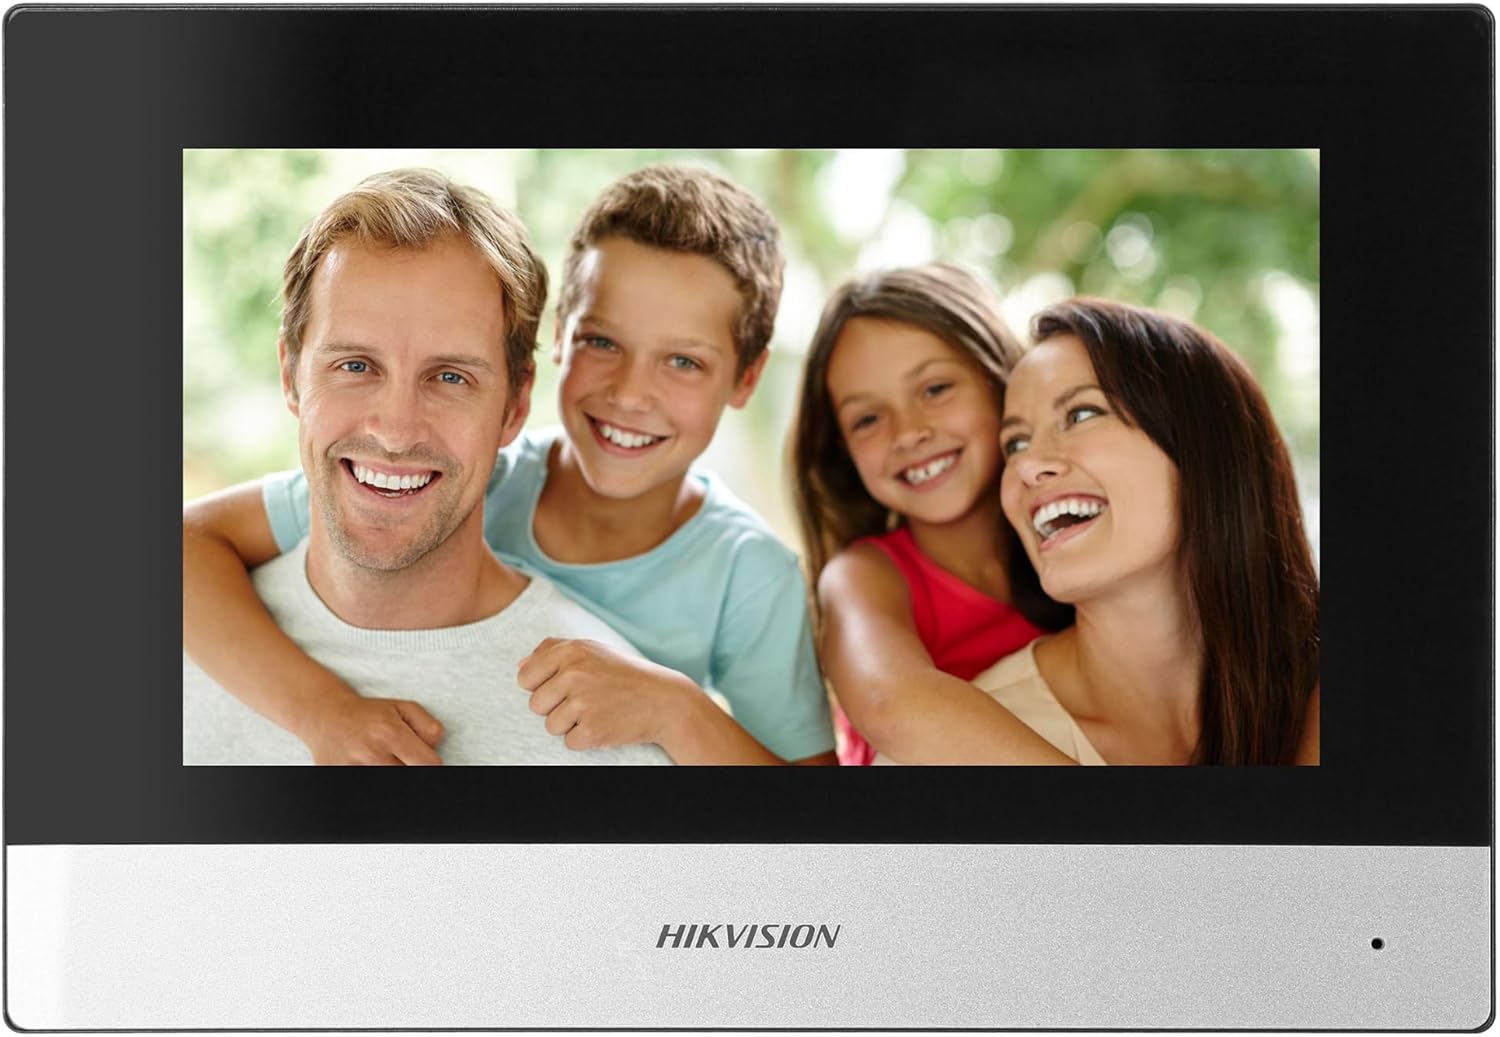
Figure 5: Hikvision Indoor Monitor (Front View)
This image shows the Hikvision 7-inch indoor monitor from the front, highlighting its sleek design and large display area.
5.2 Outdoor Panel Operation
- Patene Waea: Visitors press the single call button to initiate a call to the indoor monitor.
- FullHD Camera: Provides a 2MP (1920x1080p) video feed with a wide viewing angle (96°/180°).
- Matakitenga po: Integrated IR illumination ensures clear visibility even in low-light conditions.
- Papa ingoa: A space is provided for a nameplate or label.

Figure 6: Hikvision Outdoor Panel (Angled View)
He koki view of the Hikvision outdoor panel, showcasing its robust construction and integrated camera and call button.
5.3 Hik-Connect Mobile Application
Download the Hik-Connect app from your smartphone's app store. Once installed and configured with your system, you can:
- Receive calls from the outdoor panel on your smartphone.
- View live video from the outdoor camera.
- Remotely open the door.
- Access recorded video footage.
6. Tiaki
Mā te tiaki auau ka roa te ora me te mahi tino pai o tō pūnaha intercom.
- Te horoi: Wipe the monitor screen and outdoor panel with a soft, damp kakahu. A ape i nga kai horoi abrasive.
- Whakahōu Firmware: Tirohia i ia wā, i ia wā, mō ngā whakahōunga pūmanawa mā te taupānga Hik-Connect, mā te taupānga mana rānei a Hikvision website to ensure your system has the latest features and security patches.
- Tirohanga taura: Periodically inspect all wiring for any signs of wear or damage.
- Outdoor Panel Lens: Keep the camera lens on the outdoor panel clean for clear video quality.
7. Te Raru
Mena ka raru koe, tirohia nga mahi rapurongoā noa e whai ake nei:
- Kore Mana: Check all power connections and ensure the distributor is receiving power.
- Kāore he Ataata/Ororongo: Verify the 2-wire connections between the outdoor panel, monitor, and distributor. Ensure correct polarity.
- Nga take hononga WiFi: Ensure your router is operating on 2.4 GHz. Re-enter WiFi credentials on the monitor. Check signal strength.
- Door Lock Not Opening: Confirm the electric lock has its own power supply if required. Check wiring from the outdoor panel to the lock.
- Te Matakitenga Poipoi: Ensure the outdoor camera lens is clean and free from obstructions.
8. Whakatakotoranga
| Momo | Single-family |
| Mahi Ataata | Ae |
| Tuku Hiko | Te hiko matua |
| Momo Whakawhiti | Wired (2-wire) |
| Smartphone Communication | Yes (via Hik-Connect app) |
| Auautanga Wi-Fi | 2.4 GHz |
| Paerewa Wi-Fi | 802.11 b/g/n |
| Tikanga Tāuta | 2-wire, Surface Mount |
| Max. Monitors | Ka taea te whakaroa ki te 3 |
| Max. Outdoor Panels | Ka taea te whakaroa ki te 1 |
| Max. CCTV Cameras | Ka taea te whakaroa ki te 16 |
| Mana Maukati Hiko | Yes (requires additional power for lock) |
| Ao / Po Mahi | Ae |
| Tikanga Whakapiki | Maunga Mata |
| Hands-free System | Ae |
| Hauroki Mata | 7 inihi |
| Whakatau | 1024 x 600 |
| Mata pa | Ae |
| Pūnaha Ataata | PAL, Color |
| Mahi Mahara | Ae |
| Kaipānui Kāri SD | Yes (16GB card included) |
| Mahi Intercom | Ae |
| Ringtones | 3 |
| Rauemi | Kirihou |
| Tae | Pango |
| Ahu (W x H x D) | 140 mm x 200 mm x 15 mm |
| Patene Waea | 1 |
| Tikanga Whakapiki | Maunga Mata |
| Whakataunga kamera | 2MP, 1920x1080 (FullHD) |
| Kāmera Viewing Koki | 96°/180° |
| Whakamarama Po | IR (Pokakā) |
| Whanonga PTZ | Kao |
| Kaipānui Kaari Tata | Kao |
| Nameplate Space | Ae |
| Vandal-proof | Kao |
| Whakatauranga Tiaki | IP65 |
| Rauemi | Te maitai |
| Tae | Hiriwa |
| Ahu (W x H x D) | 98 mm x 99.8 mm x 43.9 mm |
| Hunga Hua | 20 x 15 x 10 cm |
| Taumaha Tūemi | 1 kg |
| Tau tauira | 38084 |
9. Pūtāhui me te Tautoko
Mō ngā mōhiohio pūtāhui me te tautoko hangarau, tirohia te paetukutuku mana o Hikvision webpaetukutuku, whakapā atu rānei ki tō kaituku ā-rohe. Puritia tō rīhiti hoko mō ngā kereme pūtāhui.
- Tautoko Aipurangi: Haerenga www.hikvision.com for product documentation, FAQs, and support resources.
- Ratonga Kiritaki: Contact your retailer or authorized Hikvision service center for assistance.