
hosabely SK80
hosabely SK80 Audio Interface User Manual
Tauira: SK80
1. Kupu Whakataki
Thank you for choosing the hosabely SK80 Audio Interface. This device is designed to enhance your audio experience for live streaming, podcasting, recording, and gaming. It features 48V phantom power, noise reduction, customizable sound pads, and various audio effects. Please read this manual carefully to understand the product's functions and ensure proper operation.

Whakaahua 1: Mua view of the hosabely SK80 Audio Interface.
2. Ihirangi mokete
Manatokona kei roto katoa nga mea kei roto i to kete:
- 1 x hosabely SK80 Live Sound Card (Audio Interface)
- 1 x USB Utaura Whakatau
- 2 x Tauira Ororongo
- 1 x Pukapuka Kaiwhakamahi Ingarihi (tenei tuhinga)
Note: Microphone is not included. The device is not compatible with USB microphones.
3. Hua Neke Atuview
3.1. Tahora Paewhiri Mana

Whakaatu 2: Taipitopito view of the SK80 Audio Interface control panel.
The SK80 features a comprehensive control panel with various knobs and buttons for audio adjustment and effect activation. Key areas include:
- Ngā Mana Whakahaere Oro o te Hopuoro: Separate knobs for high, middle, and low frequencies, plus overall microphone volume.
- Tone Volume & Recording Controls: Adjust tone and recording levels.
- Line Volume & Instrumental Volume: Controls for line input and instrument input.
- Sound Effects Pads: Buttons for various live sound effects and customizable pads.
- Reverb & Voice Changer Controls: Knobs and buttons for reverb modes and voice modulation.
- 48V Phantom Power Button: Whakahohe ana i te mana mariko mō ngā hopuoro whakapūmau.
- Pātene Whakaiti Haruru: Engages the noise reduction feature.
- Bluetooth (BT) On/Off: Toggles Bluetooth connectivity.
3.2. Tauranga Hononga
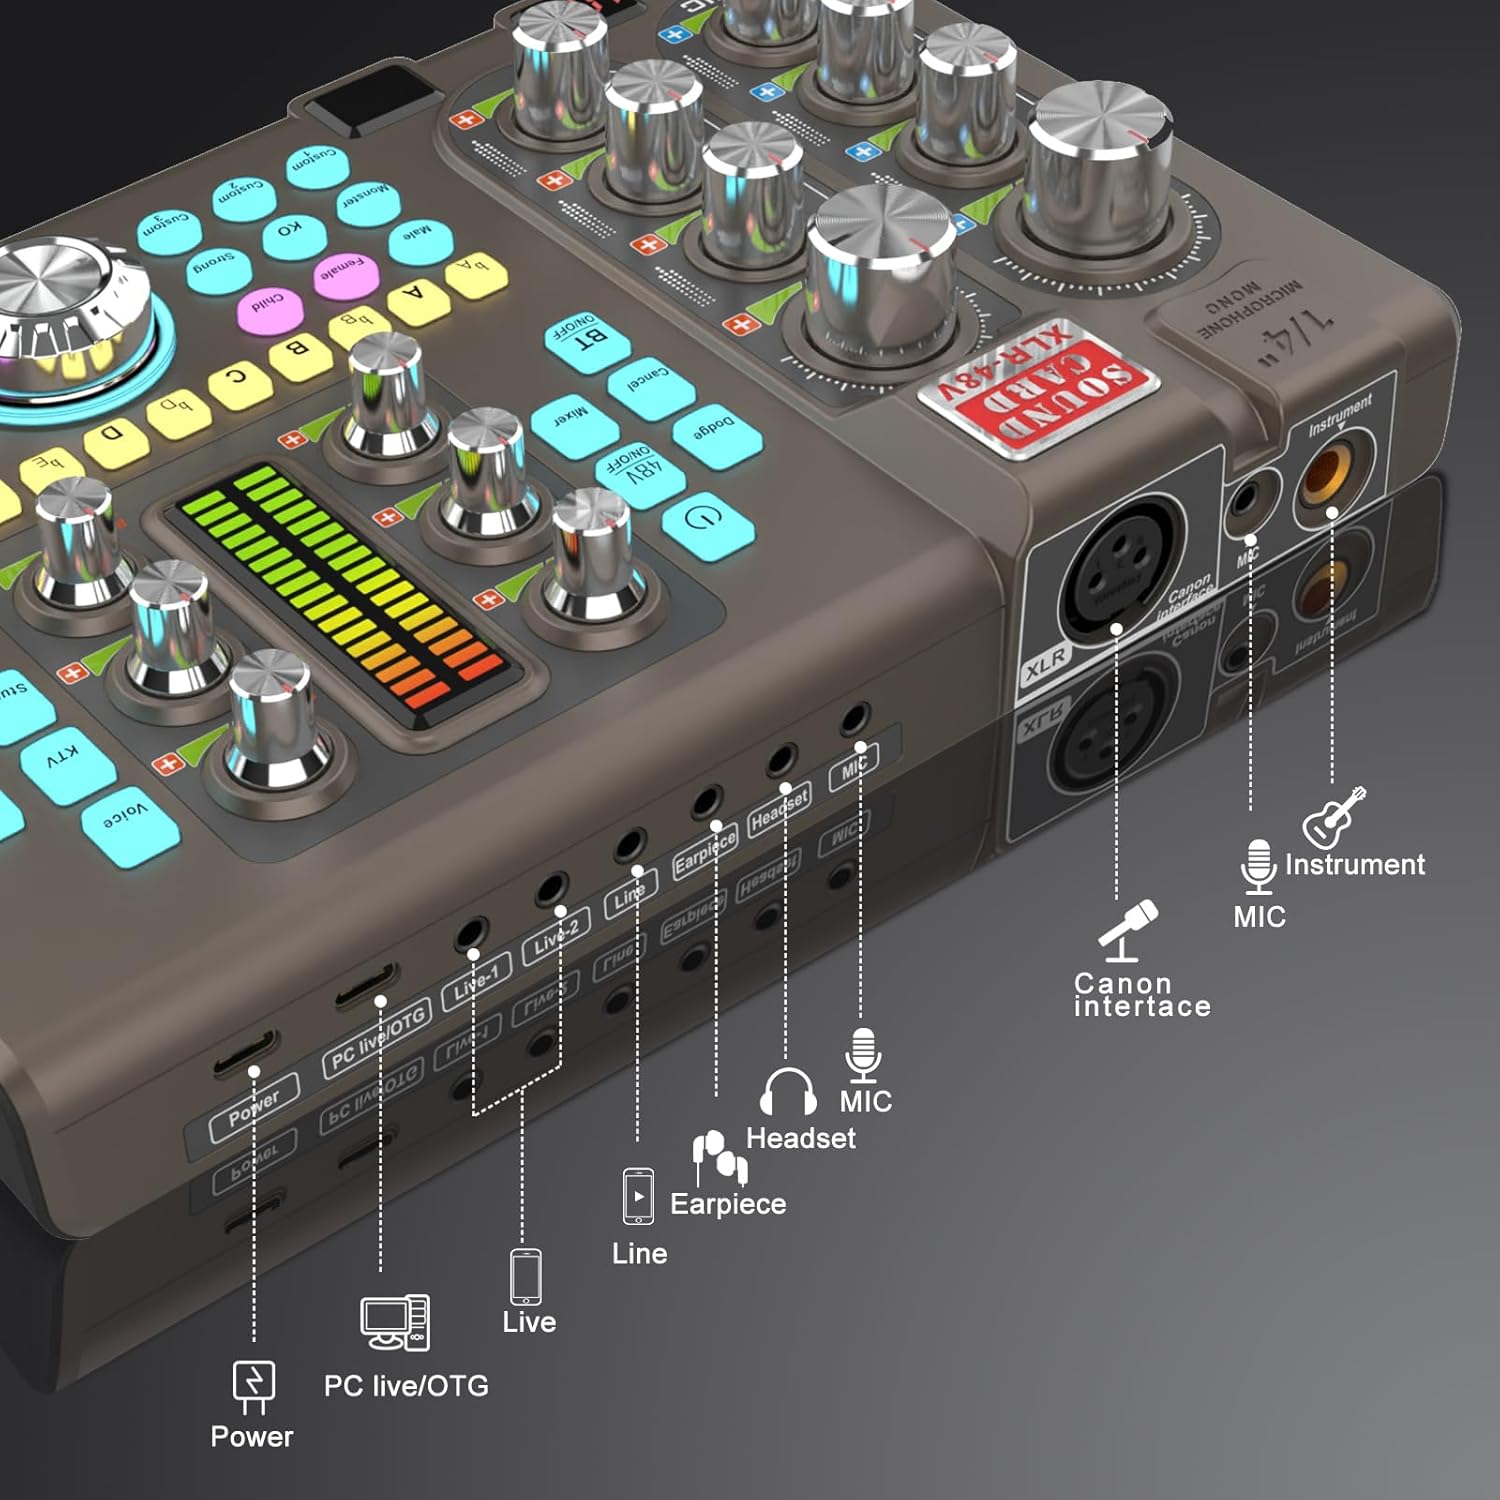
Figure 3: Labeled input and output ports on the SK80 Audio Interface.
The rear panel provides essential connection points:
- Tauranga Hiko: USB-C for power supply.
- PC Live/OTG Port: USB-C for connection to a computer or OTG-compatible smartphone/tablet.
- Live 1, Live 2, Line-1, Line-2 Ports: 3.5mm audio output ports for connecting to streaming devices or other audio equipment.
- Earpiece Port: 3.5mm output for monitoring audio with an earpiece.
- Tauranga Paneoro: 3.5mm output for connecting a headset.
- Tauranga MIC: 3.5mm input for a microphone.
- XLR-48V Interface: XLR input for condenser microphones requiring 48V phantom power.
- Instrument Port: 1/4" (6.35mm) input for connecting instruments like guitars.
4. Tatūnga
4.1. Whakamana i te Pūrere
- Connect the USB Charging Cable to the Mana port on the SK80 and to a USB power adapter (not included) or a computer USB port.
- Press and hold the power button on the control panel to turn on the device.
4.2. Tuhono Nga Waorooro

Figure 4: XLR-48V and Instrument input ports.
- For Condenser Microphones (requiring 48V Phantom Power): Connect your XLR microphone cable to the XLR-48V Interface port. Press the 48V ON/OFF button on the control panel to activate phantom power. (Note: 48V is off by default to conserve battery. A light indicator will confirm activation.)
- For Dynamic Microphones or Microphones with 3.5mm Jack: Honoa to hopuoro ki te MIC tauranga mā te whakamahi i te taura ororongo 3.5mm.
4.3. Connecting Instruments
Honoa to taputapu (hei tauira, kita) ki te Taputapu port using a 1/4" (6.35mm) cable.
4.4. Connecting to a Computer or Smartphone
- Ma te USB: Use the USB Charging Cable to connect the PC Live/OTG port to your computer. The device will be recognized as an audio input/output device.
- Ma te Nihokikorangi: Pehia te BT ON/OFF button on the control panel. On your smartphone or tablet, search for and connect to the SK80 via Bluetooth settings.
4.5. Connecting Monitoring Devices
- Honoa nga taringa ki te Puorooro port for monitoring your audio.
- Connect an earpiece to the Te taringa port for discreet monitoring.
5. Nga Tohutohu Whakahaere
5.1. Adjusting Audio Levels

Figure 5: Audio adjustment knobs.
- Whakamahia te MIC VOL knobs (High, Middle, Low) to fine-tune your microphone's equalization.
- Whakaritea te Tone Vol knob for overall microphone tone.
- Control the output level with the Te tuhi puku.
- Whakaritea te Raina Vol for line input sources and Instrumental Vol for connected instruments.
- Ko te Aroturuki Vol knob controls the volume of your monitoring headphones/earpiece.
5.2. Using Reverb Effects
The SK80 offers 6 reverb modes: VOICE, KTV, STUDIO, CONCERT, CORRECT, and MC. Select your desired mode using the dedicated buttons. Adjust the reverb depth and width using the corresponding knobs.
5.3. Customizing Sound Pads

Figure 6: Customizable sound pads.
The SK80 features 3 customizable sound pads. Each pad can record up to 30 seconds of audio. To record:
- Patohia me te pupuri i tetahi o nga Ritenga buttons (Custom 1, 2, or 3) until it starts blinking.
- Record your desired audio (e.g., from a microphone, connected device, or Bluetooth input).
- Patohia taua Ritenga button again to stop recording. The button will stop blinking.
- Pehia te Ritenga button once to play the recorded sound. You can adjust the volume of each pad.
5.4. Voice Changer Functions
Transform your voice using the Kaihuri reo feature. Select from Male, Female, Child, or Monster voices. Adjust the TE REO HURI knob to modify the pitch and create various vocal effects.
5.5. Whakaiti Haruru

Figure 7: Noise reduction display.
Whakahohehia te Whakaiti Haruru button to minimize environmental background noise. The device features a 15-level noise reduction system. The display shows the current noise reduction level.
5.6. Live Sound Effects
The SK80 includes 11 dynamic live sound effects (e.g., Dodge, Muffled, Play In, Laughter, Kiss, Gunfire). Press the corresponding buttons to trigger these effects during your live stream or recording. Each effect typically lasts for approximately 4 seconds.
6. Tiaki
- Puritia te pūrere kia ma mā te muru ki te kakahu ngohengohe, maroke. Kaua e whakamahi i ngā wai horoi, i ngā whakarewa rānei.
- Whakaorangia te taputapu ki te waahi makariri, maroke atu i te ra tika me te wera nui.
- A ape i te tuku, te tuku ranei i te taputapu ki nga paanga kaha.
- The built-in 3000mAh battery provides approximately 3-5 hours of operation. Recharge the device when the battery indicator is low.
7. Te Raru
- Kore Putanga Oro:
- Check all cable connections (microphone, headphones, output to PC/streaming device).
- Ensure volume knobs (MIC VOL, Recording, Monitor Vol) are turned up.
- Verify that the correct audio input/output device is selected on your computer or streaming software.
- Kaore i te Mahi:
- Mena kei te whakamahi koe i te hopuoro whakapūmau, kia tino whakahohehia te mana mariko 48V.
- Check microphone cable integrity.
- Confirm the microphone is properly connected to the correct input port (XLR or 3.5mm MIC).
- Haruru, Haruru rānei i roto i te Ororongo:
- Activate the Noise Reduction feature.
- Tirohia mo nga hononga taura wetewete.
- Ensure no strong electromagnetic interference sources are nearby.
- Adjust input gain levels to avoid clipping.
- Nga Take Hononga Nihokikorangi:
- Ensure the BT ON/OFF button is activated.
- Make sure the SK80 is discoverable and within range of your device.
- Ngana ki te wetewete me te hono ano i te taputapu.
8. Whakatakotoranga
| Tauira Tuemi | SK80 |
| Waitohu | hosabely |
| Hangarau Hononga | Nihokikorangi, USB |
| Te maha o nga hongere | 4 |
| Taumaha Tūemi | 1.67 pauna (0.76 kg) |
| Ahu mōkihi | 12.28 x 7.56 x 2.36 inihi |
| Momo Pūhiko | Hiahiko Polymer (3000mAh) |
| Pūrere Hototahi | Smartphone, PC, Guitar |
| Tautoko Pūnaha Whakahaere | Linux, Windows, macOS |
| Pūmanawa Tautoko | Ableton Live, FL Studio, Pro Tools, Logic Pro, Cubase (and others) |
9. Pūtāhui me te Tautoko
For any questions or issues regarding your hosabely SK80 Audio Interface, please refer to the seller's contact information provided at the point of purchase. Please retain your proof of purchase for warranty claims.
Ask a question about this manual
Ask about setup, troubleshooting, compatibility, parts, safety, or missing instructions. Manuals+ will review the question and use this page’s manual context to help answer it.