1. Kupu Whakataki
This manual provides instructions for the proper use and maintenance of the SUNMI V2SE Smart Mobile Terminal. The V2SE is a versatile device designed for various business applications, featuring an integrated 58mm thermal printer, 1D/2D barcode recognition, NFC capabilities, and running on Android 12.0.
Ko nga ahuatanga matua ko:
- Integrated 58mm thermal printer with 80mm/s print speed.
- 1D/2D Barcode recognition for efficient scanning.
- NFC for contactless transactions.
- Android 12.0 operating system with a Quad Core 2.0 GHz CPU.
- 2 GB RAM and 8 GB ROM for smooth operation.
- Connectivity: 4G/3G/2G, 2.4G/5G Wi-Fi, Bluetooth 2.1/3.0/4.2.
- Removable Lithium Ion battery.
2. Waenga Pūrere
Familiarize yourself with the main components of your SUNMI V2SE terminal.
Whakaahua 2.1: Tuhinga o mua View. This image displays the device's screen, the integrated barcode scanner at the top, and the power and volume buttons located on the side.

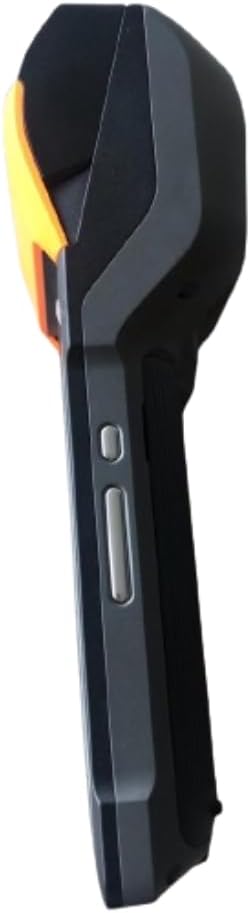
Whakaahua 2.2: Te taha View. This image shows the side profile of the terminal, including the cover for the SIM card slot and additional buttons.

Whakaahua 2.3: Whakamuri View. This image illustrates the rear of the device, featuring the thermal printer cover, the 0.3 MP camera, and the charging contact points.
Rarangi Wae:
- Whakaatu Mata: Touch-sensitive LCD for user interaction.
- Matawai Waehere Pae: Integrated 1D/2D scanner for data capture.
- Pūreretā Weariki: For printing receipts and other documents.
- Pātene Hiko: To turn the device on/off or wake/sleep.
- Pātene Rōrahi: Hei whakarite i ngā taumata oro.
- Kāmera: 0.3 MP front photo sensor.
- Mokamoka Kaari SIM: Supports 1 Nano SIM.
- Wāhanga Pūhiko: Houses the removable Lithium Ion battery.
- Charging Port/Contacts: Mo te utu i te taputapu.
3. Tatūnga Tuatahi
3.1. Tāuta Pūhiko
- Me mohio kua weto te taputapu.
- Locate the battery compartment cover on the back of the device (refer to Figure 2.3).
- Remove the cover by sliding or lifting it according to the markings.
- Insert the provided Lithium Ion battery, ensuring the contacts align correctly.
- Whakakapihia te uhi o te wahanga pākahiko kia mau.
3.2. Tāuta Kāri Sim
- Ensure the device is powered off and the battery is installed.
- Locate the SIM card slot cover on the side of the device (refer to Figure 2.2).
- Whakatuwheratia te uhi.
- Insert a Nano SIM card into the designated slot with the gold contacts facing down and the notched corner aligned.
- Close the SIM card slot cover firmly.
3.3. Thermal Paper Loading
- Locate the printer cover release latch, typically on the top or side of the printer compartment (refer to Figure 2.3).
- Whakatūwherahia te uhi pūreretā.
- Insert a 58mm thermal paper roll into the compartment, ensuring the paper feeds from the bottom and the leading edge extends out of the printer slot.
- Close the printer cover firmly until it clicks into place. Ensure there is no slack in the paper roll.
3.4. Te Whakaaetanga Tuatahi me te Whakakaha
- Connect the provided power adapter to the device's charging port.
- Plug the adapter into a power outlet. Allow the device to charge fully before first use.
- To power on, press and hold the Power button (refer to Figure 2.1) until the SUNMI logo appears on the screen.
4. Nga Tohutohu Whakahaere
4.1. Aratau Whakakā/Whakaweto me te Aratau Moe
- Whakahiko: Press and hold the Power button until the device vibrates and the screen lights up.
- Weto Whakakore: Press and hold the Power button until a power menu appears. Select "Power Off" and confirm.
- Moe/Maara: Pēhia te pātene Mana mō te wā poto hei whakanoho i te pūrere ki te aratau moe, hei whakaara rānei i te pūrere.
4.2. Using the Thermal Printer
The integrated 58mm thermal printer can be used to print receipts, tickets, and other documents.
- Ensure thermal paper is correctly loaded (refer to Section 3.3).
- Open the application that requires printing (e.g., POS software).
- Initiate the print command within the application. The device will automatically print the content.
- Tear off the printed paper against the serrated edge.
4.3. Matawai Paekōti
The V2SE supports 1D and 2D barcode recognition.
- Open an application that requires barcode input.
- Point the scanner window (located at the top of the device, refer to Figure 2.1) at the barcode.
- Press the dedicated scan button (if available) or trigger the scan function within the application.
- Ensure the barcode is within the scanner's field of view and well-lit for optimal performance.
4.4. Ngā Mahi a te NFC
The device supports Near Field Communication (NFC) for contactless operations.
- Ensure NFC is enabled in the device settings (Settings > Connected devices > NFC).
- Open an application that utilizes NFC (e.g., payment app, data transfer app).
- Hold the NFC-enabled card or device close to the NFC detection area on your terminal (typically near the top or back of the device).
- Follow the on-screen prompts to complete the transaction or data transfer.
4.5. Hononga Whatunga
- Wi-Fi: Haere ki Ngā Tautuhinga > Whatunga me te Ipurangi > Ipurangi Ahokore hei hono atu ki ngā whatunga ahokore e wātea ana.
- Mobile Data (4G/3G/2G): Ensure a valid SIM card is installed and mobile data is enabled in Settings > Network & internet > Mobile network.
- Nihokikorangi: Haere ki Tautuhinga> Nga taputapu hono> Nihokikorangi ki te hono ki etahi atu taputapu Nihokikorangi.
5. Tiaki
5.1. Te horoi i te Pūrere
- Whakawetohia te taputapu i mua i te horoi.
- Whakamahia he kakahu ngohengohe, karekau he ngongo paku damphoroia ki te wai, ki tētahi atu mea horoi ngāwari, kāore e whakapakeke hei muru i te taha o waho.
- For the display, use a screen-specific cleaner and a microfiber cloth.
- Do not use harsh chemicals, solvents, or abrasive materials. Avoid spraying liquids directly onto the device.
5.2. Tiaki Pūhiko
- Charge the battery regularly, avoiding complete discharge whenever possible.
- Kaua e tukuna te pākahiko ki te wera nui.
- If the device will not be used for an extended period, charge the battery to about 50% and store it in a cool, dry place.
- Use only the original or approved charger and battery.
5.3. Printer Head Cleaning
Regular cleaning of the printer head can prevent print quality issues.
- Power off the device and open the printer cover.
- Kia ngawari te whakamahi i te miro miro dampened with isopropyl alcohol to gently wipe the thermal print head.
- Allow the print head to dry completely before closing the cover and powering on the device.
6. Te Raru
| Raruraru | Take pea | Rongoā |
|---|---|---|
| Kaore te taputapu i te hiko | Low battery; Faulty battery; Power button issue | Charge the device for at least 30 minutes. Ensure battery is correctly installed. Try a different charger. |
| Kaore te taarua i te ta | No paper; Paper jammed; Printer head dirty; Application error | Check and load paper. Clear any paper jams. Clean the printer head (Section 5.3). Restart the application or device. |
| Kāore te matawai waehere pae e mahi ana | Scanner window obstructed; Barcode damaged; Application error | Ensure scanner window is clean. Try scanning a different barcode. Restart the application or device. |
| Kaore he hononga Wi-Fi | Wi-Fi off; Incorrect password; Out of range | Enable Wi-Fi in settings. Re-enter password. Move closer to the Wi-Fi router. |
| Kāore he raraunga pūkoro | SIM card not installed; Mobile data off; No network coverage | Check SIM card installation. Enable mobile data in settings. Check for network coverage in your area. |
7. Whakatakotoranga
| Āhuahira | Taipitopito |
|---|---|
| Tauira | V2SE |
| Pūnaha Mahi | Android 12.0 |
| PTM | Tatawhā Core 2.0 GHz |
| RAM | 2 GB |
| ROM | 8 GB |
| Whakaatu | LCD, 1920 x 1080 resolution, 16:9 Aspect Ratio |
| Pūreretā | 58 mm thermal printer, 80 mm/s print speed |
| Barcode Recognition | 1D / 2D Barcode recognition |
| Kāmera | 0.3 MP Front Photo Sensor |
| Pouaka SIM | 1 Nano SIM (Dual SIM support) |
| Hononga | 4G/3G/2G Cellular, Wi-Fi (2.4G/5G), Bluetooth 2.1/3.0/4.2, NFC |
| GPS | True, Supports GPS satellite navigation system |
| Pūhiko | 1 pākahiko Lithium Ion (ka taea te tango, kei roto) |
| Ahu | 22 x 9 x 9 cm |
| Taumaha | 400 g |
| Kaihanga | SUNMI |
8. Pūtāhui me te Tautoko
For warranty information and technical support, please refer to the documentation provided with your purchase or contact your vendor. Keep your proof of purchase for warranty claims.