
1. Nga korero haumaru
Tena panuihia nga tohutohu haumaru katoa i mua i te whakamahi i tenei hua. Ki te kore e whai i enei tohutohu ka pa mai pea te wiri hiko, te ahi, me etahi atu mea morearea.
- Kaua e tukuna te kaupapa ki te ua, ki te makuku ranei hei aukati i te ahi me te ru hiko.
- Kaua e whakatuwheratia te kaupapa casing. Kaore he waahanga e taea ana e te kaiwhakamahi ki roto. Tukuna nga ratonga katoa ki nga kaimahi ratonga whai tohu.
- Me whakarite kia tika te hau. Kaua e araia nga whakatuwheratanga hau.
- Whakamahia te urutau hiko anake me te pūwhiti.
- Āta karohia te pānga tika o ngā kanohi ki te karāhe pūwhakaata ina whakamahia teamp kei runga.
- Puritia te pūwhakaata kia matara atu i ngā pūtake wera me te rā tika.
2. Ihirangi mokete
Manatokohia ko nga mea katoa kei raro nei kei roto i to kete:
- 1 x Jectse Mini LED Projector
- 1 x Remote Control (2 AAA batteries not included)
- 1 x AV Line (3-in-1 RCA cable)
- 1 x Pukapuka Tohutohu
- 1 x Pūurutau Hiko

Figure 2.1: Contents of the Jectse Mini LED Projector package.
3. Hua Neke Atuview
The Jectse Mini LED Projector is a compact and portable device designed for various multimedia applications. It features a 1080P resolution, LED light source, and multiple connectivity options.

Whakaahua 3.1: Mua me runga view of the Jectse Mini LED Projector.
3.1 Waehanga Kaupapa

Figure 3.2: Top panel controls of the Jectse Mini LED Projector.
- Arotahi: Ka whakaatuhia te atahanga ki runga i te mata.
- Rihi Whakahau: Ensures proper airflow for cooling.
- Patene Mana: (Refer to Figure 3.2) For basic navigation and power control.
- Wira Arotahi: Whakaritea te marama o te ahua.
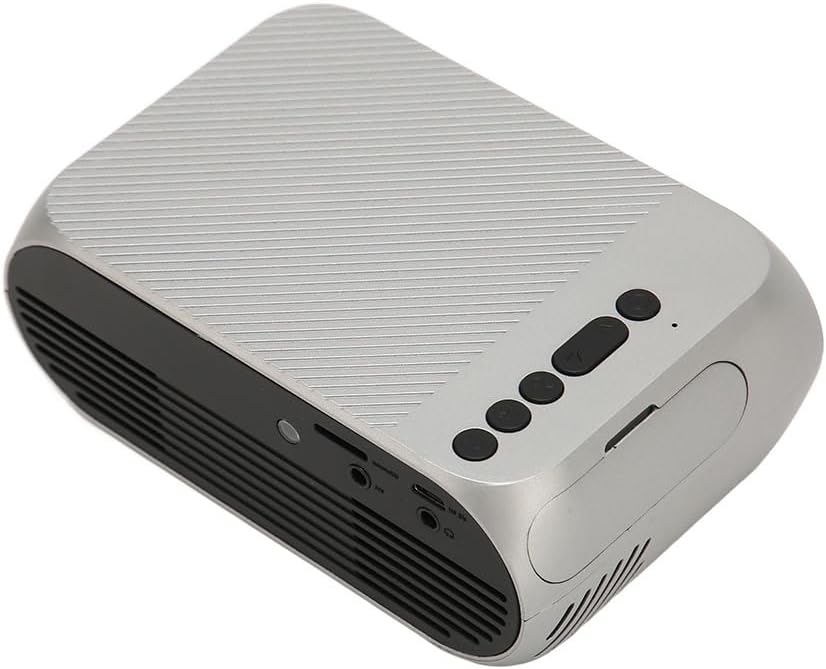
Whakaahua 3.3: Whakamuri me te taha view with input/output ports.
3.2 Tauranga Whakauru/Putanga
- HD Multimedia Interface (HDMI): For connecting devices like laptops, gaming consoles, and media players.
- Tauranga AV: Hei hono i ngā pūrere tawhito mā te whakamahi i te taura AV kua whakaurua.
- Tauranga USB: Mō te hono i ngā puku USB ki te purei pāpāho files tika.
- Whakauru Hiko: Mo te hono i te urutau hiko.
- Audio Output (3.5mm Jack): Mo te hono i nga kaikorero o waho, i nga taringa ranei.
4. Tatūnga
4.1 Whakanoho
Place the projector on a stable, flat surface. Ensure there is adequate space around the projector for ventilation. The ideal projection distance is between 1.5 to 2 meters for optimal image size and clarity.

Figure 4.1: Recommended projection distance and screen sizes.
4.2 Hononga Hiko
- Tūhonohia te pūurutau hiko ki te tauranga whakauru hiko o te pūwhiti.
- Plug the power adapter into a suitable electrical outlet (100-240V).
4.3 Te Hono i nga Puna Whakauru
The projector supports HD Multimedia Interface, AV, and USB inputs.

Figure 4.2: Projector compatibility with various devices.
- HD Multimedia Interface: Connect an HD Multimedia Interface cable from your source device (e.g., laptop, game console) to the projector's HD Multimedia Interface port.
- O: Connect the included AV cable to the projector's AV port and the corresponding audio/video output ports on your source device.
- USB: Insert a USB flash drive into the projector's USB port.
4.4 Whakatikatika Arotahi
After powering on the projector, rotate the focus wheel (usually located near the lens) until the projected image appears clear and sharp.
5. Nga Tohutohu Whakahaere
5.1 Kei te Hiko / Weto
- Hei Whakahiko: Press the Power Switch button on the projector or the power button on the remote control.
- Hei Whakaweto: Press the Power Switch button again. The projector will shut down.
5.2 Kōwhiringa Pūtake
After powering on, use the "Signal Source Button" on the projector or the "Source" button on the remote control to cycle through available input sources (HD Multimedia Interface, AV, USB).
5.3 Whakatere Tahua
Use the Direction Buttons and Confirm Button on the projector or the arrow keys and OK button on the remote control to navigate through the projector's on-screen menu for settings adjustments (e.g., picture mode, aspect ratio, sound settings).
5.4 Whakamahi Mana Mamao
Insert two AAA batteries (not included) into the remote control. Point the remote control towards the projector's IR receiver to operate functions such as power, source selection, volume, and menu navigation.
6. Tiaki
6.1 Te horoi i te Arotahi
Whakamahia he kakahu ngohengohe, kore-miro i hangaia mō ngā karāhe whatu hei muru mārire i te karāhe pūwhakaata. Kaua e whakamahi i ngā kaihoroi whakakoi, kaua hoki e whakamahi i te kaha nui rawa, nā te mea ka rakuraku pea te karāhe.
6.2 Whakapai Whanui
Wipe the exterior of the projector with a soft, dry cloth. Do not use liquid cleaners or solvents. Ensure the ventilation grilles are free from dust and debris to maintain optimal cooling.
7. Te Raru
| Raruraru | Take pea | Rongoā |
|---|---|---|
| Karekau he whakaahua i matapaetia |
|
|
| He koretake te whakaahua |
|
|
| Karekau he tangi |
|
|
| Ko te mana mamao kaore e mahi |
|
|
8. Whakatakotoranga
| Āhuahira | Taipitopito |
|---|---|
| Waitohu | Jectse |
| Tau tauira | Jectse3giz17bkpy |
| Whakatau | 1920*1080p |
| Puna Maama | LED |
| Te ora LED | 3000 haora |
| Tawhiti Matapae | 1.5-2m |
| Tauwehenga Matapae | 1.6:1 |
| Aspect Ratio | 16:9 |
| Whakauru Mana | 100-240V |
| Rahi Hua | 13 x 8.5 x 5 cm (tata ki te 5.1 x 3.3 x 2 inihi) |
| Taumaha Tūemi | 1.1 pauna |
| Hangarau Hononga | HD Multimedia Interface, AV, USB |
| Nga waahanga motuhake | Adjustable, Portable Design |
9. Pūtāhui me te Tautoko
For warranty information or technical support, please refer to the contact details provided with your purchase or visit the official Jectse webpae. Puritia to tohu hoko mo nga kereme whakamana.