1. Kupu Whakataki
Thank you for choosing the SFT Preamplifier Pickup System. This innovative device is designed to significantly enhance the acoustic properties of your guitar, providing rich, resonant tones and versatile effects. This manual will guide you through the installation, operation, and maintenance of your new preamppūnaha whakakaha.
2. Nga waahanga matua
- SFT (Same Frequency Trans) Technology: Drives the guitar body to phonate, increasing frequency response and making the sound more resonant, solid, and dynamic, even without an external ampkaikawe
- Ngā Pānga Whakauru: Features built-in Reverb, Chorus, and Delay effects for creative sound shaping.
- Dual-Pickup System: Combines a piezo pickup and a microphone to capture comprehensive details of your playing, adding extensiveness and dynamics.
- Hononga Nihokikorangi: Allows connection to a mobile phone for playing along with background music or tracks.
- Pūhiko Rechargeable: Equipped with a 2000mAh rechargeable Li-ion battery for portable use.
- Hanga Roa: Made from Acrylonitrile Butadiene Styrene (ABS) material.
3. Ihirangi mokete
Tena koa tirohia kei roto nga taonga katoa kei roto i te kete:
- 1 x SFT Preamplifier Pickup
- 1 x End-Pin Jack
- 1 x Vibrating Horn
- 1 x Pickup Wire
- 1 x Momo-C taura
- 2 x Topenga
4. Tatūnga me te Tāuta
Tuhipoka Nui: This is an on-board preamplifier system that requires opening holes in your guitar for proper installation. Professional installation by a qualified luthier or guitar technician is highly recommended to avoid damage to your instrument.
4.1. Nga Waahanga Nekeview

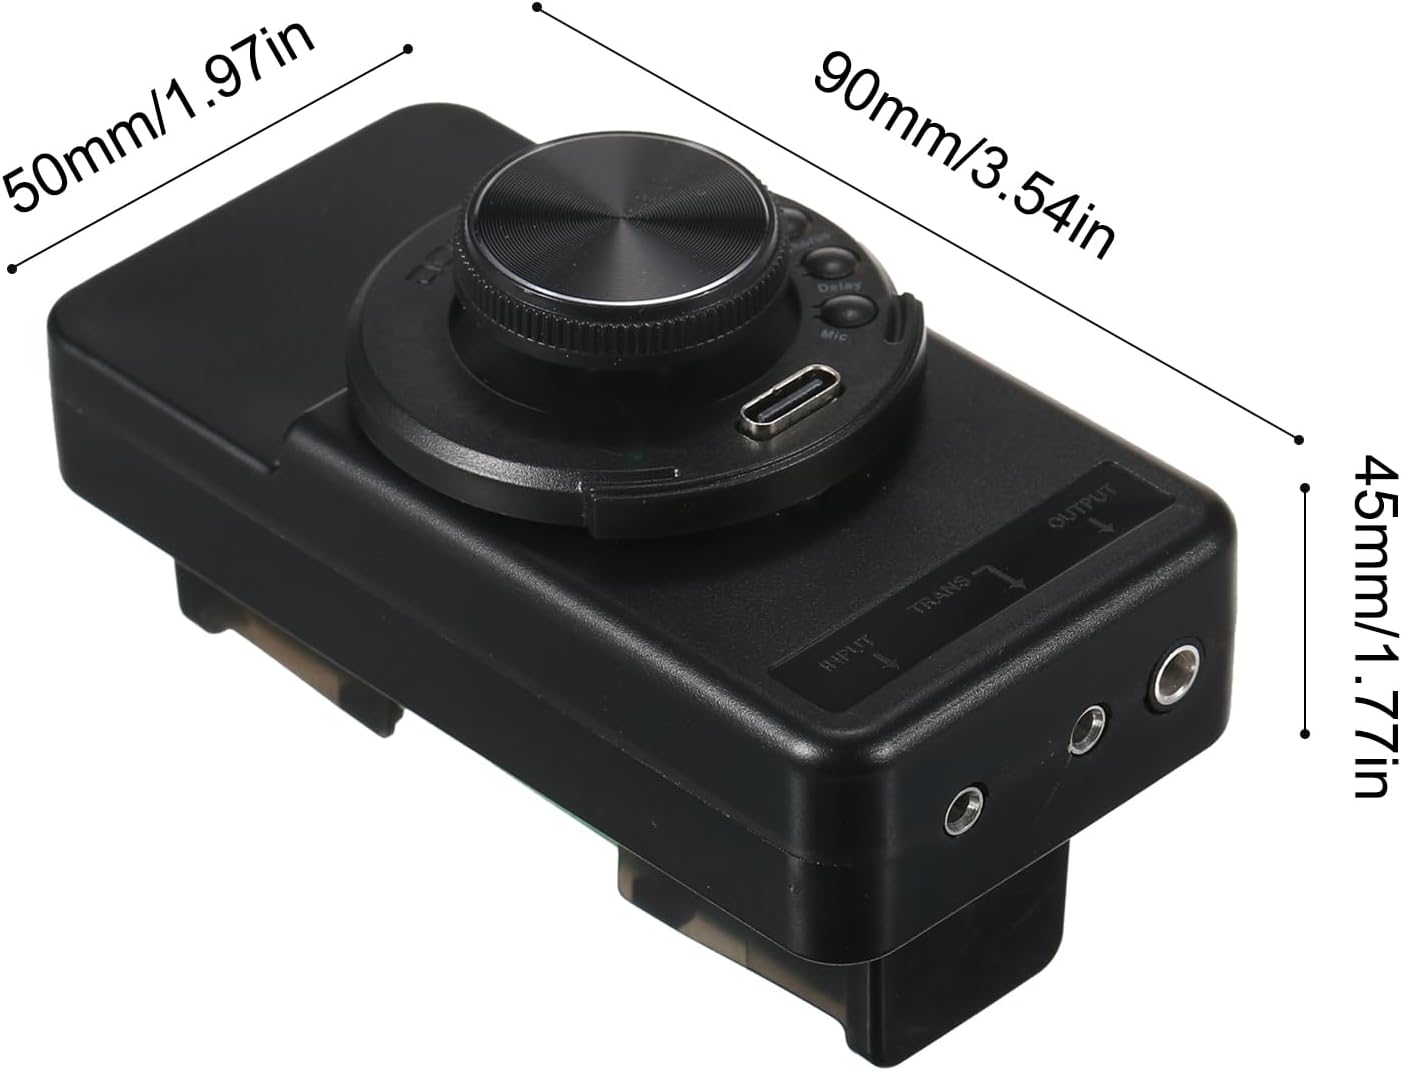
Whakaatu 4.1: Neke Atuview of the SFT Preamplifier Pickup System's controls and interfaces.
4.2. Installation Steps (Professional Installation Recommended)
- Whakaritea te Kītā: Carefully mark the locations for the preamplifier unit, end-pin jack, and vibrating horn on your guitar.
- Rua rua: Precisely drill the necessary holes for mounting the components. Ensure correct sizing to prevent damage.
- Install End-Pin Jack: Secure the end-pin jack at the designated location, typically at the bottom of the guitar.
- Mount Vibrating Horn: Install the vibrating horn inside the guitar body, ensuring it has clear contact with the soundboard for optimal resonance transmission.
- Connect Pickup Wire: Connect the pickup wire from the piezo pickup (usually under the saddle) to the preampwae lifier.
- Tāutahia Tuhinga o muaampWaeine whakaahuru: Mount the preamplifier unit securely, ensuring all connections are firm.
- Kōkuhu Pūhiko: Open the battery compartment and insert the 2000mAh rechargeable battery. Ensure correct polarity.

Figure 4.2: Battery compartment with 2000mAh battery.
5. Nga Tohutohu Whakahaere
5.1. Te Whakakaha/Weto
Locate the power button or switch on the preamplifier unit. Press and hold (or toggle) to power the unit on or off. The Dial LED Lamp will illuminate when the unit is active.
5.2. Adjusting Effects
Tuhinga o muaamplifier features dedicated controls for Reverb, Chorus, and Delay effects. Rotate the corresponding knobs to adjust the intensity of each effect. Experiment with different settings to find your desired sound.
5.3. Bluetooth (BT) Connection
The unit is equipped with Bluetooth functionality (BT5.0). To connect to your mobile phone or other Bluetooth-enabled device:
- Me whakarite i te muaampKei te whakakahangia te kaiwhakarewa.
- Whakahohehia te Nihokikorangi i runga i to taputapu pūkoro.
- Rapua available devices. The preamplifier should appear as a discoverable device.
- Tīpakohia te muaamplifier from the list to pair. Once paired, you can play background music through the system, which will be mixed with your guitar sound.

Figure 5.1: Bluetooth and other features.
5.4. Whakamahinga Waorooro
The system includes a microphone as part of its dual-pickup setup. For the microphone to be effective and audible, the preamplifier must be connected to an external speaker or amplifier. Adjust the 'Mic' control knob to blend the microphone signal with the piezo pickup signal.
6. Tiaki
6.1. Te Whakataki i te Pūhiko
Tuhinga o muaamplifier is equipped with a 2000mAh rechargeable battery. When the battery indicator shows low power, connect the provided Type-C cable to the charging port on the unit and to a suitable USB power source. The charging rate is increased by 50% with the Type-C interface.

Figure 6.1: Charging the preamplifier via Type-C cable.
6.2. Te horoi
Wipe the unit with a soft, dry cloth. Do not use abrasive cleaners or solvents, as these may damage the finish or internal components.
6.3. Rokiroki
When not in use for extended periods, store the preamplifier in a cool, dry place away from direct sunlight and extreme temperatures. It is advisable to fully charge the battery before long-term storage.
7. Te Raru
- Kore Putanga Oro:
- Ensure the unit is powered on and fully charged.
- Check all cable connections (pickup wire, end-pin jack to ampkaikawe).
- Verify that the volume on your amplifier/speaker is turned up.
- Kaore i te Mahi:
- The microphone requires connection to an external speaker or amplifier to be effective. Ensure your system is connected.
- Adjust the 'Mic' control knob to increase the microphone signal.
- Nga Take Hononga Nihokikorangi:
- Me whakarite i te muaamplifier is in pairing mode or discoverable.
- Whakawetohia me te Nihokikorangi i runga i to taputapu pūkoro.
- Move closer to the preamplifier to ensure you are within Bluetooth range.
- Poor Resonance/Effects:
- Ensure the vibrating horn is properly installed and making good contact with the guitar's soundboard.
- Adjust the Reverb, Chorus, and Delay knobs to desired levels.
8. Whakatakotoranga
Whakaatu 8.1: Nga Ahua Hua.
| Āhuahira | Whakatakotoranga |
|---|---|
| Tauira | OS1 Resonance Pickup |
| Rauemi | Acrylonitrile Butadiene Styrene (ABS) |
| Pūhiko | 1 x 2000mAh rechargeable Li-ion battery |
| Rahi Tuemi | 90 x 50 x 45 mm (3.54 x 1.97 x 1.77 inihi) |
| Taumaha Tūemi | 207 g (7.30 oz) |
| Pūrere Hototahi | Kitara |
| Tae | Pango |
| Whenua Taketake | Haina |
9. Pūtāhui me te Tautoko
Specific warranty information for this product is not provided in the available documentation. For details regarding warranty coverage, technical support, or service, please refer to the manufacturer's official webpaetukutuku, whakapā atu rānei ki te kaihokohoko nāna koe i hoko mai te hua. Puritia tō taunakitanga hoko mō ngā kereme pūtāhui katoa.


