
hosabely SK500
Hosabely SK500 Podcast Equipment Bundle Audio Interface User Manual
Tauira: SK500
Kupu Whakataki
This manual provides detailed instructions for setting up, operating, and maintaining your Hosabely SK500 Podcast Equipment Bundle. Please read this manual thoroughly before using the product to ensure proper function and longevity.

Image: The Hosabely SK500 Podcast Equipment Bundle, featuring the audio interface, microphone, and stand.
Ihirangi mokete
Manatokona kei roto katoa nga mea kei roto i to kete:
- 1x Audio Interface Mixer (SK500)
- 1x XLR to 3.5mm Microphone
- 1x Tu Tripod
- 1x Wired Headphones
- 1x Microphone Cable (XLR-3.5mm)
- 1x Tiki Panui USB XNUMXx
- 2x 3.5mm Audio Cables
- 1x Pukapuka Kaiwhakamahi Ingarihi
Aratohu Tatūnga
Follow these steps to set up your Hosabely SK500 Podcast Equipment Bundle.
1. Te Whakakaha me te Tatūnga Tuatahi
- Whakahiko: Long press the power button on the audio interface for approximately 5 seconds until the lights illuminate. The Bluetooth indicator will flash, indicating it's ready for pairing.
- Connect Headphones/Earphones: Plug your wired headphones or earphones into the designated "Earphone" port on the audio interface.
- Honoa te Hopuoro: Plug the microphone cable into either "MIC 1" or "MIC 2" port on the audio interface.
- Utu Pūrere: Connect the USB charging cable from the "Charging Port" on the audio interface to a power bank or adapter for charging.
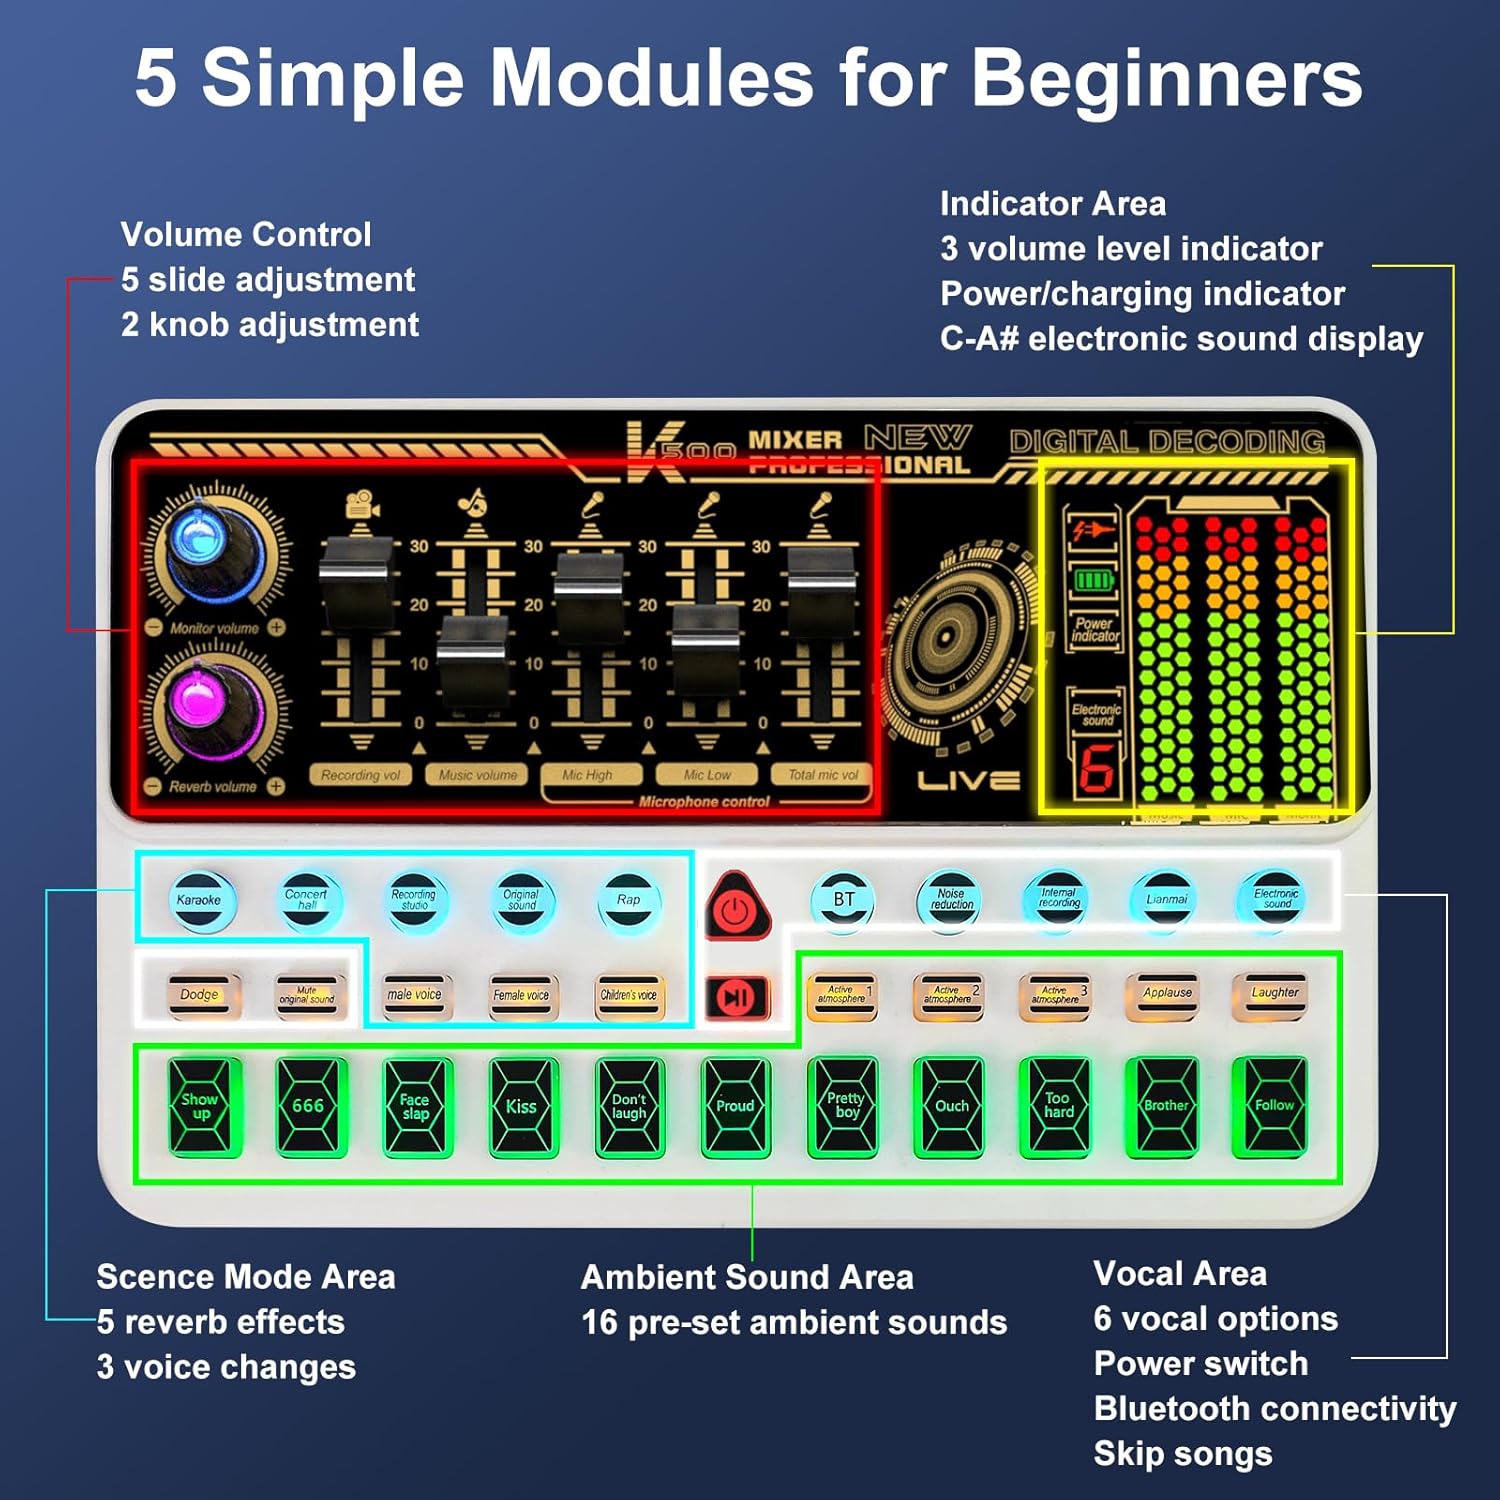
Whakaahua: Ka mutuview of the SK500 audio interface controls and indicators.
2. Connecting to a Phone or Tablet
- Tauira Nihokikorangi: On your phone or tablet, enable Bluetooth and search for "SK500". Select it to pair.
- Hononga Waea (Whiringa): For phones without a 3.5mm jack, an OTG adapter (not included) is required. Connect a USB cable from the "OTG" port on the audio interface to your phone's USB port.
- Putanga Ora: Connect one of the 3.5mm audio cables from the "Live" port on the audio interface to your phone's 3.5mm audio input (if available).
Video: Instructions on how to connect the SK500 sound board to your phone or pad.

Image: Diagram illustrating various connection methods for the SK500, including single phone, dual phone, phone+PC/laptop, and PC/laptop only setups.
3. Connecting to a PC or Laptop
- Hononga USB: Connect the USB charging cable from the "Charging Port" on the audio interface to your PC/laptop's USB port.
- Tīpakonga Putanga Ororongo: On your PC/laptop, navigate to Sound Settings. Select "SK500 Studio" as the output device.
Video: Instructions on how to connect the SK500 sound board to your PC or laptop.
4. Connecting to a PS5
- Hononga USB: Connect the USB charging cable from the "Charging Port" on the audio interface to an available USB port on your PS5.
- Input/Output Device Selection: On your PS5, go to Settings > Sound.
- For Microphone Input Device, select "USB Headset (SK500)".
- For Audio Output Device, select "USB Headset (SK500)".
- Whakaritea te taumata hopuoro: Adjust the microphone level in the PS5 settings to ensure optimal input volume.
Video: Instructions on how to connect the SK500 sound card to a PS5 console.
Nga Tohutohu Whakahaere
The SK500 audio interface offers intuitive controls for various audio functions.
1. Mana Volume
The soundboard features 5 volume faders for precise adjustment:
- Rōrahi hopuoro: Adjusts the input level of the connected microphone(s).
- Rōrahi Apiti: Controls the volume of background music or tracks.
- Rōrahi tuhi: Sets the overall recording level.
- Rōrahi Aroturuki: Adjusts the volume for your monitoring headphones.
- Reverb Volume: Controls the intensity of the reverb effects.

Image: Close-up of the SK500 audio mixer showing the 5 individual volume faders for precise control over microphone, music, and recording levels.
2. Voice Change Options
The SK500 offers 3 voice change options for creative alterations:
- Te Reo Tane
- Te Reo Wahine
- Te Reo Tamariki

Image: The SK500 audio mixer highlighting the voice changer buttons for male, female, and child voices.
3. Reverb Modes and Sound Effects
Enhance your audio with various effects:
- 5 Reverb Modes: Includes Echo, Reverb, and Original Sound.
- 16 Preset Sound Effects: A variety of ambient sounds to enrich your recordings or performances.

Image: The SK500 audio mixer displaying the various sound effect buttons and reverb mode options.
4. Āhuatanga Arā
- Whakaiti Haruru: Ka whakaiti i te haruru papamuri kia mārama ake ai te oro.
- Whakarei Reo: Improves vocal clarity and presence.
- Paera: Ka whakaheke aunoa i te puoro papamuri ina kitea te whaikorero.
- Tango Waiata: Isolates instrumental tracks by removing lead vocals.
- Whakamuri: Allows internal recording of audio output back into the system (useful for PC).
- Nihokikorangi 5.0: For seamless wireless accompaniment track input.
- Dual-Device Broadcasting: Supports simultaneous broadcasting to two devices.
- Aroturuki Wā-tūturu: Allows for easy control of audio output during live sessions.

Image: The SK500 mixer shown in a streaming setup, compatible with various live broadcast applications.
Whakamahinga hopuoro
The included XLR to 3.5mm microphone features a cardioid pickup pattern, designed to capture sound sources directly in front of it with precision. The adjustable tripod stand provides stable positioning and anti-vibration properties.
Tuhipoka: The XLR microphone supports 3.5mm MIC input only and cannot be used with phantom power. Ensure proper connection to the MIC ports on the audio interface.

Image: The included XLR to 3.5mm microphone with its tripod stand, highlighting its cardioid pickup pattern and low noise features.
Te tiaki
- Te horoi: Use a soft, dry cloth to clean the surface of the audio interface and microphone. Avoid using liquid cleaners or abrasive materials.
- Rokiroki: Whakaorangia te taputapu ki te waahi makariri, maroke atu i te ra tika me te wera nui.
- Tiaki taura: Handle cables carefully to prevent damage. Avoid sharp bends or excessive pulling.
Raparongoā
- Kore Putanga Oro:
- Check all cable connections (headphones, speakers, live output).
- Ensure volume faders on the audio interface are not at minimum.
- Verify correct input/output device selection on your connected phone, PC, or PS5.
- Kaore i te Mahi:
- Confirm the microphone is securely plugged into a "MIC" port.
- Adjust the microphone volume fader.
- Remember the microphone does not support phantom power.
- Nga Take Hononga Nihokikorangi:
- Ensure Bluetooth is enabled on both the audio interface and your device.
- Check that "SK500" is selected and paired in your device's Bluetooth settings.
- Ngana ki te whakaara ano i nga taputapu e rua.
- Poor Sound Quality / Noise:
- Activate the noise reduction feature on the audio interface.
- Ensure all cables are properly shielded and not damaged.
- Adjust microphone gain and output levels to avoid clipping or distortion.
- Phone Connectivity (No 3.5mm Jack):
- An OTG adapter (not included) is required for wired connection to phones without a 3.5mm jack.
Whakatakotoranga
| Āhuahira | Taipitopito |
|---|---|
| Waitohu | hosabely |
| Tauira | SK500 |
| Taumaha Tūemi | 2.14 pauna |
| Hunga Hua | 5.11 x 7.87 x 1.96 inihi |
| Pūhiko | 1 te pākahiko Lithium Polymer e hiahiatia ana (kei roto) |
| Tae | Mā |
| Pūrere Hototahi | Headphone, Laptop, Microphone, Smartphone, Speaker |
| Pūnaha Mahi | Android, iOS |
| Hangarau Hononga | USB, Nihokikorangi 5.0 |
| Te maha o nga hongere | 2 |
Pūtāhui me te Tautoko
For any issues or questions regarding your Hosabely SK500 Podcast Equipment Bundle, please feel free to contact us. We are committed to resolving any problems within 12 hours.
Tena tirohia to tuhinga hoko mo nga taipitopito whakamana.
Ask a question about this manual
Ask about setup, troubleshooting, compatibility, parts, safety, or missing instructions. Manuals+ will review the question and use this page’s manual context to help answer it.