
1. Kupu Whakataki
Welcome to the instruction manual for your Jectse WiFi 6 4G/5G CPE LTE Router. This document provides essential information on how to set up, operate, maintain, and troubleshoot your device. Please read this manual carefully before using the product to ensure optimal performance and longevity.
The Jectse WiFi 6 Router is designed to provide high-speed internet connectivity by converting a 4G LTE signal into a Wi-Fi hotspot, supporting multiple devices simultaneously. Its robust design with four antennas ensures stable and wide coverage.
2. Hua Neke Atuview
2.1 Nga waahanga matua
- 4G LTE Support: Compatible with multiple 4G LTE bands, including FDD B1, B3, B5, B7, B8, B20, TDD B38, B40, B41, and WCDMA B1, B5, B8. This ensures versatile connectivity across various networks.
- Tere Tere: Experience 4G download speeds up to 150 Mbps and upload speeds up to 50 Mbps. Wireless transfer rates reach up to 300 Mbps for smooth streaming, gaming, and browsing.
- Tatūnga ngawari: Simply insert a standard SIM card to transform the 4G LTE signal into a Wi-Fi hotspot. Enjoy immediate internet access with minimal configuration.
- Te kaha o te taputapu: Connect up to 32 devices simultaneously, including smartphones, tablets, and PCs, within a maximum coverage area of 300 square meters.
- Hoahoa Pūihi 4-: Equipped with four antennas for enhanced signal coverage, faster network speeds, and stable connectivity throughout your space.
2.2 Ihirangi mokete
Tena koa tirohia te pouaka mo nga mea e whai ake nei:
- 1 x Jectse WiFi 6 4G/5G CPE LTE Router
- 1 x Pūurutau Hiko
- 1 x Ite Itene
- 1 x Tauira USB
- 1 x Manual Kaiwhakamahi (tenei tuhinga)

Image: Jectse WiFi 6 Router with its power adapter, Ethernet cable, and USB cable.
3. Tohutohu Tatūnga
Follow these steps to set up your Jectse WiFi 6 Router:
- Wewetehia te Pouara: Tangohia marietia te pouara me ngā taputapu katoa i roto i te takai.
- Kōkuhu Kāri Sim: Locate the SIM card slot on the side of the router. Insert a standard-sized 4G LTE SIM card into the slot until it clicks into place. Ensure the SIM card is correctly oriented as indicated by the diagram near the slot.

Whakaahua: Taha view of the router highlighting the SIM card slot and USB/WAN/LAN ports.
- Hono Hono: Connect the power adapter to the router's power input port and then plug the adapter into a wall outlet. The router will power on automatically.
- Whakahiko: Wait for the router's indicator lights to stabilize. The Wi-Fi and network status lights should indicate a successful connection.
- Optional: Wired Connection: If you prefer a wired connection, connect one end of the Ethernet cable to the WAN/LAN port on the router and the other end to your computer or another network device.
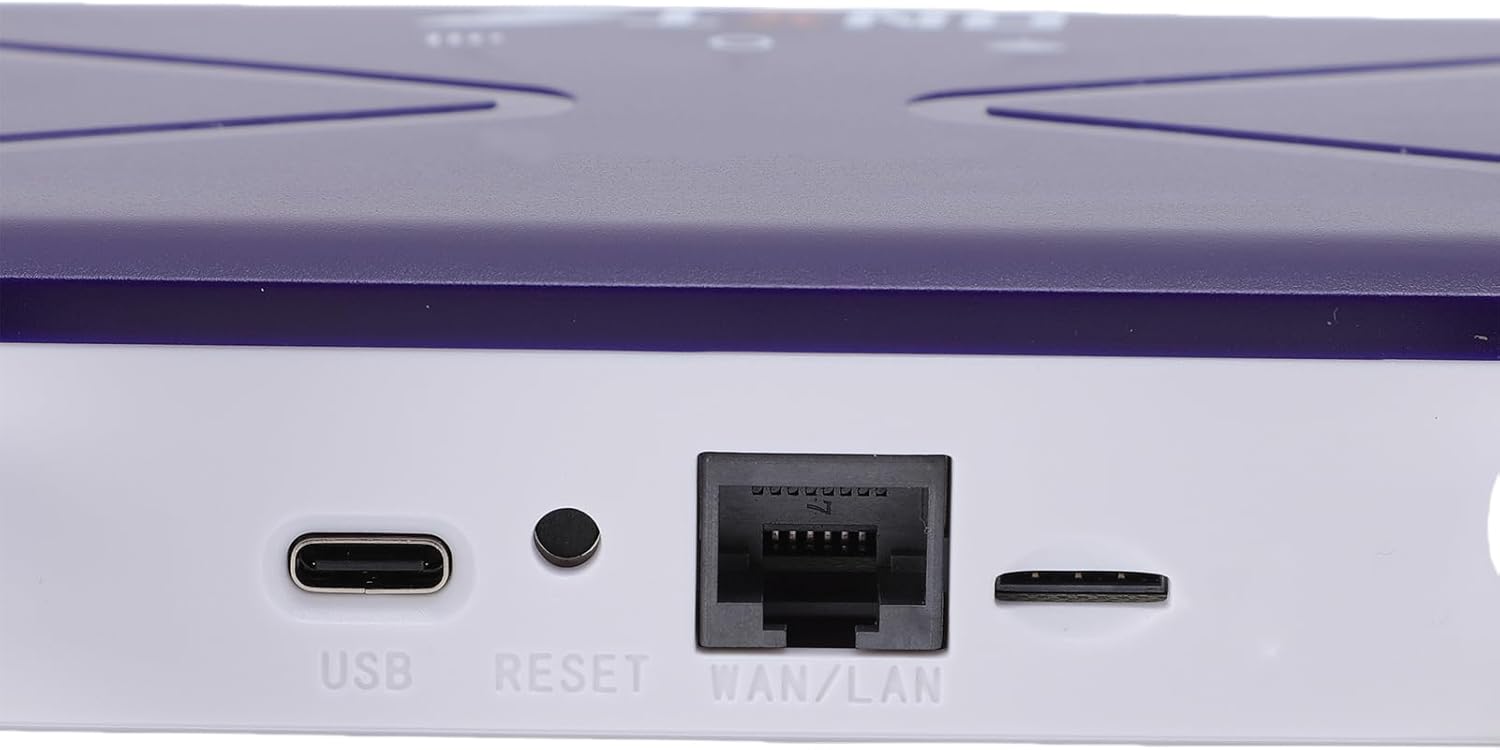
Image: Close-up of the router's rear panel showing the USB port, Reset button, and WAN/LAN port.
4. Nga Tohutohu Whakahaere
4.1 Te hono ki Wi-Fi
To connect your devices to the router's Wi-Fi network:
- I runga i tō pūrere (waea atamai, papa, pona), whakatuwheratia ngā tautuhinga Wi-Fi.
- Rapua available Wi-Fi networks. The router's default Wi-Fi network name (SSID) and password (Wi-Fi Key) are typically printed on a label on the bottom of the router.
- Select the router's SSID from the list.
- Enter the Wi-Fi Key when prompted. The default Wi-Fi Key is usually 1234567890.
- Kia honoa, me whai urunga ipurangi tō pūrere.

Image: Bottom label of the router displaying default Wi-Fi Key and Web Wāhitau IP.
4.2 Te Uru Atu ki ngā Tautuhinga Pouara
To manage your router settings, such as changing the Wi-Fi name or password, or configuring advanced network options:
- Connect your device to the router's Wi-Fi network or via an Ethernet cable.
- Tuwhera a web pūtirotiro (hei tauira, Chrome, Firefox, Edge).
- I te pae wāhitau, patohia te taunoa Web Wāhitau IP: 192.168.100.1 ka pehi i te tomo.
- You will be prompted for a username and password. Refer to the label on the bottom of your router for default login credentials.
- Once logged in, you can customize your network settings.
4.3 Te Kapinga Whatunga
The router provides Wi-Fi wireless coverage and supports network port wired output for various environments.

Image: Diagram showing the router's Wi-Fi coverage and wired output capabilities.
5. Tiaki
To ensure the optimal performance and longevity of your router, consider the following maintenance tips:
- Turanga: Whakatakotoria te pouara ki tētahi wāhi pokapū, kia matara atu i ngā mea aukati, i ngā mea whakarewa nunui, me ētahi atu taputapu hiko ka pāngia ai e te pokanoa.
- Whakahau: Ensure the router has adequate ventilation. Do not cover the ventilation holes or place it in an enclosed space.
- Te horoi: Gently clean the router's exterior with a soft, dry cloth. Avoid using liquid cleaners or aerosols.
- Whakahōu Firmware: Tirohia i ia wa i te kaihanga website for firmware updates. Keeping your router's firmware up-to-date can improve performance, security, and add new features.
- Hurihanga Hiko: If you experience minor network issues, try power cycling the router by unplugging it from the power outlet for 10-15 seconds and then plugging it back in.
6. Te Raru
Mena ka pāngia koe e ngā raruraru me tō pouara, tirohia ngā raruraru me ngā otinga e whai ake nei:
- Kaore he Hononga Ipurangi:
- Tirohia mēnā kua tika te whakaurunga o te kāri SIM, ā, kua whakahohea rānei.
- Verify that the router's network indicator lights are stable and show a connection.
- Ensure your SIM card has an active data plan.
- Try power cycling the router.
- Ngā Tere Wi-Fi Pōturi:
- Whakatata atu ki te pouara hei whakapai ake i te kaha tohu.
- Reduce the number of connected devices if many are actively using bandwidth.
- Tirohia mo te pokanoa mai i etahi atu taputapu hiko.
- Tīmataria anō te pouara.
- Kāore e taea te Tūhono ki Wi-Fi:
- Ensure you are entering the correct Wi-Fi password (Wi-Fi Key).
- Check if the Wi-Fi function on the router is enabled (refer to router settings via web atanga).
- Tīmata anō i te pouara me tō pūrere hono.
- Karekau te Pouara Whakautu:
- Perform a hard reset by pressing and holding the 'RESET' button (located near the WAN/LAN port) with a pin for about 10 seconds until the lights flash. This will restore the router to factory default settings, including the default Wi-Fi name and password.
7. Whakatakotoranga
| Āhuahira | Whakatakotoranga |
|---|---|
| Tau tauira | Jectseak28xtdzqf |
| Paerewa Wi-Fi | 802.11b/g/n |
| Auau Ahokore | 2.4 GHz |
| 4G LTE Bands (FDD) | B1, B3, B5, B7, B8, B20 |
| 4G LTE Bands (TDD) | B38, B40, B41 |
| Nga Roopu WCDMA | B1, B5, B8 |
| Tere Tikiake Max | 150 Mbps |
| Tere Tukuake Max | 50 Mbps |
| Wireless Transfer Rate | 300 Mbps |
| Kāri Kāri Sim | SIM Paerewa |
| Antenna | 4 |
| Built-in Firewall | Ae |
| Max Pūrere Hono | 32 |
| Te Rohe Kapi | Tae atu ki te 300 m² |
| Kaihanga | Jectse |
| Whenua Taketake | Haina |
8. Pūtāhui me te Tautoko
8.1 Nga Korero Whakaputanga
This Jectse WiFi 6 4G/5G CPE LTE Router comes with a 2 tau te whakamana a te kaiwhakanao mai i te ra o te hokonga. Ka kapi tenei raihana i nga hapa o nga rawa me nga mahi i raro i te whakamahinga noa. Tena koa pupurihia to tohu mo te hoko mo nga kereme whakamana.
The warranty does not cover damage caused by misuse, accidents, unauthorized modifications, or external factors such as power surges.
8.2 Tautoko Kiritaki
For technical assistance, troubleshooting beyond this manual, or warranty inquiries, please contact your retailer or the Jectse customer support team. Refer to the contact information provided with your purchase or visit the official Jectse webpae mo nga rauemi tautoko.