1. Kupu Whakataki
Thank you for choosing the Gawfolk 32-inch 4K 144Hz Gaming Monitor. This monitor is designed to provide an immersive visual experience with its 4K UHD resolution, high refresh rate, and adaptive synchronization technology. This manual provides essential information for setting up, operating, maintaining, and troubleshooting your monitor to ensure optimal performance and longevity.
2. Nga korero haumaru
- Pānuihia ngā tohutohu katoa i mua i te whakamahinga o te mata.
- Puritia te matawai kia matara atu i te wai, te makuku me te pāmahana tino kino.
- Kaua e aukati i nga tomokanga hau.
- Use only the power adapter provided with the monitor.
- A ape i te whakatakoto i nga mea taumaha ki runga i te taura hiko.
- Momotuhia te mono hiko mai i te putanga ki te kore e whakamahia te aroturuki mo te wa roa.
- Tukuna nga ratonga katoa ki nga kaimahi ratonga whai tohu.
3. Tatūnga
3.1 Te Wetewete pouaka me nga Ihirangi
Kia ata tangohia nga waahanga katoa mai i te kete. Me whakarite kei te noho katoa nga mea kei raro nei:
- Gawfolk 32-inch 4K 144Hz Monitor
- Tu Aroturuki (Turanga me te kaki)
- Pūurutau Hiko
- Tauera HDMI
- Papanga Whakaatu
- Pukapuka Kaiwhakamahi
3.2 Huihuinga Tu
- Whakanohia te mata o te aroturuki ki runga i te mata ngawari, ma kia kore e pakaru.
- Attach the stand neck to the back of the monitor using the provided screws. Ensure it is securely fastened.
- Attach the stand base to the stand neck, tightening the screw at the bottom of the base.
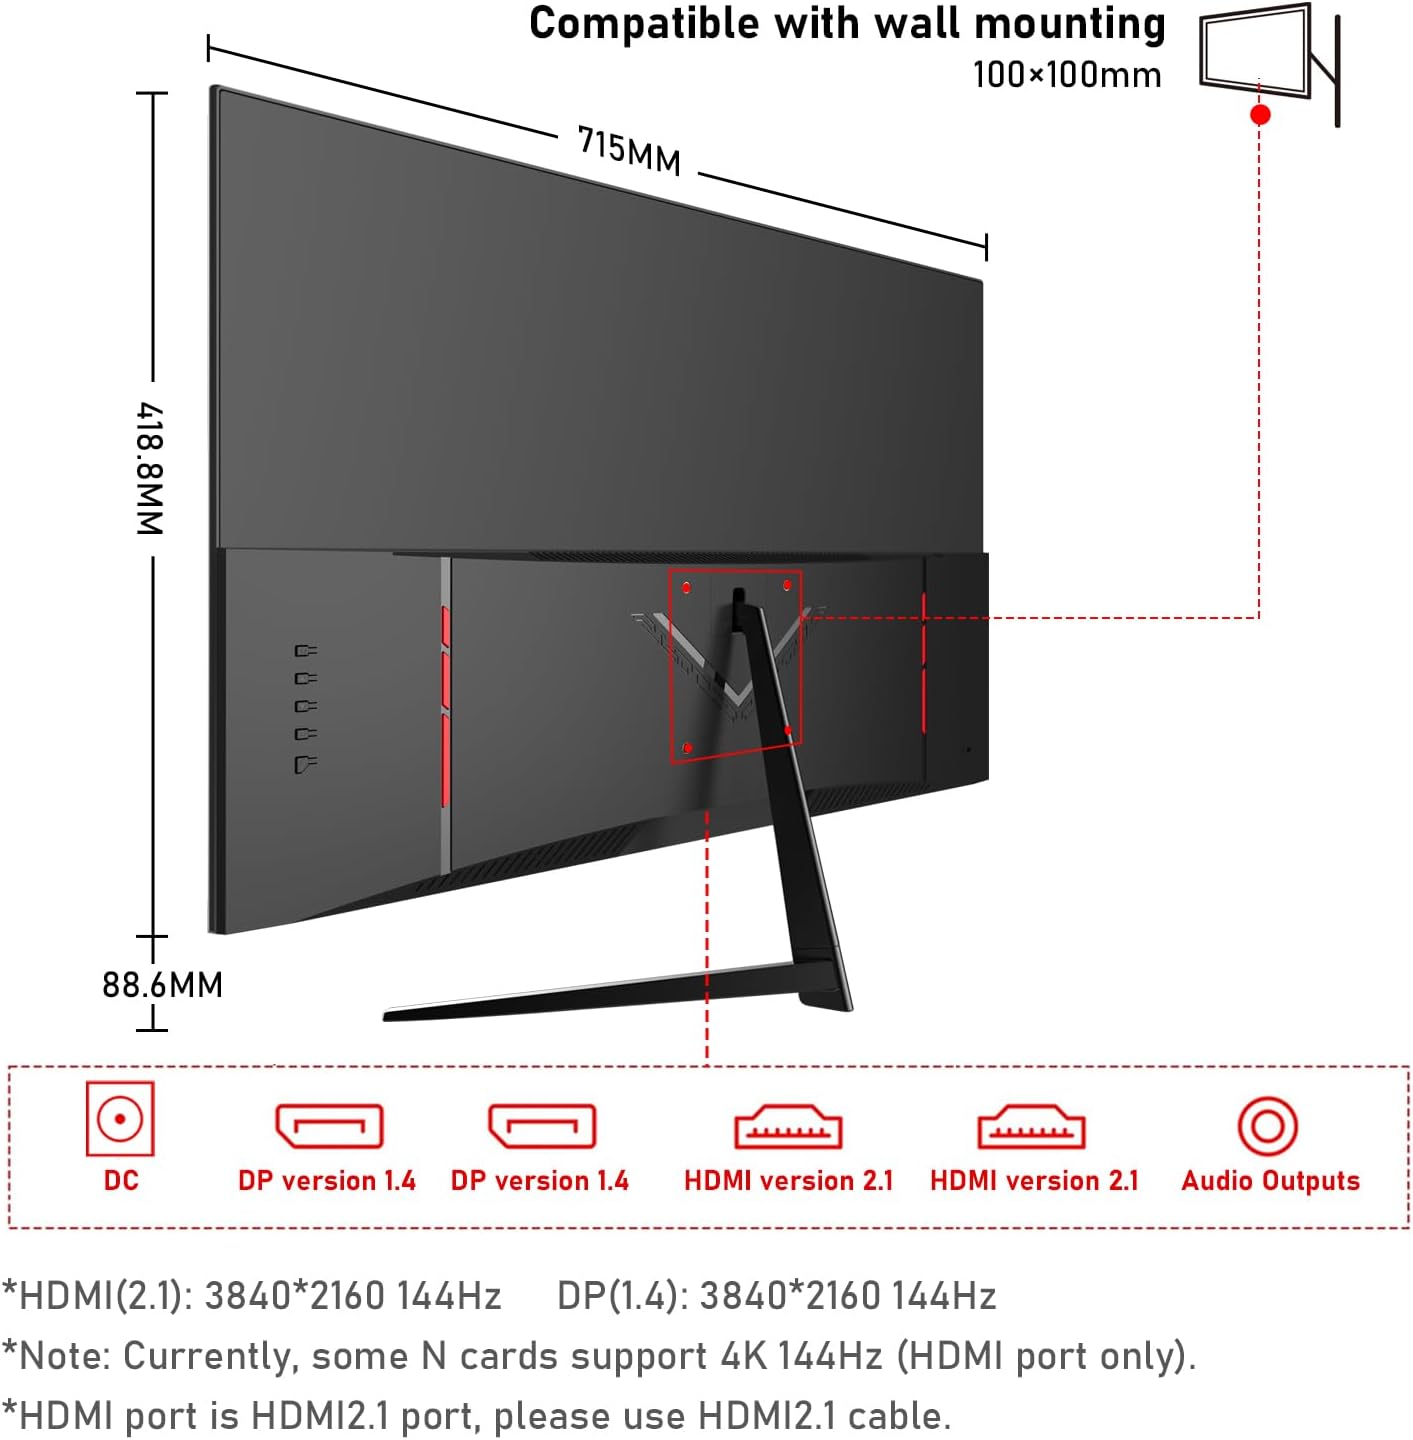
3.3 Te hono i te Aroturuki
Honoa te kaupane ki to rorohiko, ki etahi atu taputapu ma te whakamahi i nga taura tika.
- Hononga Hiko: Connect the power adapter to the monitor's DC input port, then plug the adapter into a power outlet.
- Hononga Ataata:
- For 4K@144Hz, use an HDMI 2.1 cable (if your graphics card supports it) or a DisplayPort 1.4 cable.
- Connect one end of the HDMI or DisplayPort cable to the corresponding port on your monitor and the other end to your computer's graphics card.
- Hononga Ororongo: If you wish to use external speakers or headphones, connect them to the 3.5mm audio output port on the monitor.
3.4 Hiko Tuatahi
Press the power button on the monitor. The monitor should display the Gawfolk logo and then your computer's desktop. If no image appears, ensure all cables are securely connected and the correct input source is selected in the monitor's On-Screen Display (OSD) menu.
4. Whakahaere i te Aroturuki
4.1 Tahua Whakaatu Ma-Mata (OSD).
The OSD menu allows you to adjust various monitor settings. Typically, buttons are located on the back or bottom edge of the monitor. Use these buttons to navigate the menu and select options.
4.2 Tautuhinga Whakaatu
- Whakatau: The monitor supports 4K UHD (3840 x 2160) resolution. Ensure your computer's display settings are configured to this resolution for the sharpest image.
- Rere tāmata: For smooth visuals, especially in gaming, set the refresh rate to 144Hz in your computer's display settings.
- Tautuhinga Tae: This monitor offers 100% sRGB coverage and 16.7 million colors for vibrant and accurate color reproduction. Adjust brightness, contrast, and color temperature via the OSD menu to suit your preference.

4.3 Nga waahanga petipeti
- Wā Urupare 1ms: The monitor features a 1ms response time (GTG), minimizing motion blur and ghosting for a more responsive gaming experience.
- Adaptive Sync (FreeSync): This technology synchronizes the monitor's refresh rate with your GPU's frame rate, eliminating screen tearing and stuttering. Enable FreeSync in your graphics card settings and the monitor's OSD menu.

4.4 Hangarau Tiaki Kanohi
The monitor incorporates low blue light and flicker-free technology to reduce eye strain during prolonged use. These features are designed to enhance viewing whakamarie.
4.5 Built-in Dual Speakers
The monitor includes built-in dual speakers, providing convenient audio without the need for external speakers. You can adjust the volume through your computer's audio settings or the monitor's OSD menu.

5. Tiaki
- Te horoi i te Mata: Whakamahia he kakahu ngohengohe, karekau he ngongo paku dampened with water or a specialized screen cleaner. Do not spray cleaner directly onto the screen.
- Te horoi i te Casing: Whakamahia he kakahu ngohengohe, maroke hei muru i te aroturuki casing. A ape i te whakamahi i nga kai horoi me nga whakarewa.
- Whakahau: Ensure the ventilation openings on the monitor are clear and not obstructed to prevent overheating.
6. Te Raru
- Kore Mana: Check if the power cable is securely connected to both the monitor and the power outlet. Ensure the power adapter is functioning.
- Kore he Atahanga: Verify that the video cable (HDMI/DisplayPort) is correctly connected to both the monitor and the computer. Ensure the correct input source is selected in the OSD menu.
- Mata Matapihi: Check the video cable connection. Ensure the refresh rate is set correctly in your computer's display settings. Enable Adaptive Sync if supported by your graphics card.
- Kounga Atahanga Kino: Adjust resolution, brightness, contrast, and color settings via the OSD menu. Ensure the video cable is not damaged.
- Kore Oro: Check the audio cable connection (if using external speakers/headphones). Adjust volume settings on both the monitor and your computer. Ensure the correct audio output device is selected on your computer.
7. Whakatakotoranga
| Āhuahira | Whakatakotoranga |
|---|---|
| Waitohu | Karekau |
| Tau tauira | GF320L |
| Rahi Mata | 32 Inihi |
| Whakatau | 4K UHD 2160p (3840 x 2160 Pixels) |
| Rere tāmata | 144 Hz |
| Wā Whakautu | 1 Millisecond (GTG) |
| Aspect Ratio | 16:9 |
| Momo Whakaatu | LED (VA Technology) |
| Whakaahua Mata Mata | Moataata |
| Āhuahira Motuhake | Kopikopiko |
| Viewing Koki | 178 Waeine |
| Tirohanga | 320 cd/m² |
| Uara Gamut Tae | 120% sRGB |
| Whakanuia Kounga Atahanga | Eye-Care + Adaptive Sync |
| Hononga taputapu | 2x HDMI, 2x DisplayPort, 3.5mm Audio |
| Adaptive Synchronization | FreeSync |
| Tae | Pango |
| Taumaha Tūemi | 6.34 Kirokaramu |
| Rahi Tūemi (D x W x H) | 50.7 x 71.5 x 19 Henemita |
8. Pūtāhui me te Tautoko
Gawfolk provides a 12-month after-sales service for this monitor. If you encounter any issues during use, please do not hesitate to contact our customer support for assistance. Our team is dedicated to ensuring your satisfaction.