1. Kupu Whakataki
This manual provides detailed instructions for the proper installation, operation, and maintenance of your Lanzar RBHTG414 Heritage 600 Watt 4-Channel MOSFET Amplifier. To ensure optimal performance and safety, please read this manual thoroughly before attempting to install or operate the ampkaiwhakarewa. Puritia tenei pukapuka hei tohutoro a meake nei.
2. Nga Tohutohu Haumaru
Kia mau tonu nga whakaritenga haumaru e whai ake nei i te wa e whakauru ana me te mahi:
- Disconnect the vehicle's negative battery terminal before beginning any installation work to prevent electrical shorts.
- Me whakarite kia tika te rere o nga waea katoa kia kore ai e pakaru nga taha koi, nga waahanga neke ranei.
- Whakamahia ngā waea ine tika mō ngā hononga hiko me te whenua e ai ki te wāhanga tāutanga.
- Tāutahia te amphe whakamahana ki tetahi waahi e taea ai te whai hau kia kore e wera rawa.
- A ape i te whakapuru i te ampwhakawerawera i ngā wāhi e pāngia ana e te makuku, e te nui rawa rānei o te wiri.
- Kaua e ngana ki te whakatika, ki te whakarereke ranei i te ampTukuna ngā mahi tiaki katoa ki ngā kaimahi whai tohu.
3. Hua Neke Atuview
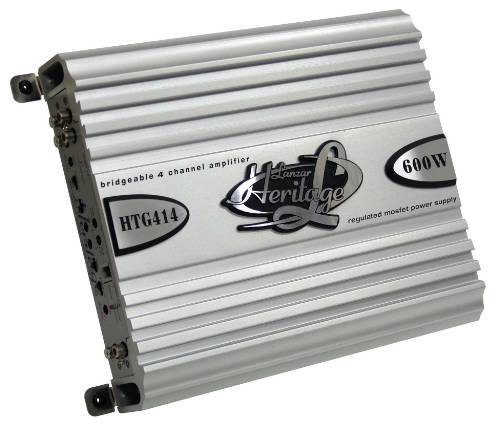
The Lanzar RBHTG414 Heritage amplifier is a 600 Watt, 4-channel MOSFET amplifier designed to deliver powerful and clear audio performance for your car audio system. It features a regulated MOSFET power supply and is bridgeable, offering flexible configuration options for various speaker setups.
4. Tatūnga me te Tāuta
He mea nui te whakaurunga tika mo te mahi me te roa o to oranga amplifier. The Lanzar RBHTG414 is designed for surface mounting.
4.1 Rarangi Arowhai I mua i te Whakaaturanga
- Ensure you have all necessary tools and wiring kits (power wire, ground wire, remote turn-on wire, RCA cables, speaker wire, fuses, terminals).
- Choose a mounting location that is dry, well-ventilated, and secure.
- Plan your wiring routes to avoid interference and potential damage.
4.2 Hononga Waea
The following outlines general wiring procedures. Consult a professional installer if you are unsure about any steps.
- Power Connection (BATT+): Connect a heavy-gauge power cable (e.g., 8-gauge or 4-gauge depending on total system power) directly from the vehicle's positive battery terminal to the ampte tauranga BATT+ a liifier. Tāutahia he puri whakahiato-raina i roto i te 18 inihi (45 cm) o te pākahiko.
- Hononga Papa (GND): Connect a heavy-gauge ground cable of the same length as the power cable from the ampte tauranga GND a lifier ki te mata whakarewa ma, kaore ano kia pania i runga i te tahuhu o te waka. Me whakarite he hononga totoka, iti-atete.
- Whakakā Mamao (REM): Connect a smaller gauge wire (e.g., 18-gauge) from the ampte pūrua REM a te kaiwhakaara ki te putanga tahuri-mamao o tō waeine upoko. Ka tohu tēnei waea i te amppūwhakaoho hei whakakā, hei whakaweto hoki i te pūnaha oro o tō waka.
- Hononga Whakauru RCA: Connect RCA audio cables from your head unit's pre-amp putanga ki te amplifier's RCA input jacks. For 4-channel operation, use two pairs of RCA cables (Front L/R, Rear L/R).
- Hononga Kaikōrero: Tūhonohia ō kaikōrero ki te ampnga pito putanga o te korero a liifier.
- 4-Channel Stereo Mode: Connect each speaker to its corresponding channel output (e.g., Front Left speaker to CH1+, CH1-, Front Right to CH2+, CH2-, etc.).
- Bridged Mode (2-Channel): For higher power output to subwoofers or a pair of speakers, the RBHTG414 can be bridged. Refer to the amplifier's terminal markings for specific bridged connection points (typically CH1+ and CH2- for one bridged channel, and CH3+ and CH4- for the second). Ensure your speakers are rated for the increased power output in bridged mode.
4.3 Whakapiki
Whakanuia te amplifier to a solid surface using appropriate screws. Ensure there is sufficient space around the amplifier for air circulation, especially around the heat sink fins, to prevent thermal shutdown.
5. Nga Tohutohu Whakahaere
Kia tāuta, te amplifier will turn on automatically with your head unit. Adjustments should be made carefully to achieve optimal sound quality.
- Whiwhi Mana: The gain control matches the amplifier's input sensitivity to the output level of your head unit. Start with the gain set to minimum, then slowly increase it until you hear distortion, then back off slightly. This is not a volume control.
- Tautuhinga Whakawhiti: Mena ko to amplifier includes crossover controls (e.g., High-Pass Filter (HPF), Low-Pass Filter (LPF)), adjust them according to your speaker type. HPF is used for full-range speakers to block low frequencies, while LPF is used for subwoofers to block high frequencies.
- Parepare Pai: Use the bass boost feature sparingly, if available, as excessive boosting can lead to distortion and potential speaker damage.
6. Tiaki
Ko te tiaki i nga wa katoa ka awhina i te roa me te mahi o to mahi ampkaikawe
- Te horoi: Me horoi i ia wa te amplifier's exterior with a soft, dry cloth. Ensure the heat sink fins are free of dust and debris to maintain proper cooling.
- Hononga: Occasionally check all wiring connections for tightness and corrosion. Loose connections can cause poor performance or damage.
- Whakahau: Me whakarite ko te amplifier's mounting location remains clear of obstructions that could impede airflow.
7. Te Raru
Mena ka pa ki a koe nga raru o to ampi mua i te rapu ratonga ngaio.
| Raruraru | Take pea | Rongoā |
|---|---|---|
| Ampe kore e huri te kaitahu | Blown fuse; loose power/ground/remote wire; no power from head unit remote output. | Tirohia te fiusi ā-roto me te amplifier fuses; verify all power, ground, and remote connections are secure; test remote wire for 12V when head unit is on. |
| Kaore he putanga oro | Loose RCA cables; incorrect gain setting; speaker wires disconnected; ampkaiwhakarewa i roto i te aratau tiaki. | Tirohia nga hononga RCA i nga hononga e rua amplifier and head unit; ensure gain is set correctly; verify speaker wire connections; check for protect light indicator. |
| Oro kerekere | Gain set too high; improper crossover settings; damaged speaker; poor ground connection. | Reduce gain setting; adjust crossover filters; inspect speakers for damage; ensure ground connection is solid. |
| Ampka wera rawa te rama | Insufficient ventilation; impedance mismatch; prolonged high-power operation. | Me whakarite kia pai te rere o te hau huri noa i te ampkaiwhakaora; manatokohia ngā taurite ārai o te kaikorero amplifier's rating; reduce volume or operating time. |
8. Whakatakotoranga
The following are key specifications for the Lanzar RBHTG414 Heritage AmpKaiwhakaora:
- Waitohu: Lanzar
- Tau tauira: RBHTG414
- Te maha o nga hongere: 4
- Putanga Mana: 600 Watts (Peak)
- Ampakomanga lifier: MOSFET
- Momo Whakaeke: Maunga Mata
- Rahi Hua (L x W x H): 2 x 2 x 2 inihi
- Taumaha Tūemi: 10.89 pauna
- UPC: 068888725088
- Tae: BLACK (Unit shown in image is silver, but product data indicates BLACK)
9. Pūtāhui me te Tautoko
Lanzar products are designed for reliability and performance. For information regarding warranty coverage, technical support, or service, please refer to the warranty card included with your product or visit the official Lanzar website. Please have your model number (RBHTG414) and purchase information ready when contacting support.


