1. Kupu Whakataki
The Topeak Dual Touch Bike Storage Stand is designed to provide an elegant and space-saving solution for storing bicycles indoors. This freestanding tension-mounted rack securely holds multiple bicycles, making it ideal for both home and garage environments. Constructed from durable aluminum, it features adjustable components to accommodate various bike sizes and styles.
2. Nga korero haumaru
- Ensure the stand is installed on a stable, level surface.
- Verify that the tension mechanism is securely engaged between the floor and ceiling.
- Do not exceed the maximum weight capacity of 39.7 pounds per mount or 158.7 pounds per stand.
- Regularly check all fasteners and adjustments to ensure they remain tight and secure.
- Keep children and pets away from the stand during installation and when bikes are being mounted or dismounted.
- If securing to a wall, use appropriate hardware for your wall type (wood studs, masonry, etc.) and consult a hardware professional if unsure.
3. Ihirangi mokete
Manatokohia kei te noho nga waahanga katoa i mua i te tiimata o te huihuinga.
- Main support pole sections
- 2 x Bike mounts (cradle arms)
- Quick-release mechanisms for height adjustment
- Rubber feet and padded contact points
- Mounting accessories (optional, for wall attachment)
4. Tatūnga me te Runanga
The Topeak Dual Touch Bike Storage Stand is designed for straightforward assembly.
- Assemble the Main Pole: Connect the main support pole sections by screwing them together. Ensure all connections are tight and secure.
- Tuhia te Tu: Place the assembled pole in the desired location, ensuring it is on a stable, level floor surface and directly beneath a solid ceiling.
- Adjust Height and Apply Tension:
- Extend the pole using the quick-release mechanism until it firmly presses against the ceiling.
- Engage the QR locking stepper foot at the base to secure the stand and apply sufficient tension. The stand should be stable and not wobble.
 Figure 1: Fully assembled Topeak Dual Touch Bike Storage Stand. The pole extends from floor to ceiling, secured by tension.
 - Install Bike Mounts: Attach the two included bike mounts (cradle arms) to the main pole.
- The mounts feature a quick-release system for easy height adjustment. Position them at the desired height for your bicycles.
- The bike holders can be angled from 0-30 degrees to accommodate various frame styles, including those with sloping top tubes. Adjust the angle using the large knob for secure bike placement.
 Whakaahua 2: Whakatata view of an adjustable bike mount, showing the angle adjustment mechanism.
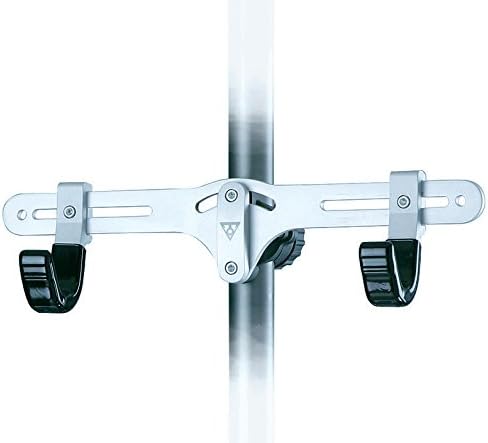 Figure 3: Bike mount in a horizontal position, ready to support a bicycle frame.
 - Te Whakapuru Pakitara Kōwhiringa: If additional stability is desired, the stand can be secured to a wall using the provided mounting accessories. Locate a wall stud and use appropriate screws to fix the stand's base or upper section to the wall.
Video: Dual-Touch™ Bike Stand Overview
Ataata 1: Kua mutuview of the Topeak Dual-Touch Bike Stand, demonstrating its features and use for bicycle storage and maintenance.5. Nga Tohutohu Whakahaere
- Mounting a Bicycle:
- Carefully lift your bicycle and place its top tube onto the padded cradle arms.
- Ensure the bike is balanced and stable on the mounts. Adjust the cradle arm angle if necessary for a secure fit.
- For bikes with sloped top tubes, adjust the cradle arms to match the angle, ensuring both points of contact are secure.
 Whakaahua 4: Example of two bicycles securely mounted on the stand, demonstrating efficient space utilization.
 - Dismounting a Bicycle:
- Grasp the bicycle firmly with both hands.
- Carefully lift the bike off the cradle arms, ensuring it clears the mounts completely before moving it away from the stand.
- Using Optional Handlebar Stabilizer: If using an optional handlebar stabilizer, attach it to prevent the front wheel from turning, providing additional stability, especially during maintenance.
 Figure 5: A handlebar stabilizer attached to a bicycle, preventing the front wheel from turning.
6. Tiaki
- Keep the stand clean by wiping it with a damp kakahu. A ape i nga kai horoi abrasive.
- Periodically inspect all bolts, screws, and quick-release mechanisms for tightness. Tighten as needed.
- Check the rubber feet and padded contact points for wear and tear. Replace if damaged to prevent slippage or damage to bikes/surfaces.
7. Te Raru
Stand is unstable or slips:
- Ensure the quick-release stepper foot is fully engaged and applying adequate tension between the floor and ceiling.
- Verify that the floor and ceiling surfaces are clean and free of debris that could reduce friction.
- Check that the stand is positioned vertically straight. Adjust if it is leaning.
- If using on delicate ceilings (e.g., drywall), consider placing a small, sturdy wooden disc or plate between the top of the pole and the ceiling to distribute pressure and prevent damage.
Bike does not sit securely on mounts:
- Adjust the height of the cradle arms to ensure the bike's top tube rests evenly across both arms.
- Adjust the angle of the cradle arms (0-30 degrees) to match the angle of your bike's top tube for optimal support.
- Ensure the padded contact points on the cradle arms are intact and providing sufficient grip.
8. Whakatakotoranga
| Waitohu | Topeak |
| Ingoa Tauira | Dual Touch |
| Nama Wahi | 68001004 |
| Rauemi | 6061 T6 Aluminum Tubing |
| Tae | Hiriwa |
| Rahi Hua (L x W x H) | 17.3" x 7.1" x 126" (max height) |
| Teitei Whakaritea | Tae atu ki te 320 henemita (126 inihi) |
| Bike Mount Adjustment | 0-30 nga nekehanga |
| Weight Capacity (per mount) | 39.7 Pauna |
| Weight Capacity (per stand) | 158.7 Pauna |
| Taumaha Tūemi | 11 Pauna |
| Huihuinga e hiahiatia ana | Ae |
9. Pūtāhui me te Tautoko
For warranty information, technical support, or to purchase additional accessories (such as third hooks or handlebar stabilizers), please contact Topeak customer service or visit the official Topeak webpae.


