1. Kupu Whakataki
The SPL 2Control is a compact and user-friendly stereo monitor controller designed to provide comprehensive control over your digital audio workstation's (DAW) monitoring functions. It ensures high-quality audio reproduction through both studio monitors and headphones, allowing you to hear every detail of your mix. Key features include a precise speaker volume potentiometer, active circuitry for sound integrity, and a unique Crossfeed control for accurate headphone monitoring that simulates a stereo speaker image.
2. Nga Tohutohu Haumaru
- Pānuihia ēnei tohutohu kia mārama i mua i te whakahaere i te taputapu.
- Puritia tenei pukapuka hei tohutoro a meake nei.
- Kaua e tukuna te waahanga ki te ua, ki te makuku ranei hei aukati i te ahi me te ru hiko.
- Me whakarite kia tika te hau; kaua e aukati i nga whakatuwheratanga hau.
- Whakamahia anake nga taapiri / taputapu kua tohua e te kaihanga.
- Momotuhia te taura hiko i te wa e uira ana te tupuhi, i te kore ranei e whakamahia mo te wa roa.
- Tukuna nga ratonga katoa ki nga kaimahi ratonga whai tohu.
- A ape i te whakanoho i te waeine ki te taha o nga puna wera penei i nga radiators, rehita wera, umu, me etahi atu taputapu (tae atu ki ampkaiwhakaora) e whakaputa ana i te wera.
3. Ihirangi mokete
Ina wetewetehia, tirohia koa kei roto nga taonga e whai ake nei:
- 1 x SPL 2Control Module
- 1 x Te Raimana Tini
- Tenei Manual Kaiwhakamahi
4. Hua Neke Atuview
4.1 Nga Mana me nga Tohu Paewhiri o mua
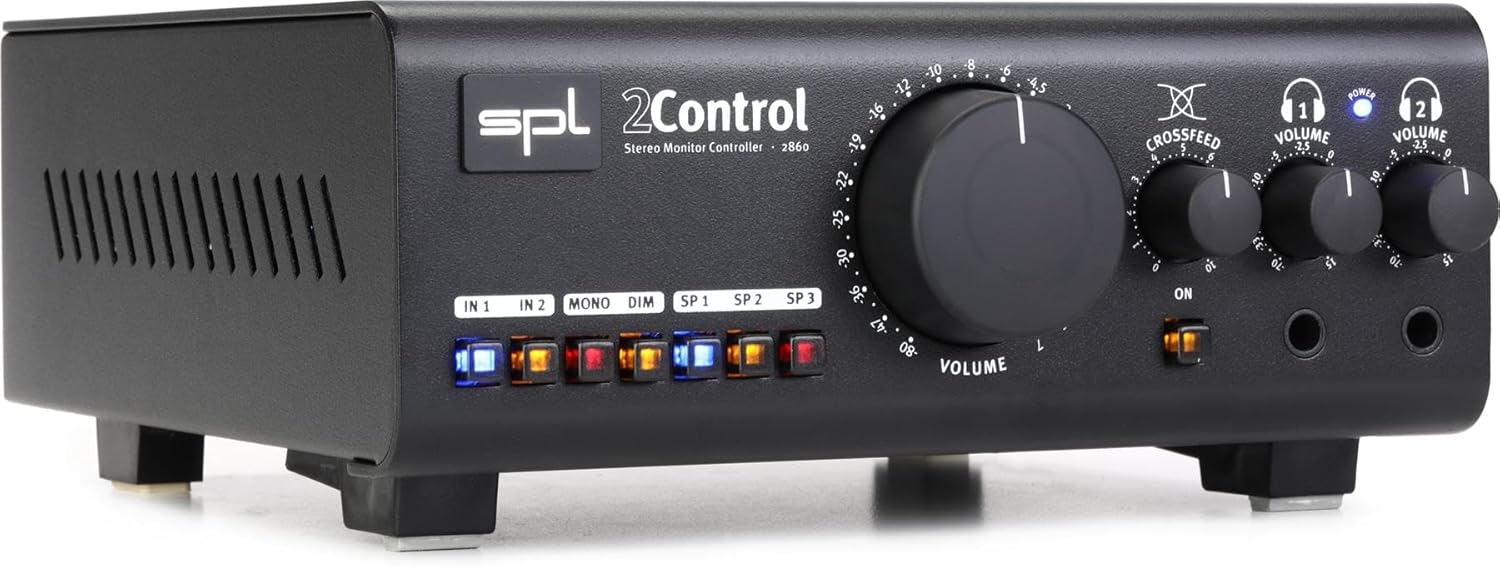
Whakaahua 1: Front Panel of the SPL 2Control Stereo Monitor Controller.
This image displays the front panel of the SPL 2Control. From left to right, it features input selection buttons (IN 1, IN 2), function buttons (MONO, DIM), speaker output selection buttons (SP 1, SP 2, SP 3), a large central master VOLUME knob, a CROSSFEED knob, and two individual headphone VOLUME knobs with corresponding headphone output jacks. A power indicator LED is visible above the headphone controls.
- IN 1 / IN 2 Buttons: Selects the active stereo input source.
- MONO Button: Sums the stereo signal to mono for compatibility checking.
- Pātene DIM: Reduces the output volume by a fixed amount (e.g., -20dB) for temporary level reduction.
- SP 1 / SP 2 / SP 3 Buttons: Selects the active stereo speaker output pair.
- PUKA PUKA: Master volume control for selected speaker outputs.
- CROSSFEED Knob: Adjusts the stereo panorama for headphone monitoring to simulate a speaker listening environment.
- HEADPHONE VOLUME 1 / 2 Knobs: Independent volume controls for the two headphone outputs.
- HEADPHONE 1 / 2 Jacks: 1/4-inch stereo headphone outputs.
- Arahina mana: E tohu ana kei te hiko te waeine.
4.2 Rear Panel Connections (Inferred)
The rear panel typically houses the audio input and output connections, as well as the power input. Based on common audio equipment and product specifications, you can expect:
- Tāuru tairitenga: Balanced XLR or TRS inputs for connecting your audio interface or mixer.
- Putanga Tukuoro: Multiple sets of balanced XLR or TRS outputs for connecting up to three pairs of studio monitors.
- Whakauru Hiko: Connector for the included power cord.
5. Tatūnga
- Turanga: Position the SPL 2Control on a stable, flat surface, ensuring adequate ventilation around the unit.
- Hononga Hiko: Connect the provided power cord to the power input on the rear panel of the 2Control and then to a suitable AC power outlet.
- Hononga Whakauru: Connect the stereo outputs of your audio interface, mixer, or other audio source to the IN 1 and/or IN 2 inputs on the rear panel using balanced XLR or TRS cables.
- Hononga Kaikōrero: Connect your studio monitors to the SP 1, SP 2, and/or SP 3 outputs on the rear panel using balanced XLR or TRS cables. Ensure correct left and right channel connections.
- Headphone Connections: Plug your headphones into the HEADPHONE 1 and/or HEADPHONE 2 jacks on the front panel.
- Hiko Tuatahi: Ensure all volume controls are set to their minimum positions before powering on the unit. Then, connect the power cord to the wall outlet. The POWER LED on the front panel will illuminate.
6. Nga Tohutohu Whakahaere
- Kei te kowhiri i tetahi urunga: Pēhia rānei te I TE 1 or I TE 2 button to select your desired audio source. The active button will illuminate.
- Selecting Speaker Outputs: Pehia te SP1, SP2, ranei SP3 button to route the audio to the corresponding pair of studio monitors. Only one speaker output can be active at a time.
- Te Whakatikatika i te Oro Matua: Slowly turn the large ROTO knob clockwise to increase the listening level for the selected speaker outputs. Turn counter-clockwise to decrease.
- Mono Summing: Pehia te MONO button to sum the stereo signal to mono. This is useful for checking phase compatibility and mix balance. Press again to return to stereo.
- Taumahi Ataahua: Pehia te DIM button to temporarily reduce the output volume. This is useful for quick conversations or when you need to lower the volume without losing your main volume setting. Press again to restore the original volume.
- Aroturuki Waea:
- Plug your headphones into the desired headphone jack (HEADPHONE 1 or 2).
- Whakaritea te tangata takitahi HEADPHONE VOLUME 1 or 2 knob to set the listening level for your headphones.
- Whakamahia te Tuhinga o mua knob to adjust the stereo image for headphone listening. Turning it clockwise increases the crossfeed, simulating a more natural speaker-like stereo field by blending the left and right channels slightly.
7. Tiaki
- Te horoi: Whakamahia he kakahu ngohengohe, maroke hei horoi i waho o te waahanga. Kaua e whakamahia nga kai horoi wai, nga whakarewa ranei.
- Whakahau: Ensure that the ventilation slots are kept clear of dust and debris to prevent overheating.
- Rokiroki: Mēnā he roa te wā e penapena ana i te kōwae, momotuhia mai i te hiko ka penapena ki tētahi wāhi mātao, maroke.
8. Te Raru
| Raruraru | Take pea | Rongoā |
|---|---|---|
| Karekau he oro mai i nga kaikorero. |
|
|
| Kaore he tangi mai i nga taringa. |
|
|
| Ororongo kerekere. |
|
|
9. Whakatakotoranga
| Āhuahira | Taipitopito |
|---|---|
| Ingoa Tauira | 2 Control (also known as 2860) |
| Waitohu | SPL |
| Momo Kaikorero | Aroturuki |
| Nga Whakamahinga Manakohia | Control, Volume for Monitors |
| Pūrere Hototahi | Monitors, Speakers |
| Whirihoranga Hongere oro a tawhio noa | 2.0 |
| Tae | Pango |
| Nga Waahanga kei roto | 1 x SPL Control Module |
| Rahi Hua (D x W x H) | 8.66" x 8.46" x 3.15" |
| Taumaha Tūemi | 7.06 pauna (tata ki te 3.2 kg) |
| Puna Mana | Hiko Hiko |
| Hangarau Hononga | TRS, XLR |
| Aratau Putanga Ororongo | Tirooro |
| Momo Whakaeke | Maunga Ripanga |
| Kaihanga | Sound Performance Lab |
10. Pūtāhui me te Tautoko
The SPL 2Control Monitor Controller comes with a limited warranty. For specific warranty terms, duration, and conditions, please refer to the documentation provided with your purchase or visit the official SPL website. For technical support, service, or inquiries, please contact the manufacturer, Sound Performance Lab, or your authorized dealer.
Kaihanga: Sound Performance Lab