1. Kupu Whakataki
This manual provides comprehensive instructions for the installation, operation, and maintenance of your Jensen AWM965 AM/FM|CD|DVD|MP3/USB Wallmount Stereo. The AWM965 is a versatile 12-volt unit designed for wall mounting, featuring an AM/FM electronic tuner, CD and DVD player, and a front USB input for MP3, WMA, and JPEG file playback. It also includes three stereo high-level speaker output zones and a remote control for convenient operation.

Whakaahua 1.1: Mua view of the Jensen AWM965 Wallmount Stereo, showing the display, control knobs, and various buttons.
2. Nga korero haumaru
Please read all safety instructions carefully before operating the unit. Failure to follow these instructions may result in injury or damage to the unit. Keep this manual for future reference.
- Tuku Hiko: This unit operates on a 12V DC negative ground power supply. Ensure correct voltage and polarity during installation.
- Tāutatanga: Professional installation is recommended. Ensure all wiring is secure and properly insulated to prevent short circuits.
- makuku: Kaua e tukuna te waahanga ki te ua, ki te makuku ranei hei aukati i te ahi me te ru hiko.
- Te horoi: Whakamahia he kakahu ngohengohe, maroke hei horoi. Āta karohia ngā kaihoroi whakakoi, ngā whakarewa rānei.
- Ratonga: Do not attempt to service this unit yourself. Refer all servicing to qualified personnel.
3. Rarangi Tapaki
Manatokohia kei roto katoa nga mea kei roto i te kete i mua i te haere ki te whakaurunga.
- Jensen AWM965 Wallmount Stereo Unit
- Mana Mamao me te Pūhiko
- 20-Pin Power/A/B Speaker Mating Pigtail
- Aux Audio/Video Cable
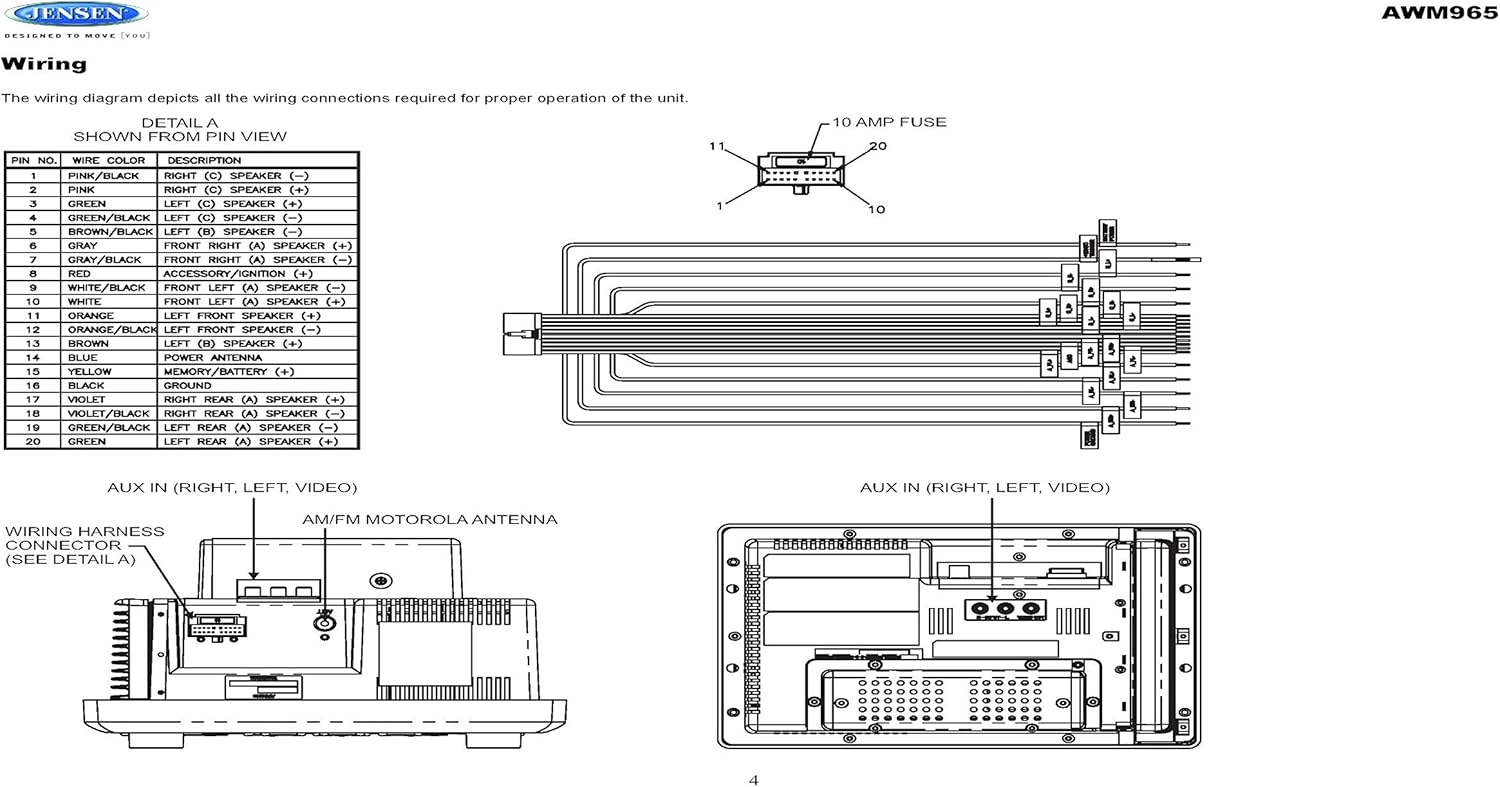
Figure 3.1: Diagram illustrating the components included in the Jensen AWM965 package, including the main unit, remote control, wiring harness, and auxiliary cables.

Figure 3.2: Image showing the included remote control, 20-pin wiring harness, and auxiliary audio/video cable.
4. Tatūnga
4.1 Te Kowhiri i te Tauwāhi Whakapuru
It is important to select an appropriate mounting location for the AWM965 to ensure optimal performance and longevity. Consider the following:
- Avoid places exposed to heat-radiating appliances such as electric heaters.
- Do not mount adjacent to other equipment that radiates significant heat.
- Ensure the location is well-ventilated and not dusty.
- A ape i nga waahi makuku, makuku ranei.
4.2 Preparing the Opening
Use the provided mounting hole diagram to measure and cut an opening in the mounting surface. After cutting, mount the unit using four M3x20mm screws.
4.3 Te Whakaeke i te Reo Irirangi
Route the power, speaker, and antenna cables through the hole. Connect them to the unit as outlined in the wiring diagram. After ensuring correct connections, perform a test operation.
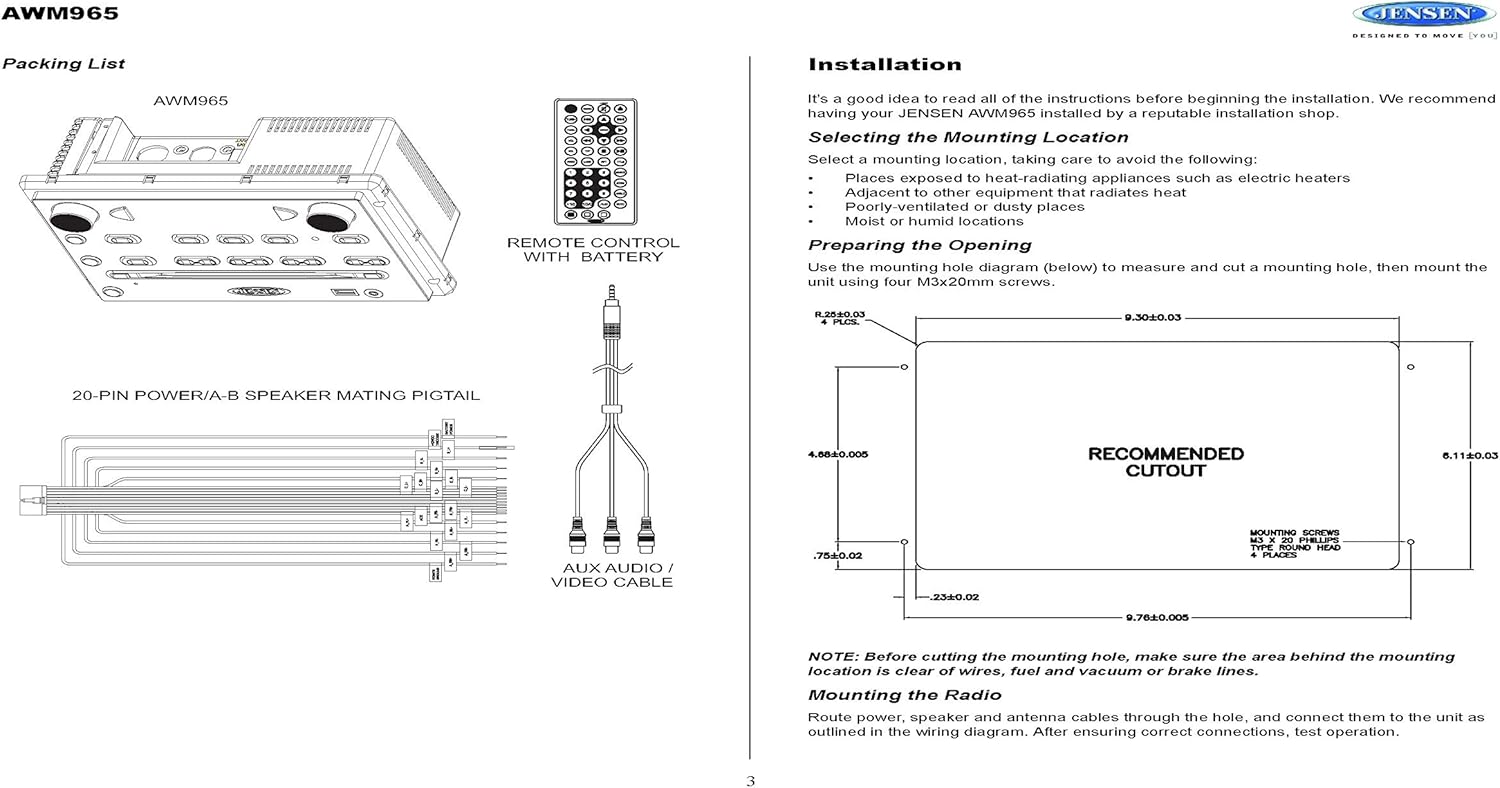
Figure 4.1: Detailed diagram showing the product dimensions (10.43"W x 7.01"H x 5"D) and the recommended cutout dimensions for installation (9.30"W x 6.11"H).
4.4 Waea Whakahoahoa
The wiring diagram below depicts all the connections required for proper operation of the unit. Ensure all connections are secure and correctly matched to prevent damage.
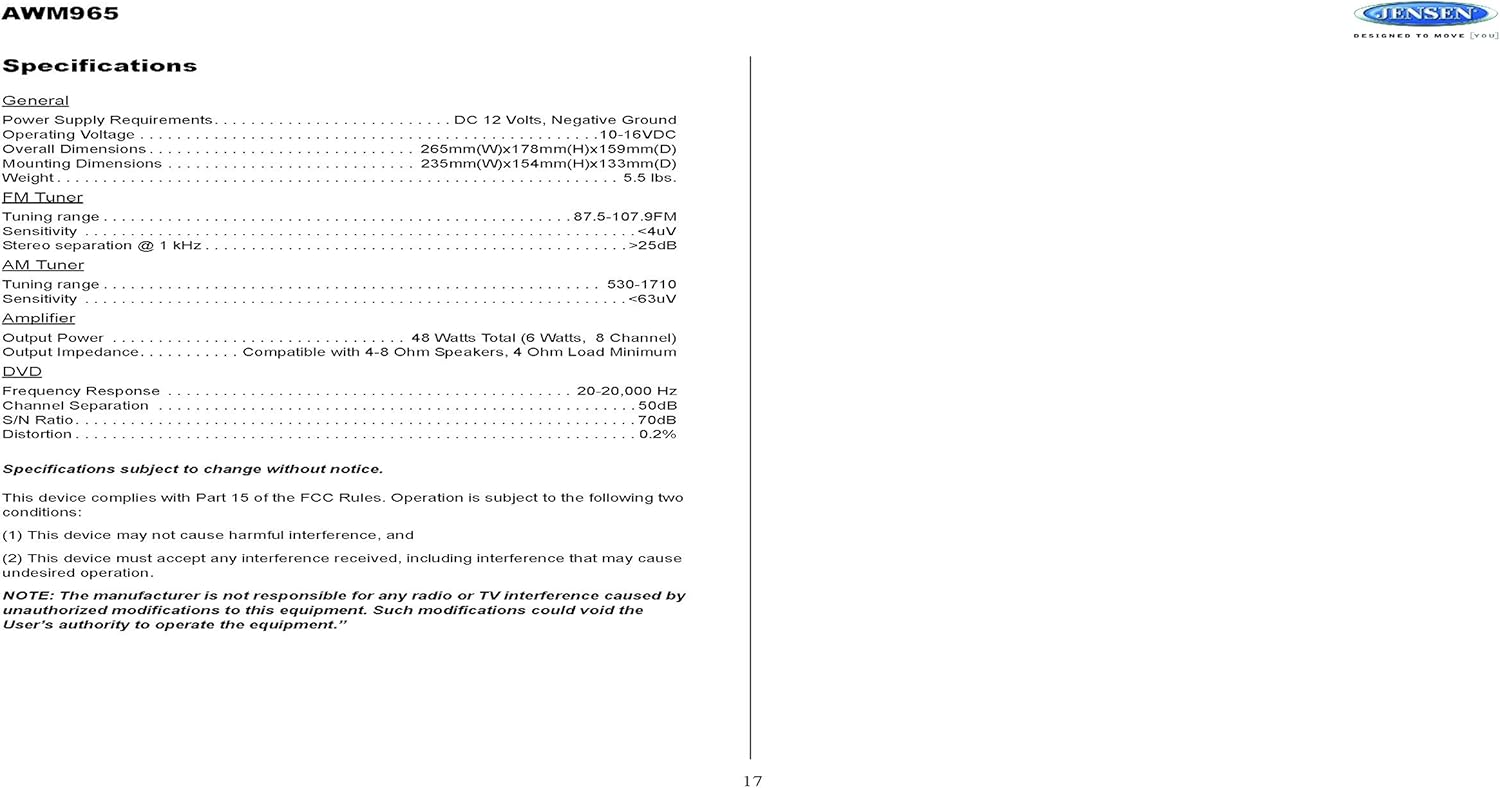
Figure 4.2: Detailed wiring diagram for the Jensen AWM965, showing the 20-pin connector pin assignments for power, ground, accessory, antenna, and speaker outputs (Right/Left, Front/Rear, A/B/C zones).
Wiring Harness Pin Details:
| Pin No. | Tae Waea | Whakaahuatanga |
|---|---|---|
| 1 | PINK / PANGO | KAUPAPA KAUPAPA (C) (-) |
| 2 | PINK | KAUPAPA KAUPAPA (C) (+) |
| 3 | KAKAKAKA | MAUI (C) KORERO (+) |
| 4 | HE RANGI / KORE | MAUI (C) KORERO (-) |
| 5 | PARAINI / PANGO | MAUI (B) KORERO (-) |
| 6 | PARAONE | MAUI (B) KORERO (+) |
| 7 | KEREI / PANGO | Tuhinga o mua (A) KAIKORERO (-) |
| 8 | Whero | ACCESSORY / IGNITION (+) |
| 9 | WHITE / Pango | MUA MAUI (A) KORERO (-) |
| 10 | WHITE | MUA MAUI (A) KORERO (+) |
| 11 | ORANGE | KORERO MUA MAUI (+) |
| 12 | ORANGE / PANGO | KORERO MUA MAUI (-) |
| 13 | PARAONE | TIKA (B) KORERO (+) |
| 14 | KAHURANGI | ATENNA MANA |
| 15 | KOwhai | MEMORY / BATTERY (+) |
| 16 | Pango | WHENUA |
| 17 | WAIRETI | TUARUA MATAU (A) KAIKORERO (+) |
| 18 | VIOLET / BLACK | TUARUA MATAU (A) KAIKORERO (-) |
| 19 | HE RANGI / KORE | MAHUI MURI (A) KORERO (-) |
| 20 | KAKAKAKA | MAHUI MURI (A) KORERO (+) |
5. Nga Tohutohu Whakahaere
5.1 Mana Paewhiri Mua
Familiarize yourself with the controls on the front panel for easy operation.

Whakaahua 5.1: Whakatata view of the Jensen AWM965 front panel, highlighting the display, volume knob, power button, tuning/track buttons, and various function buttons for AUX, AS/PS, speaker zones, and media playback.
- VOL (Rōrahi) Puka: Rotate to adjust volume. Push to access audio menu.
- Pihi POWER: Pēhia kia whakakā, whakaweto rānei te kōwae.
- T/F CLOCK Button: Press to display or set the clock.
- TUN/TRK (Tune/Track) Buttons: Use for tuning radio stations or navigating tracks on media.
- Pātene AUX: Selects the auxiliary input source.
- AS/PS (Auto Store/Preset Scan) Button: Automatically stores strong radio stations or scans through presets.
- A, B, C (Speaker Zone) Buttons: Activates or deactivates speaker output zones.
- ENTER Pātene: Ka whakamana i nga whiringa.
- LOUD Button: Activates/deactivates loudness compensation.
- Patene Mute: Mutes/unmutes audio output.
- 1-6 Pātene: Radio station presets, track functions (RPT, RDM, G.LANG).
- ALARM SET / ON/OFF Buttons: Sets and activates/deactivates the alarm clock.
- DVD MENU Button: Ka uru atu ki te tahua DVD.
- Disc Eject Button: Ejects a loaded disc.
- Tauranga USB: Honoa nga taputapu USB mo te purei pāpāho me te utu.
5.2 Mahi Taketake
- Hiko Whakaka/Weto: Pehia te MANA pātene.
- Whakaritenga Rōrahi: Hurihia te VOL puku.
- Kōwhiringa Pūtake: Pehia te MODE button (if available, or cycle through sources using a dedicated button or menu).
5.3 Te Whakahaere Reo Irirangi (AM/FM)
- Whakatika: Pehia te TUN/TRK buttons to manually tune or hold to seek.
- Teihana tatūkē: Press and hold a numbered button (1-6) to store the current station. Press briefly to recall.
- Auto Store / Preset Scan: Whakamahia te AS/PS button for automatic station management.
5.4 CD/DVD/MP3/USB Playback
- Uta Kōpae: Insert a disc into the slot with the label side up. The unit will automatically begin playback.
- Purei Whakahoki USB: Insert a compatible USB flash drive into the front USB port. The unit supports MP3, WMA, and JPEG formats.
- Mana Purei: Whakamahia te TUN/TRK buttons for track navigation (skip forward/backward). Use numbered buttons for repeat (RPT) or random (RDM) playback.
- Tahua DVD: Pehia te Tahua DVD button to access the disc's menu.
- Whakatau USB: The front USB port supports charging of iPod and other USB-based devices.
5.5 Clock and Alarm Features
- Whakaritea te Karaka: Patohia me te pupuri i te T/F CLOCK button to enter clock setting mode. Use the TUN/TRK ngā pātene hei whakarite i ngā hāora me ngā meneti, me KAUPAPA ki te whakau.
- Karaka Whakaoho: Whakamahia te WHAKATAHI PANUI button to configure the alarm time and the ON/OFF button to activate or deactivate it.
- Waka Moe: Refer to the full manual for detailed instructions on setting the sleep timer.
5.6 Whakauru Awhina
Connect external audio/video devices to the front 3.5mm line-level input using the provided Aux Audio/Video Cable. Press the AUX button to select this source.
5.7 Mana Mamao
The included wireless remote control provides convenient access to most functions. Ensure the battery is correctly installed.
Figure 5.2: Image of the Jensen AWM965 remote control, showing buttons for power, menu, tune, volume, enter, source, program, language, repeat, title, zoom, angle, and numeric keypad.
6. Tiaki
6.1 Te Whakapai i te Waeine
Wipe the front panel and cabinet with a soft, dry cloth. For stubborn stains, dampen the cloth lightly with water. Never use harsh chemicals, abrasive cleaners, or solvents as they may damage the finish.
6.2 Tiaki Kōpae
Puritia ngā kōpae mā ō rātou taha kia kore ai e takai ngā tapumati. Puritia kia ma, kia kore hoki e rakuraku ngā kōpae. Rokirokihia ngā kōpae ki roto i ō rātou pouaka ina kore e whakamahia.
7. Te Raru
If you experience problems with your AWM965, consult the following common issues and solutions before contacting support.
- Kore Mana: Check the 12V DC power connection and ensure the unit's fuse (10 AMP) is not blown. Verify proper grounding.
- Kore Oro: Check speaker connections and ensure speaker zones (A, B, C) are activated. Verify volume level and mute status.
- Disc Error: Ensure the disc is clean, free of scratches, and inserted correctly. Try a different disc.
- Te Manaaki Reo Irirangi Kino: Check the antenna connection. Ensure the antenna is fully extended and positioned for best reception.
- Kāore i te Mōhiotia te Pūrere USB: Ensure the USB device is formatted correctly and contains compatible files (MP3, WMA, JPEG). Try a different USB device.
8. Whakatakotoranga
Detailed technical specifications for the Jensen AWM965 unit.
| Kāwai | Whakatakotoranga |
|---|---|
| Tuku Hiko | 12V DC, Papa kino |
| Mahinga Mahi Voltage | 10-16VDC |
| Te Whanuitanga | 265mm(W) x 178mm(H) x 159mm(D) / 10.4"W x 7"H x 5"D |
| Whakaekenga Ahu | 235mm(W) x 154mm(H) x 133mm(D) / 9.25"W x 6.06"H x 5.25"D |
| Taumaha | 0.9 lbs (approx.) |
| Raupaparorohiko a FM | 87.5-107.9MHz |
| Te Maharahara FM | <4uV |
| FM Stereo Separation @ 1 kHz | >25dB |
| Awhe Tuning AM | 530-1710kHz |
| AM Maharahara | <63uV |
| Ampkaiwhakaora Huaputa lifier | 48 Watts Total (8 Channel) |
| Putanga Putanga | Compatible with 4-8 Ohm Speakers |
| DVD Frequency Response | 20-20,000 Hz |
| DVD Channel Separation | 50dB |
| DVD S/N Ratio | 70dB |
| DVD Distortion | 0.2% |
| Hōputu Kōpae Hototahi | CD, CD-R, CD-RW, MP3, DVD, DVD+/-RW |
| Nga waahanga motuhake | Adjustable LCD Dimmer, Front USB (MP3/WMA/JPEG, Charging), Front 3.5mm Line-Level Video/Audio Input, 1 Composite Video Out, 1 Stereo Audio Input |
Ko nga korero ka whakarereke me te kore panui.
8.1 Tautukunga FCC
Ka tutuki tenei taputapu ki te Wahanga 15 o nga Ture FCC. Ko te mahi i raro i nga tikanga e rua e whai ake nei:
- Kare pea tenei taputapu e whakararu kino.
- Me whakaae tenei taputapu ki nga pokanoa kua tae mai, tae atu ki te pokanoa ka puta he mahi kore.
NOTE: The manufacturer is not responsible for any radio or TV interference caused by unauthorized modifications to this equipment. Such modifications could void the user's authority to operate the equipment.
9. Nga Korero Whakaputanga
Jensen products are designed and manufactured to the highest quality standards. This product is covered by a limited warranty against defects in materials and workmanship. The specific terms and duration of the warranty are typically provided with the product packaging or can be found on the manufacturer's official webpae. Tena koa pupurihia to tohu mo te hoko mo nga kereme whakamana.
10. Tautoko
If you require further assistance or encounter issues not covered in this manual, please contact Jensen customer support. You can typically find contact information (phone number, email, or support portal) on the official Jensen webte waahi kei roto ranei i te kohinga hua.
When contacting support, please have your product model number (AWM965) and a detailed description of the issue ready.


