1. Kupu Whakataki
The M-AUDIO Avid KeyStudio is a 49-key, velocity-sensitive, synth-action USB MIDI keyboard controller designed for music creation and performance. It provides essential controls for interacting with digital audio workstations (DAWs) and virtual instruments.
Ko nga ahuatanga matua ko:
- 49 velocity-sensitive keys for expressive playing.
- Assignable modulation wheel for vibrato and filter effects.
- Pitch bend wheel for expressive performances.
- Volume slider for output level control.
- Octave and transpose buttons to adjust the keyboard's range.

Whakaahua 1: Koki view of the M-AUDIO Avid KeyStudio 49-Key USB MIDI Keyboard Controller.
2. Nga korero haumaru
Please read and understand the following safety precautions before operating the Avid KeyStudio:
- Puna Hiko: Connect the device only to a USB port that meets the specified power requirements.
- makuku: Kaua e tukuna te waeine ki te ua, te makuku, te makuku nui ranei.
- wera: Tiakina te waeine mai i nga puna wera penei i nga radiators, nga rehita wera, nga umu, etahi atu taputapu whakaputa wera ranei.
- Te horoi: Horoia noa ki te kakahu maroke. Kaua e whakamahi i ngā wai horoi, i ngā wai horoi rānei.
- Ratonga: Kaua e tarai ki te mahi i tenei hua maau ake. Tirohia nga ratonga katoa ki nga kaimahi tohu tohu.
- Turanga: Place the unit on a stable, flat surface to prevent accidental falls.
3. Ihirangi mokete
Manatokona kei roto katoa nga mea kei roto i te kete:
- Avid KeyStudio 49-Key USB MIDI Keyboard Controller
- Tauira USB
- M-Audio Micro USB Audio Interface (may be included with some bundles)
- Software Installation Disc (e.g., Pro Tools SE)
- Pukapuka Kaiwhakamahi (tenei tuhinga)

Figure 2: Avid KeyStudio product packaging, indicating included components.

Figure 3: The M-Audio Micro USB Audio Interface, often bundled with the KeyStudio.
4. Tatūnga
4.1 Hononga Miihini
- Connect one end of the supplied USB cable to the USB port on the back of the Avid KeyStudio.
- Connect the other end of the USB cable to an available USB port on your computer. The KeyStudio is USB bus-powered and does not require an external power adapter.
- If using the M-Audio Micro USB Audio Interface, connect it to another available USB port on your computer.

Figure 4: Rear panel of the Avid KeyStudio with the USB port for computer connection.
4.2 Tāuta Pūmanawa
The Avid KeyStudio typically includes a software bundle, such as Pro Tools SE, and requires drivers for full functionality. Follow these steps:
- Insert the software installation disc into your computer's optical drive. If no disc is provided or your computer lacks an optical drive, download the latest drivers and software from the official M-Audio webpae.
- Follow the on-screen instructions to install the necessary drivers for the Avid KeyStudio. It is recommended to install drivers before connecting the keyboard for the first time.
- Install the bundled software (e.g., Pro Tools SE) as per its specific instructions.
- I muri i te tāutanga, tīmata anō tō rorohiko ki te ākina.
- Once your computer has restarted, connect the Avid KeyStudio via USB. The operating system should recognize the device.

Figure 5: The Avid KeyStudio connected to a computer, ready for use with music production software.
5. Nga Tohutohu Whakahaere
5.1 Mana Whakahaereview
The Avid KeyStudio features a straightforward layout for intuitive control:

Whakaahua 6: Runga view of the Avid KeyStudio, highlighting its main controls.
- 49 Kī Tere-tairongo: These keys respond to how hard you press them, allowing for dynamic musical expression.
- Pira Piko Pere: Located on the left, this wheel allows you to momentarily raise or lower the pitch of notes for expressive effects.
- Wira Whakawaenga: Also on the left, this wheel is typically assigned to control vibrato, filter cutoff, or other continuous parameters within your software.
- Rēreti rōrahi: Adjusts the MIDI output volume. This controls the volume within your software, not the physical output of the keyboard itself.
- Ngā Pātene Octave: Use these buttons to shift the entire keyboard's range up or down in octaves. This allows access to a wider range of notes than the 49 physical keys provide.
- Ngā Pātene Whakawhiti: These buttons allow you to shift the pitch of the keyboard up or down in semitone increments.
- Edit Mode Button: This button is used to access advanced configuration options. Refer to the software documentation for specific functions.
5.2 Te Whakamahi me te Pūmanawa
The Avid KeyStudio functions as a MIDI controller, sending MIDI data to your computer. It is compatible with most Digital Audio Workstations (DAWs) and music software, including the bundled Pro Tools SE, GarageBand, FL Studio, and REAPER.
- Launch your DAW: Open your preferred music software (e.g., Pro Tools SE).
- Select MIDI Input: In your DAW's preferences or settings, ensure that the Avid KeyStudio is selected as a MIDI input device.
- Load an Instrument: Create a new track and load a virtual instrument (e.g., piano, synth, drums).
- Play and Record: You can now play the virtual instrument using the KeyStudio's keys and controls. Use the DAW's recording functions to capture your performance.
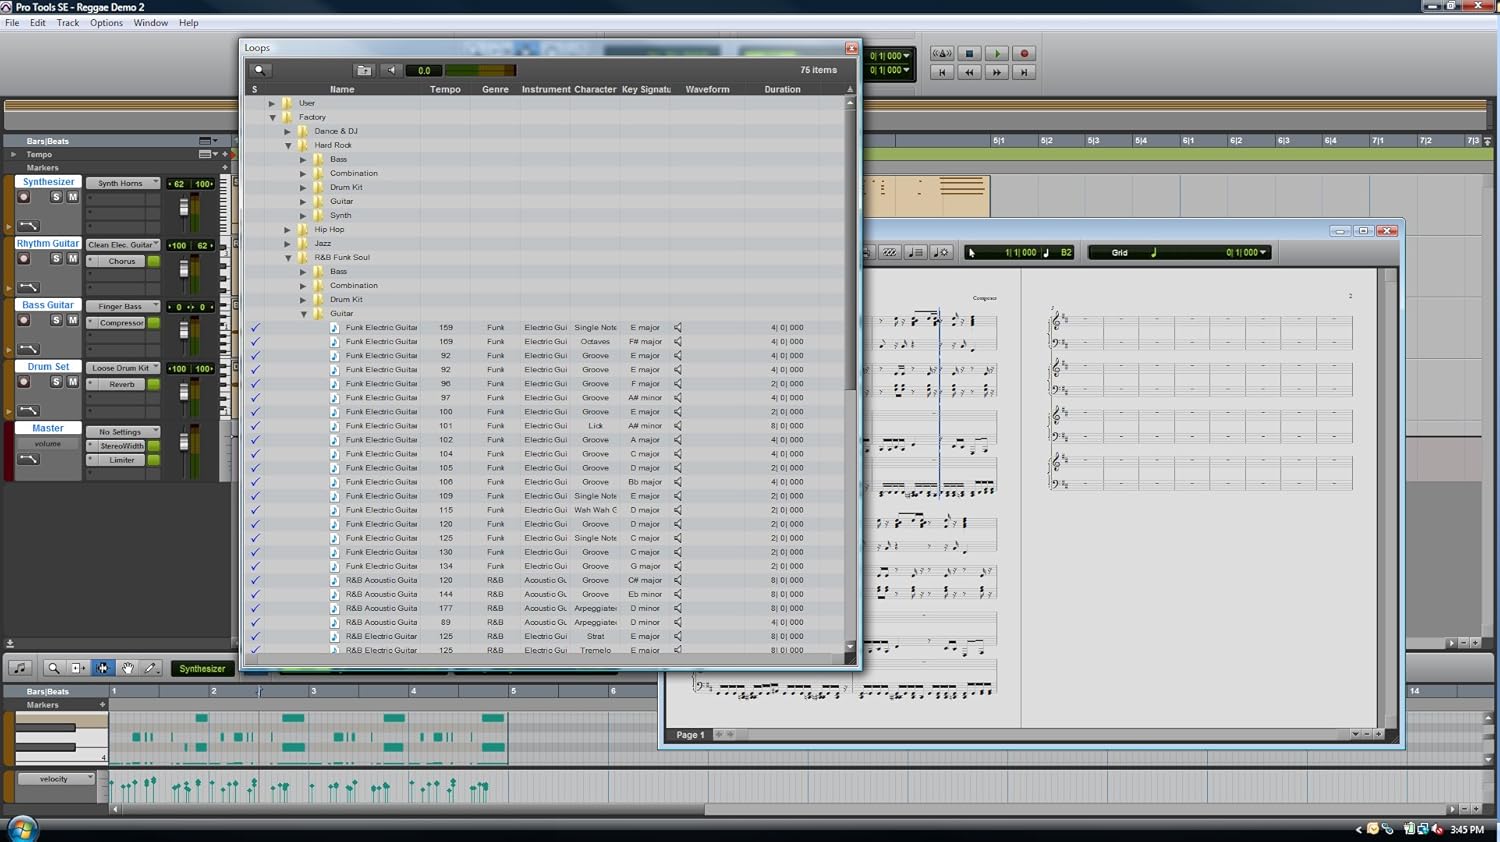
Whakaahua 7: Example of the Pro Tools SE software interface, where the KeyStudio can control virtual instruments.

Figure 8: Pro Tools SE 'New Session' screen, allowing selection of various project templates.

Figure 9: Selecting a virtual instrument (Guitars) within Pro Tools SE.
6. Tiaki
Proper maintenance ensures the longevity and optimal performance of your Avid KeyStudio.
- Te horoi: Use a soft, dry, lint-free cloth to wipe the surface of the keyboard. Avoid abrasive cleaners, solvents, or waxes.
- Rokiroki: When not in use, store the keyboard in a clean, dry environment, away from direct sunlight and extreme temperatures. Consider using a dust cover.
- Te whakahaere: A ape i te tuku i te papapātuhi, te tuku ranei ki nga paanga kaha. Kaua e utaina nga mea taumaha ki runga.
7. Te Raru
If you encounter issues with your Avid KeyStudio, refer to the following common problems and solutions:
| Raruraru | Te Take Taea / Rongoa |
|---|---|
| Keyboard not recognized by computer/software. |
|
| No sound when playing keys. |
|
| Keys feel unresponsive or inconsistent velocity. |
|
| Software crashes during installation or use. |
|
8. Whakatakotoranga
| Āhuahira | Taipitopito |
|---|---|
| Kī | 49, velocity-sensitive, synth-action |
| Hononga | USB |
| Mana whakahaere | Pitch Bend Wheel, Modulation Wheel, Volume Slider, Octave Up/Down Buttons, Transpose Buttons, Edit Mode Button |
| Mana | USB pahi-Powered |
| Taumaha Tūemi | 6.5 pauna (2.95 kg) |
| Hunga Hua | 34 x 4 x 9.5 inihi (86.36 x 10.16 x 24.13 cm) |
| Tau tauira | Avid KeyStudio |
| UPC | 763615778978, 777785735495, 613570227335 |
| Tuatahi Wātea | Mahuru 16, 2010 |
9. Pūtāhui me te Tautoko
M-AUDIO products are covered by a limited warranty. For specific warranty terms and conditions, please refer to the warranty card included with your product or visit the official M-AUDIO webpae.
For technical support, driver downloads, and additional resources, please visit the M-AUDIO support page:
https://www.m-audio.com/support
When contacting support, please have your product model (Avid KeyStudio) and serial number ready.


