Nga Tohutohu Haumaru Nui
Please read and save these important safety instructions before using this fan. Failure to follow these instructions may result in electric shock, fire, or serious personal injury.
- Momotuhia te momotu o te hau i mua i te horoi, i te ratonga rānei.
- Kaua e whakahaere i tetahi mea powhiriwhiri ki te taura pakaru, mono ranei.
- Puritia te pā hau kia matara atu i te wai me te makuku.
- Me whakarite kia utaina te mea powhiriwhiri ki runga i te papa, te mata papatahi kia kore ai e pakaru.
- Kaua e whakauru i ngā maihao, i tētahi atu mea rānei mā roto i te whakakā i te wā e whakahaerehia ana te pā hau.
- Ko tenei poapoa mo te whakamahi o roto anake.
Ka mutu te huaview
The PELONIS FS40-8JR is a 16-inch oscillating pedestal fan designed to provide efficient airflow and cooling in various indoor environments. Its adjustable height and wide-angle oscillation ensure comprehensive air distribution.
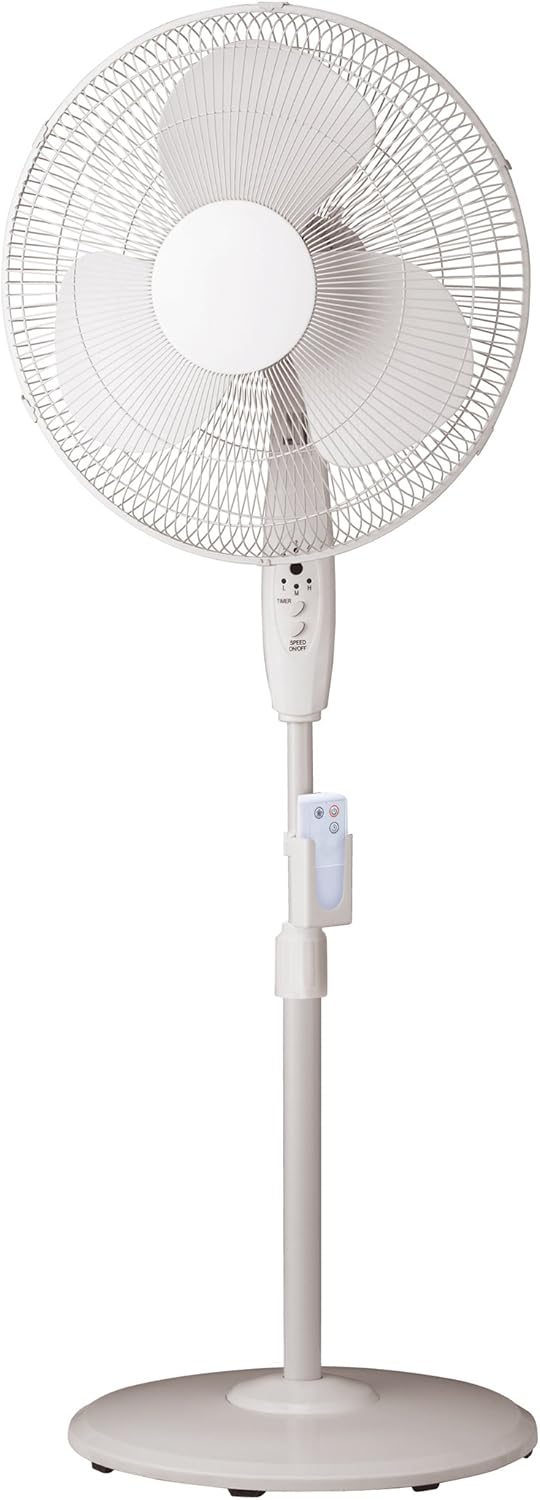
Figure 1: PELONIS FS40-8JR Pedestal Fan. This image displays the complete fan assembly, highlighting its white finish, the protective grille, fan blades, central control panel, the adjustable stand with a remote control holder, and the stable round base.
Āhuatanga matua:
- Wide-angle oscillation and tilt for broad air coverage.
- Convenient 4-hour timer function.
- Remote control with a dedicated holder for easy access.
- Adjustable height to suit different cooling needs.
- Stable round base for secure placement.
- Three-speed settings (Low, Medium, High).
Rarangi Wahi
Before assembly, ensure all parts are present and undamaged. Refer to the diagram in the Product Overview section for visual identification.
- Tunu o Mua
- Paerewa Whakamuri
- Matahi Fan
- Whare Motini
- Paewhiri Mana
- Pou Tūnga Whakarite
- Turanga Porowhita
- Mana Mamao
- Kaipupuri Mana Mamao
- Fasteners (nuts, screws, washers - specific types may vary)
Tatūnga me te Runanga
Minimal assembly is required to set up your PELONIS pedestal fan. Follow these steps carefully:
- Huihuia te turanga: Attach the adjustable stand pole securely to the round base using the provided fasteners. Ensure it is stable and upright.
- Attach Motor Housing: Mount the motor housing onto the top of the adjustable stand pole. Secure it firmly.
- Tāutahia te Matapihi o Muri: Place the rear grille onto the motor housing, aligning it correctly.
- Mount Fan Blades: Carefully slide the fan blades onto the motor shaft. Secure them with the retaining cap or nut.
- Attach Front Grille: Position the front grille over the fan blades and secure it to the rear grille using the clips or screws provided. Ensure the grille is fully closed and locked for safety.
- Kōkuhu Pūhiko Mamao: Whakatuwheratia te wāhanga pākahiko i runga i te mana mamao ka whakaurua kia rua ngā pākahiko AAA (kāore i te whakaurua), me te tirotiro i te polarity.
- Āpiti Pūmau Mamao: Clip the remote control holder onto the adjustable stand pole at a convenient height.
Once assembled, place the fan on a firm, level surface and plug it into a standard electrical outlet.
Nga Tohutohu Whakahaere
Your PELONIS fan can be operated using the control panel on the fan unit or the included remote control.
Nga Mahi Paewhiri Mana:
- Hiko Whakaka/Weto: Press the "ON/OFF" button to turn the fan on or off.
- Mana Tere: Press the "SPEED" button repeatedly to cycle through Low (L), Medium (M), and High (H) speed settings.
- Matawā: Press the "TIMER" button to set the fan to operate for a specific duration (e.g., 1, 2, 4 hours). The fan will automatically turn off after the set time.
- Whakatairite: Press the "OSC" button (if present on the panel, otherwise use remote) to activate or deactivate the oscillation function, allowing the fan head to sweep from side to side.
Nga Mahi Mana Mamao:
The remote control provides convenient operation from a distance. Ensure the remote is pointed towards the fan's control panel for optimal response.
- Pātene Hiko: Ka whakakā, ka whakaweto rānei i te pā.
- Patene Tere: Separate buttons for Low, Medium, and High speeds, or a single button to cycle through them.
- Pātene Matawā: Ka whakatakoto i te taima mahi.
- Pene Whakatika: Activates or deactivates the oscillation feature.
Whakaritea Teitei me te Hoa:
- Teitei: Loosen the height adjustment knob on the stand pole, raise or lower the fan to the desired height, and then tighten the knob securely.
- Tapahia: Gently push the fan head up or down to adjust the vertical angle of airflow.
Te tiaki me te horoi
Ko te horoi me te tiaki i nga wa katoa ka awhina i te wa roa me te mahi tino pai o to kaiwhaiwhai.
- Momotuhia te pūhiko o te hau i ngā wā katoa mai i te putanga hiko i mua i te horoi.
- Horoi o waho: Whakamahia he ngohengohe, damp he kakahu hei muru i nga mata o waho o te powhiriwhiri. Kaua e whakamahi i nga kai horoi me nga whakarewa.
- Horoi Roopu: Dust and lint can accumulate on the grilles and blades. Periodically remove the front grille (refer to assembly instructions in reverse) to clean the fan blades and inside of the grilles with a soft cloth or vacuum cleaner. Ensure all parts are dry before reassembling.
- Rokiroki: Ki te kore e whakamahia mo te wa roa, penapena te powhiriwhiri ki tetahi wahi matao, maroke, pai ake ki roto i tana putunga taketake, hei tiaki i te puehu me te kino.
Raparongoā
If you experience issues with your fan, consult the following table for common problems and solutions.
| Raruraru | Take pea | Rongoā |
|---|---|---|
| Kare te Fan e huri. | Not plugged in; Power outlet not working; Fan switch off. | Ensure fan is securely plugged into a working outlet; Check household circuit breaker; Press the power button on the fan or remote. |
| Te rere hau ngoikore. | Fan speed set too low; Grilles or blades are dirty. | Increase fan speed; Clean the fan grilles and blades as per maintenance instructions. |
| Haruru te Fan. | Loose parts; Fan not on a level surface; Obstruction. | Check for loose screws or components and tighten; Place fan on a stable, level surface; Ensure nothing is obstructing the fan blades. |
| Kaore e mahi te mana mamao. | Kua mate nga pākahiko, kua he ranei te whakaurunga; Te aukati i waenga i te mamao me te mea powhiriwhiri. | Replace batteries (3 AAA); Ensure correct polarity; Remove any obstructions and point remote directly at the fan's control panel. |
Whakatakotoranga
| Huanga | Taipitopito |
|---|---|
| Tau tauira | FS40-8JR |
| Waitohu | PERONI |
| Momo Kaiwhaiwhai | Tangata Karahipi |
| Rahi Kaiwhaiwhai | 16 Inihi |
| Te maha o nga tere | 3 (Paheke, Waenga, Teitei) |
| Nga waahanga motuhake | Oscillating, Adjustable Height, Timer, Remote Control |
| Matawā | Tae atu ki te 4 haora |
| Puna Mana | Hiko Hiko |
| Wattage | 60 watts |
| Tae | Mā |
| Taumaha Tūemi | 8.16 Pauna (tata ki te 3.7 kg) |
| Rahi Hua (L x W x H) | 57.71 x 11.99 x 46.41 cm |
| Huihuinga e hiahiatia ana | Huihuinga Iti |
| Nga Pohiko mo te Mamao | 3 x AAA (kaore i whakauruhia) |
Pūtāhui me te Tautoko
For warranty information or technical support, please refer to the warranty card included with your product or visit the official PELONIS website. You may also contact customer service for assistance with product operation, parts, or troubleshooting beyond this manual.
Whakapā Ratonga Kiritaki: Tirohia ngā taipitopito whakapā kei runga i te takai o te hua, tirohia rānei te apitihanga mana a te kaihanga webpae.


