Kupu Whakataki
This manual provides comprehensive instructions for the setup, operation, and maintenance of your InFocus IN126x WXGA Network Projector. Designed for both business presentations and home cinema, this projector delivers 4200 lumens and excellent image quality with high contrast and BrilliantColor technology. Its compact and lightweight design ensures portability while maintaining powerful performance.

Figure 1: InFocus IN126x Projector Front View
This image displays the InFocus IN126x projector from a front-right angle, highlighting its main lens and the sleek black casing. The top panel features control buttons and the InFocus logo.
Nga Korero Haumaru Nui
Please read all safety instructions carefully before operating the projector. Failure to follow these instructions may result in fire, electric shock, or other injuries.
- Puna Hiko: Use only the power adapter supplied with the projector. Ensure the power outlet matches the voltage whakaritenga.
- Whakahau: Kaua e āraia ngā pūaha hau. He mea nui te rere o te hau kia kore ai e wera rawa.
- wera: Ko te pūwhiti lamp and surrounding areas can become very hot during operation. Avoid touching these areas.
- Lamp Whakatupato: Kei teamp contains mercury. Dispose of lamps according to local regulations. Do not open the lamp compartment until the projector has cooled down.
- Puranga Wai: Kaua e tukuna te pūwhiti ki te ua, te makuku, te wai ranei.
- Ratonga: Kaua e tarai ki te mahi i tenei hua maau ake. Tirohia nga ratonga katoa ki nga kaimahi tohu tohu.

Figure 2: Projector Bottom Panel with Warning Labels
This image shows the underside of the InFocus IN126x projector, displaying various regulatory and safety labels. Notable warnings include information about mercury in the lamp and instructions for lamp replacement, emphasizing the need to allow the unit to cool down before servicing.
Aratohu Tatūnga
1. Te Wetewete me te Whakanoho
Carefully remove the projector and all accessories from the packaging. Place the projector on a stable, flat surface or mount it securely. Ensure there is adequate space around the projector for proper ventilation.

Figure 3: Projector Dimensions
This image illustrates the physical dimensions of the InFocus IN126x projector. The measurements are approximately 29.2 cm (length), 22.1 cm (width), and 9.8 cm (height), providing a clear understanding of its compact size for placement considerations.
2. Te Mana Hononga
Connect the power cord to the projector's power inlet and then plug the other end into a grounded electrical outlet.
3. Te Hononga i ngā Pūtake Whakauru
The InFocus IN126x projector supports various input sources. Connect your device (e.g., laptop, Blu-ray player) to the appropriate port on the projector's rear panel.
- HDMI: Mo te whakamaarama teitei o te ataata mamati me te ororongo.
- VGA (Rorohiko 1/2): For analog computer video input.
- S-Video/Video: Mo te ataata whakamaramatanga paerewa.
- Audio In (Audio 1/2): Mō te tāuru ororongo anaro.
- USB-A/USB-B: For service or specific data transfer.
- LAN: Mo te hononga whatunga.
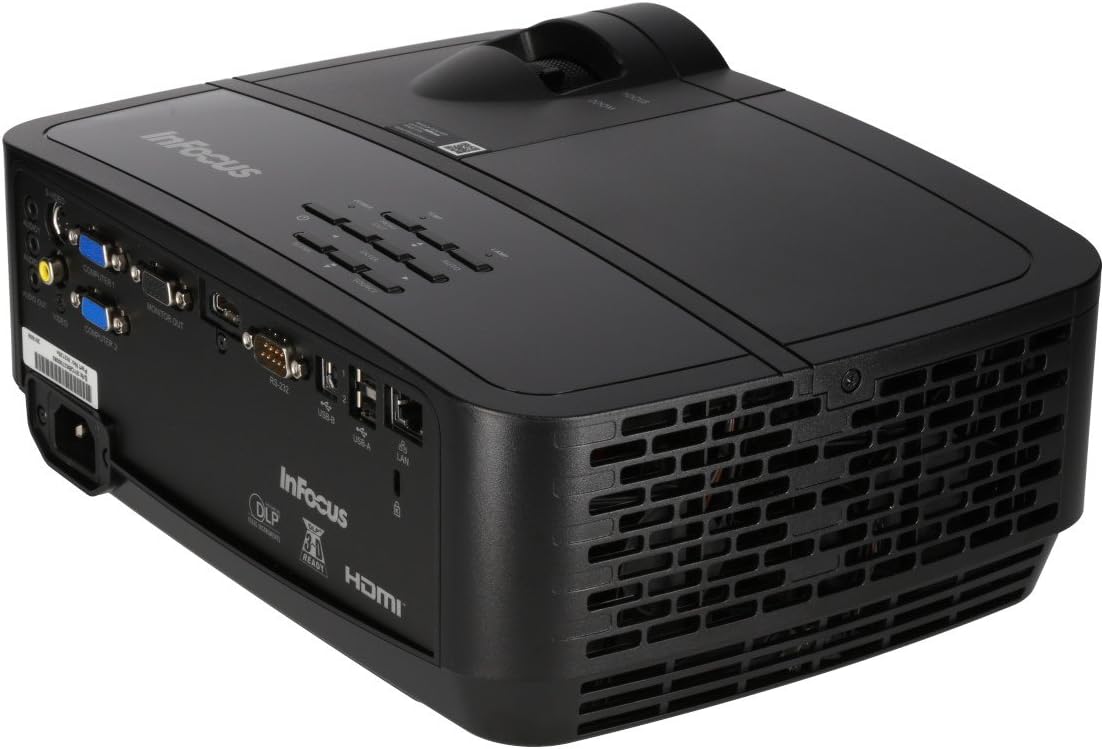
Figure 4: Projector Rear Panel Connectivity
Ko tenei whakaahua e whakarato ana i nga korero taipitopito view of the rear panel of the InFocus IN126x projector, clearly showing all available input and output ports. These include HDMI, VGA (Computer 1 and 2), S-Video, Video, Audio In (Audio 1 and 2), Monitor Out, RS-232, USB-B, USB-A, and LAN ports, facilitating diverse connectivity options.
4. Initial Power On and Adjustment
Press the power button on the projector or remote control. The projector will power on and display the input source. Use the focus and zoom rings on the lens to adjust the image clarity and size to your desired projection area.

Figure 5: Projector Top Panel Controls
This image shows the top surface of the InFocus IN126x projector, highlighting the control panel with various buttons for navigation and settings adjustment. The focus and zoom rings on the lens are also visible, used for fine-tuning the projected image.
Nga Tohutohu Whakahaere
Mana Taketake
The projector can be operated using the control panel on the top of the unit or the included remote control.
- Pātene Hiko: Ka whakakā, whakaweto rānei te pūwhiti.
- Pene Puna: Cycles through available input sources (HDMI, VGA, etc.).
- Patene Tahua: Opens the On-Screen Display (OSD) menu.
- Patene Whakaterenga: Whakamahia hei whakatere i ngā kōwhiringa tahua me te whakarerekē i ngā tautuhinga.
- Pātene Tāuru: Whakaū i ngā kōwhiringa i te tahua.
Tahua Navigation me Tautuhinga
Press the Menu button to access the OSD. Use the navigation buttons to select categories such as Picture, Display, Setup, and Advanced. Within each category, you can adjust settings like:
- Tīahoaho me te Pūrata: Optimize image visibility.
- Color & Tint: Fine-tune color accuracy.
- Ahuatanga ōwehenga: Select between 4:3, 16:9, or other ratios to match your content.
- Te Whakatikatika Kohatu: Adjust image shape if the projector is not perfectly perpendicular to the screen.
- BrilliantColor Technology: Enhance color vibrancy and detail.
Āhuatanga Arā Atu Anō
The IN126x supports a superior viewing experience, including 3D home cinema (3D Glasses sold separately). For enhanced connectivity, the projector can easily connect to your phone or iPad with a LightCast Key (sold separately).
Te tiaki
Lamp Whakakapinga
Ko te pūwhiti lamp has a lifespan of over 5,000 hours. When the lamp reaches the end of its life, a warning message may appear, or the lamp indicator light may illuminate. Always allow the projector to cool down completely (at least 60 minutes) before attempting to replace the lamp. Refer to the safety information on the bottom of the projector for specific warnings regarding mercury content and replacement procedures.
Te horoi
- Arotahi: Whakamahia he kakahu ngohengohe, kore-raro i hangaia mo nga arotahi whatu. Kaua e whakamahi i nga horoi horoi.
- Pūwhiti Casing: Horoia ki te ngohengohe, damp kakahu. A ape i nga matū kino.
- Puawai Hau: Regularly check and clean the air vents to ensure proper airflow and prevent overheating. Use a soft brush or compressed air to remove dust.

Figure 6: Projector Side Ventilation
This image displays the side of the InFocus IN126x projector, prominently featuring the ventilation grilles. These grilles are crucial for dissipating heat generated during operation, and keeping them clear of obstructions is vital for the projector's longevity and performance.
Raparongoā
| Raruraru | Take pea | Rongoā |
|---|---|---|
| Kaore he ahua o te mata |
|
|
| He ngoikore, he ngoikore rānei te kounga o te ahua |
|
|
| Karekau he tangi |
|
|
Whakatakotoranga
| Āhuahira | Taipitopito |
|---|---|
| Waitohu | InArotahi |
| Tau tauira | F321717 (IN126x) |
| Hunga Hua | 18.58 x 20.67 x 7.44 inihi |
| Taumaha Tūemi | 5.5 pauna |
| Whakaatu Whakatau | 1280 x 800 (WXGA) |
| Hangarau Hononga | HDMI, VGA, S-Video, USB, LAN |
| Lamp Te ora | Neke atu i te 5,000 haora |
| Āhuahira Motuhake | Kawe |
| Te Ra Wātea Tuatahi | Akuhata 7, 2016 |
Nga korero Whakaputanga
The InFocus IN126x Projector comes with a 2-tau pūtāhui. InFocus stands behind its products and provides customer service for any issues you may encounter. Please retain your proof of purchase for warranty claims.
Tautoko Kiritaki
For technical assistance, troubleshooting beyond this manual, or warranty inquiries, please contact InFocus customer support. Visit the official InFocus webpaetukutuku mō ngā mōhiohio whakapā hou rawa atu, tae atu ki ngā nama waea me ngā rauemi tautoko ipurangi.
You can also refer to the official InFocus webpae mo etahi atu rauemi me nga FAQ: www.infocus.com


