1. Kupu Whakataki
This manual provides detailed instructions for the safe and effective operation of the Mastech MS8260A Digital Multimeter. The MS8260A is a versatile instrument designed for various electrical measurements, including AC/DC voltage, AC/DC current, resistance, diode check, continuity test, and transistor check. It also features a non-contact voltage mahi kitenga.
Key features of the MS8260A include:
- Vol-whakapā-koretage kitenga
- Automatic power-off function to conserve battery life
- Tohu pākahiko iti
2. Nga korero haumaru
To ensure safe operation and service of the meter, please read all instructions carefully before use. Failure to observe safety warnings can result in electric shock, fire, or damage to the meter.
- Always disconnect test leads from the circuit before changing functions.
- Kaua e tono nui ake i te reiti voltage, kua tohuhia ki te mita, i waenga i nga pito, i waenga ranei i tetahi tauranga me te whenua whenua.
- Kia tupato ki te mahi tahi me te voltagkei runga ake i te 30V AC RMS, te tihi 42V, te 60V DC ranei. Ko enei voltaghe morearea ohorere.
- Before measuring current, ensure the meter's fuses are intact and the test leads are connected correctly.
- Whakakapihia te pākahiko ina puta te tohu iti o te pākahiko kia tika ai nga panui.
- Kaua e whakahaeretia te mita ki te ahua kua pakaru, ki te tuwhera ranei te keehi.
- Kia mau ki nga ture haumaru o te rohe me te motu.
3. Waenga Hua
The Mastech MS8260A Digital Multimeter consists of the main unit and essential accessories.
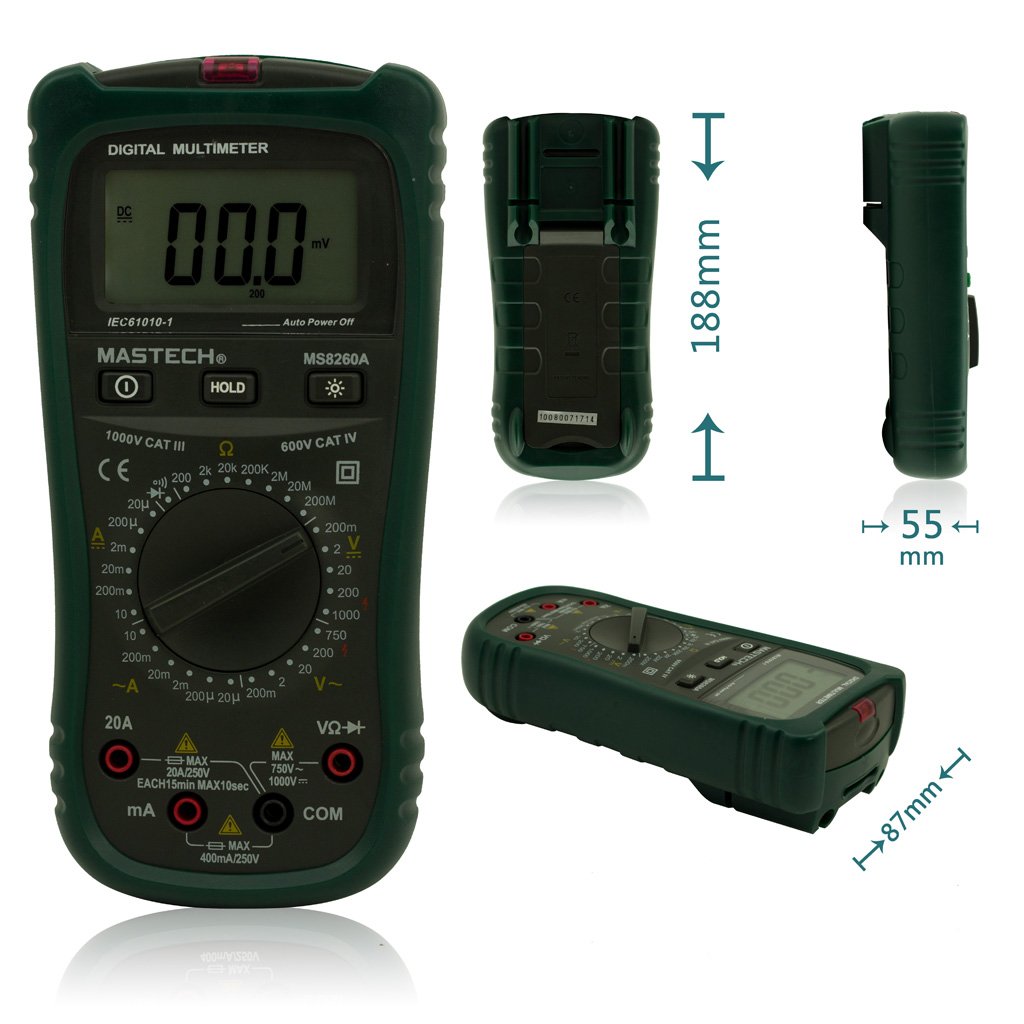
Whakaahua 1: Mua View of Mastech MS8260A Digital Multimeter with Dimensions
This image displays the Mastech MS8260A Digital Multimeter from the front, highlighting its LCD screen, rotary function switch, and input terminals. Key dimensions are indicated: 188mm height, 87mm depth, and 55mm width. The display shows '00.0 mV' and 'Auto Power Off' text. The rotary switch is set to 'mV' range. The input jacks are labeled 'VΩHz', 'mA', and 'COM'.
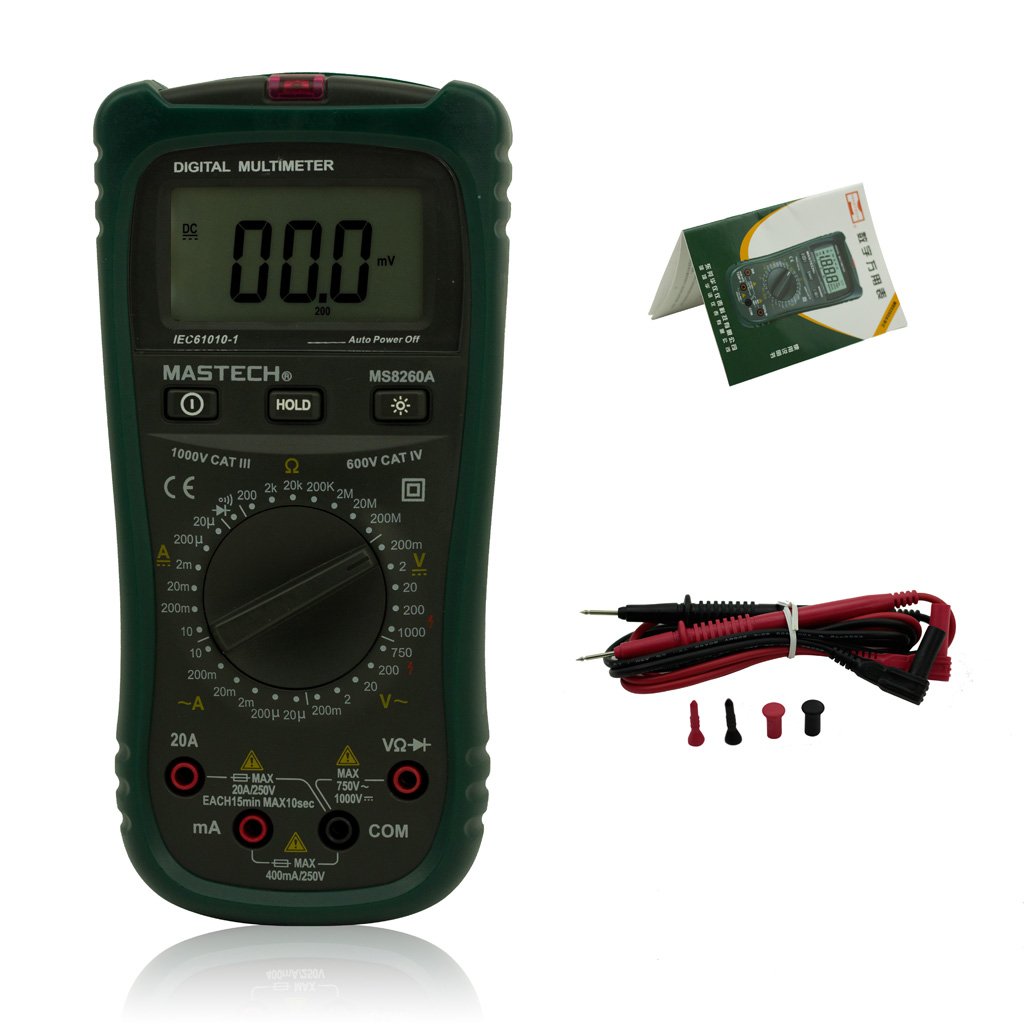
Figure 2: Mastech MS8260A Digital Multimeter and Accessories
This image shows the Mastech MS8260A Digital Multimeter accompanied by its standard accessories. These include a pair of red and black test leads with protective caps, and a printed user manual. The multimeter itself is shown from the front, similar to the main product view.
3.1 Main Unit Features
- Whakaaturanga LCD: E whakaatu ana i ngā pānui ine, ngā waeine, me ngā tohu mahi.
- Whakawhiti Rotary: Selects the desired measurement function and range.
- Ngā Jack Tāuru: Terminals for connecting test leads (VΩHz, mA, COM).
- Pātene HOLD: Whakatio i te panui whakaatu onāianei.
- Pātene Whakamuri: Activates the display backlight for improved visibility in low light.
- Kore-Whakapā Voltage (NCV) Sensor: Ka kitea te AC voltage kore whakapā tika.
3.2 Nga Taapiringa Tae
- Nga Tohu Whakamatau (Whero me te Pango)
- Pukapuka Kaiwhakamahi
4. Tatūnga Tuatahi
4.1 Tāuta Pūhiko
The Mastech MS8260A Digital Multimeter requires one 9V 6F22 battery for operation. Batteries are not included with the product.
- Me whakaweto te mita maha, ka momotu i ngā taura whakamātautau katoa.
- Kimihia te uhi o te wahanga pākahiko kei muri o te waeine.
- Use a screwdriver to remove the screw securing the battery cover.
- Āta tango i te uhi.
- Connect a new 9V 6F22 battery to the battery clips, observing correct polarity.
- Whakanohoia te pākahiko ki roto i te wahanga.
- Whakakapia te uhi o te wahanga pākahiko ka mau ki te huri.
5. Nga Tohutohu Whakahaere
Before taking any measurements, ensure the test leads are properly connected to the meter and the circuit under test.
5.1 Te hono i nga kaiarahi Whakamātautau
- Hono tonu te pango arahi whakamatautau ki te COM hononga tāuru (noa).
- Mo te voltage, resistance, diode, continuity, and transistor measurements, connect the whero arahi whakamatautau ki te VΩHz Jack tāuru.
- For current measurements (mA or 20A), connect the whero test lead to the appropriate current input jack (mA or 20A).
5.2 Kōwhiringa Mahi
Turn the rotary switch to the desired measurement function and range. The meter will display the reading on the LCD.
5.2.1 DC Voltage Ine (V–)
- Whakatakotoria te pana hurihuri ki te DC Voltage e hiahiatia anatage awhe (hei tauira, 200mV, 2V, 20V, 200V, 1000V).
- Honoa nga arataki whakamatautau ki te ara iahiko, ki te waahanga ranei hei ine.
- Pānuihia te voltage uara kei runga i te whakaaturanga.
5.2.2 AC Voltage Ine (V∼)
- Tautuhia te huri hurihuri ki te Vol AC e hiahiatia anatage awhe (hei tauira, 2V, 20V, 200V, 750V).
- Honoa ngā taura whakamātautau kia whakarara ki te hiko ACtage puna.
- Pānuihia te voltage uara kei runga i te whakaaturanga.
5.2.3 DC Current Measurement (A–)
- Tautuhia te pana hurihuri ki te awhe DC o naianei e hiahiatia ana (hei tauira, 20µA, 200µA, 2mA, 20mA, 200mA, 20A).
- Hiranga: Disconnect power to the circuit. Break the circuit and connect the meter in series with the load.
- Hoatu te mana ki te ara iahiko.
- Pānuihia te uara o nāianei i te whakaaturanga.
5.2.4 AC Current Measurement (A∼)
- Tautuhia te pana hurihuri ki te awhe AC o naianei e hiahiatia ana (hei tauira, 20µA, 200µA, 2mA, 20mA, 200mA, 20A).
- Hiranga: Disconnect power to the circuit. Break the circuit and connect the meter in series with the load.
- Hoatu te mana ki te ara iahiko.
- Pānuihia te uara o nāianei i te whakaaturanga.
5.2.5 Ine Atete (Ω)
- Set the rotary switch to the desired Resistance range (e.g., 200Ω, 2kΩ, 20kΩ, 200kΩ, 2MΩ, 20MΩ).
- Me mohio kua whakakorehia te hiko i mua i te ine i te parenga.
- Honoa nga arataki whakamatautau puta noa i te waahanga hei ine.
- Panuihia te uara aukati kei runga i te whakaaturanga.
5.2.6 Diode Test (→|)
- Tautuhia te pana hurihuri ki te tūranga Whakamātautau Diode.
- Honoa te taura whakamātautau whero ki te anode me te taura whakamātautau pango ki te cathode o te diode.
- Ka whakaatuhia te rōrahi whakamua e te whakaaturangatage drop. Reverse the leads; the display should show 'OL' (Open Loop) for a good diode.
5.2.7 Continuity Test (♫)
- Set the rotary switch to the Continuity Test position.
- Honoa nga arataki whakamatautau puta noa i te ara iahiko, i te waahanga ranei.
- Mena kei raro iho te ātete i te 50Ω, ka tangi te buzzer, e tohu ana i te haere tonu.
5.2.8 Whakamātautau Transistor (hFE)
- Tautuhia te huri hurihuri ki te tuunga hFE.
- Insert the transistor's emitter, base, and collector leads into the appropriate sockets on the meter's hFE test socket.
- The display will show the hFE value (DC current gain).
5.2.9 Whakapā-kore Voltage (NCV) Rapunga
- Set the rotary switch to the NCV position.
- Move the top front part of the meter (where the NCV sensor is located) close to the conductor suspected of having AC voltage.
- Mena AC voltage greater than 110V is detected, the meter will emit an audible beep and the NCV indicator light will illuminate.
6. Tiaki
6.1 Te horoi
Mukua te keehi me te panuiamp kakahu me te hopi horoi ngawari. Kaua e whakamahia he mea whakakoi, he mea whakarewa rānei. Me whakarite kia maroke rawa te mita i mua i te whakamahinga.
6.2 Whakakapinga Pūhiko
When the low battery indicator appears on the display, replace the 9V 6F22 battery as described in Section 4.1. Prompt battery replacement ensures accurate measurements and proper meter function.
6.3 Whakakapinga Puka
If the meter fails to measure current, the fuse may be blown. Refer to the specifications for the correct fuse type and rating. Fuse replacement should only be performed by qualified personnel.
7. Te Raru
- Kāore he whakaaturanga, he whakaaturanga ngoikore rānei: Tirohia te whakaurunga o te pākahiko me te whakakapi mehemea e tika ana.
- Ngā pānui hē: Ensure test leads are properly connected, the correct function/range is selected, and the battery is not low.
- Kāore he inenga o te au: Check the fuse. Ensure the meter is connected in series with the circuit.
- 'OL' (Taumaha rawa) e whakaaturia ana: The measured value exceeds the selected range. Select a higher range.
8. Whakatakotoranga
| Whakatakotoranga | Uara |
|---|---|
| Waitohu | mastech |
| Tau tauira | MS8260A |
| Momo Ine | Mamati Multimeter |
| Puna Mana | 9V 6F22 Battery |
| Taumaha Tūemi | 454 g |
| Tiwhikete | CE |
| Kei roto nga pākahiko | Kao |
9. Nga Korero Whakaputanga
Please refer to the warranty card included with your product or contact Mastech customer support for detailed warranty terms and conditions. Warranty coverage typically applies to defects in materials and workmanship under normal use.
10. Tautoko Kiritaki
For technical assistance, troubleshooting, or service inquiries, please contact Mastech customer support. Refer to the official Mastech webpaetukutuku, te takai hua rānei mō ngā mōhiohio whakapā hou.
Ka taea e koe te toro ki te Mastech Store on Amazon mo etahi atu korero hua.