Kupu Whakataki
Thank you for choosing the Berdsen BR-68W Mini Dehumidifier. This manual provides essential information for the safe and efficient operation, maintenance, and troubleshooting of your new appliance. Please read this manual thoroughly before use and keep it for future reference.
The Berdsen BR-68W Mini Dehumidifier is designed to maintain optimal humidity levels in your home, ensuring healthy and clean indoor air. It effectively addresses humidity problems and reduces the risk of mold, bacteria, and dust mite growth. Featuring efficient Peltier technology, it operates quietly and includes an intelligent automatic circuit to prevent water tank overflow, ensuring safe and hassle-free use.
Nga Tohutohu Haumaru
Hei whakaiti i te tupono o te ahi, te wiri hiko, te whara ranei, me whai i nga whakatupatotanga haumaru e whai ake nei:
- Always use the dehumidifier on a stable, level surface.
- Kaua e rumakina te waeine, te taura hiko, te mono ranei ki te wai, ki etahi atu wai ranei.
- Me whakarite kia rite te toha hiko ki te voltage kua tohua ki te tapanga whakatauranga.
- Tiakina te taputapu mai i nga puna wera, te ra tika, me nga mea muramura.
- Kaua e araia te uru hau, te putanga ranei. Kia mau ki te 10 cm te iti rawa o te waatea huri noa i te waahanga.
- Wetewetehia te whakamahana i mua i te horoi, te tiaki, te kore ranei e whakamahia.
- Do not operate the unit with a damaged cord or plug. Contact qualified service personnel for repair.
- Ko tenei taputapu mo te whare o roto anake.
- Kaua e taea e nga tamariki me nga kararehe.
- Kaua e ngana ki te whakatika, ki te wetewete ranei i te waahanga.
Ihirangi mokete
Tirohia ngā mea kei roto i te kete i te wā e wetewete ana i te taonga. Mēnā kua ngaro, kua pakaru rānei ētahi taonga, whakapā atu ki tō kaihokohoko.
- Berdsen BR-68W Mini Dehumidifier Unit
- Pūurutau Hiko
- Pukapuka Tohutohu (tenei tuhinga)
Ka mutu te huaview
Familiarize yourself with the components of your Berdsen BR-68W Mini Dehumidifier.

Whakaahua 1: Mua view of the Berdsen BR-68W Mini Dehumidifier. The control panel is visible at the top, featuring an ON/OFF switch and indicator lights for power and full water tank. The transparent water tank is located at the bottom.
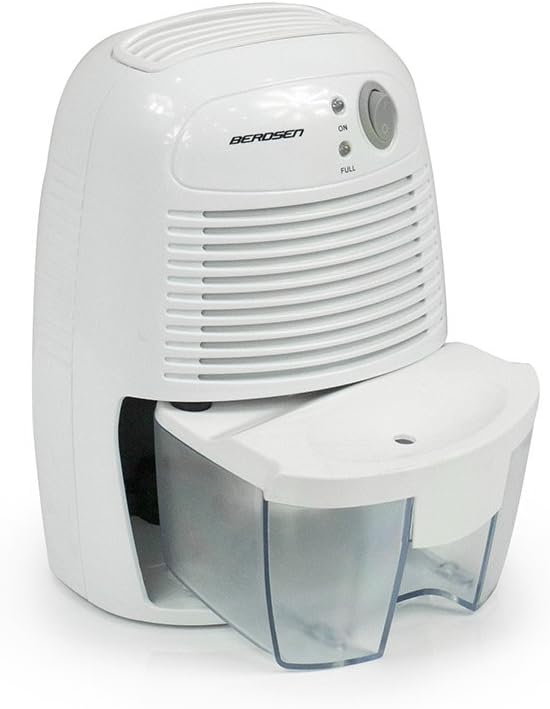
Whakaahua 2: Taha view of the dehumidifier, illustrating the water tank partially slid out from its housing for removal or emptying.

Figure 3: The power adapter, which connects the dehumidifier to an electrical outlet.

Figure 4: A diagram explaining Peltier technology. Moist air passes over a cold surface (KALT), causing water to condense into the water tank (WASSERTANK). The now dry air (TROCKENE LUFT) is then expelled. The Peltier module has a warm (WARM) and cold side.
Tatūnga
- Wetekina te Whakamaroke: Me ata tango i te whakamahana me nga taputapu katoa mai i te kete. Puritia te kete mo te rokiroki a muri ake nei, hei kawe ranei.
- Kōwhiria he Tauwāhi: Place the dehumidifier on a firm, level surface in the desired room. Ensure there is at least 10 cm (4 inches) of clear space around the air inlet and outlet to allow for proper airflow. Avoid placing it near heat sources or in direct sunlight.
- Hono Hono: Insert the small end of the power adapter into the DC input port on the back of the dehumidifier. Plug the other end of the power adapter into a suitable electrical outlet.
- Taki Tuatahi: Ensure the water tank is correctly seated in the unit.
Nga Tohutohu Whakahaere
- Whakahiko: Press the ON/OFF switch located on the control panel. The "ON" indicator light will illuminate, indicating the dehumidifier is operating.
- Te Tukanga Whakamaroke: The unit will begin to draw in moist air, condense the water vapor using Peltier technology, and collect the water in the transparent tank. Dry air will be expelled from the top vent.
- Tāke Wai Ki tonu: When the water tank is full, the "FULL" indicator light will illuminate, and the dehumidifier will automatically shut off to prevent overflow.
- Te Putua i te Taaka Wai:
- Turn off the dehumidifier by pressing the ON/OFF switch and unplug it from the power outlet.
- Carefully slide out the water tank from the front of the unit.
- Putua te wai i kohia ki roto i te totohu, i te waikeri ranei.
- Rinse the water tank with clean water if necessary. Do not use harsh detergents.
- Pania te tāke wai kau ki roto i te whakamaroke kia pāorooro rā anō ki tōna wāhi tika.
- Tonu Mahi: Once the water tank is emptied and reinserted, you can restart the dehumidifier by pressing the ON/OFF switch again.
- Weto Whakakore: To turn off the dehumidifier, press the ON/OFF switch. The "ON" indicator light will turn off. Unplug the unit if it will not be used for an extended period.
Te tiaki
Ko te tiaki i nga wa katoa ka tino pai te mahi me te whakaroa i te roanga o to whakamaarama.
- Te horoi i waho: Horoia te taha o waho o te waeine ki te ngohengohe, damp kakahu. Kaua e whakamahi i nga kai horoi me nga whakarewa.
- Te horoi i te Taaka Wai: Empty and rinse the water tank regularly (as described in "Operating Instructions"). If mold or mildew appears, clean the tank with a mild detergent and warm water, then rinse thoroughly.
- Kouru/Putanga Hau: Periodically check the air inlet and outlet for dust or obstructions. Use a soft brush or vacuum cleaner to gently remove any debris. Do not insert objects into the vents.
- Rokiroki: If storing the dehumidifier for an extended period, ensure the water tank is empty and clean. Unplug the unit and store it in a cool, dry place, preferably in its original packaging.
Raparongoā
I mua i te whakapā atu ki te tautoko kiritaki, tirohia te aratohu rapurongoā e whai ake nei mo nga take noa.
| Raruraru | Take pea | Rongoā |
|---|---|---|
| Karekau e ka ana te whakamahau. |
|
|
| Dehumidifier is running but not collecting water. |
|
|
| Kei te kā te rama tohu "FULL", engari kāore anō kia kī te tāke. |
|
|
| He haruru te waeine. |
|
|
Whakatakotoranga
| Āhuahira | Whakatakotoranga |
|---|---|
| Waitohu | Berdsen |
| Tau tauira | BR-68W |
| Tae | Mā |
| Rahi Hua (L x W x H) | 13 x 15.4 x 21.8 cm |
| Taumaha Tūemi | 1.12 Kirokaramu |
| Mana | 23 Watts |
| Rōrahi Tāke Wai | 500 Miririta |
| Rauemi | Kirihou |
| Te maha o nga tere | 2 |
| Ngā āhuatanga | Water level indicator, Automatic shut-off |
| Te Rahi o te Papa | Up to 20 square meters (20-25 m3 rooms) |
| Whakamahi Manakohia | I roto i te kainga |
| Nga Waahanga kei roto | Dehumidifier, Water Tank, Power Adapter |
Nga korero Whakaputanga
Berdsen products are manufactured to the highest quality standards. This product comes with a standard manufacturer's warranty against defects in materials and workmanship. The specific warranty period may vary by region and retailer. Please retain your proof of purchase for warranty claims.
Karekau te raihana e kapi i te kino na:
- Te whakamahi kino, te whakaurunga ranei.
- Accidental damage, abuse, or neglect.
- Nga whakatikatika, whakarereketanga kore ranei.
- Te kakahu me te haehae noa.
For detailed warranty terms and conditions, please refer to the documentation provided at the time of purchase or contact your retailer.
Tautoko
If you encounter any issues not covered in the troubleshooting section or require further assistance, please contact Berdsen customer support or your retailer.
Please have your model number (BR-68W) and proof of purchase ready when contacting support.
Rauemi ipurangi: For additional information, FAQs, or product registration, please visit the official Berdsen webpae (ki te waatea).


