1. Kupu Whakataki
The JBL Professional 308P MkII is an 8-inch, 2-way, powered, active studio monitor designed for accurate near-field music production, studio monitoring, and high-fidelity audio playback. This manual provides essential information for setting up, operating, and maintaining your monitor speaker to ensure optimal performance and longevity.

Whakaahua 1: Mua view of the JBL Professional 308P MkII Studio Monitor.
2. Nga waahanga matua
- 8-inch Woofer and 1-inch Tweeter: Provides superior bass performance and accurate, crystal-clear highs.
- JBL Image Control Waveguide Technology: Delivers stunning detail, precise imaging, and a wide sweet spot.
- Updated High and Low Frequency Transducers: Optimized damping for superior transient response and lower harmonic distortion.
- New Boundary EQ: Restores neutral low-frequency response when speakers are placed on a work surface or adjacent to walls.
- Patented Slip Stream Low-Frequency Port: Ensures superior bass performance at all playback levels.
- Dual Integrated, Custom Class-D Ampkaikawe: Provides 112 watts of power for high output and dynamic range.
- Hononga Hangawari: Balanced XLR and 1/4" TRS inputs, +4dBu / -10dBV input-sensitivity switch, and adjustable volume control.
- Rigorous 100-Hour Full-Power Test: Ensures years of dependable performance.
3. He aha kei roto i te Pouaka
- JBL 308P MkII Studio Monitor (sold individually)
- Waea Hiko
4. Tatūnga
4.1. Whakanoho
Optimal placement of your studio monitors is crucial for accurate sound reproduction. Position the speakers so that the tweeters are approximately at ear level when you are in your primary listening position. Ensure an equilateral triangle is formed between the two monitors and your listening position for the best stereo imaging. Avoid placing objects directly in front of the speakers that could obstruct the sound path.
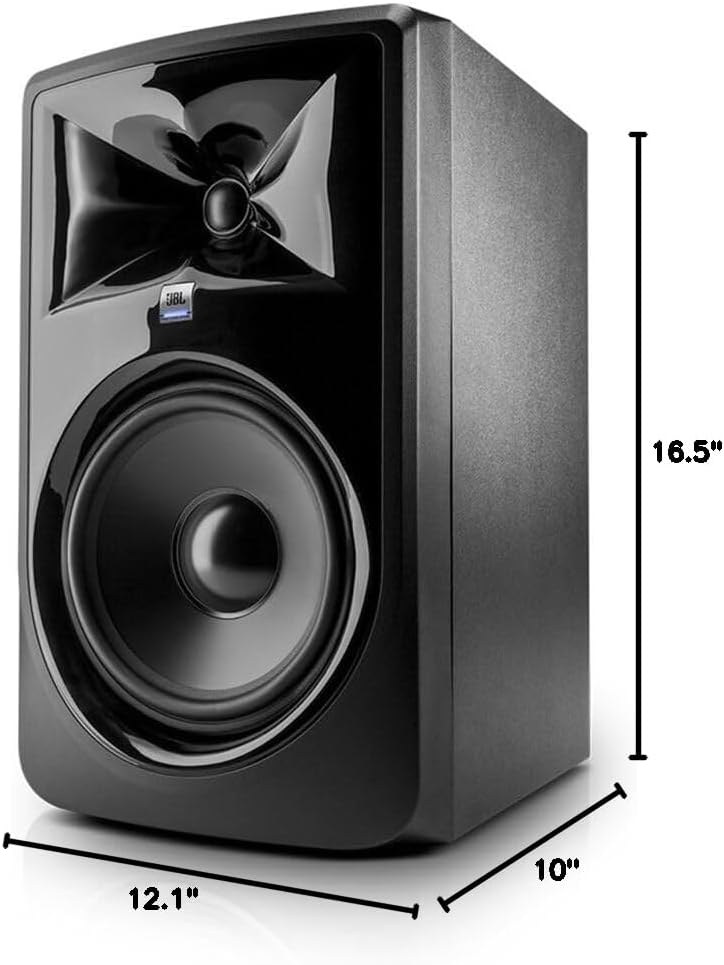
Figure 2: Dimensions of the JBL Professional 308P MkII Studio Monitor (12.1"D x 10"W x 16.5"H).
4.2. Hononga Mana
- Ensure the monitor's power switch is in the OFF position.
- Connect the supplied power cable to the AC IN port on the rear panel of the monitor.
- Monohia tetahi pito o te taura hiko ki tētahi putanga hiko AC e tika ana.
4.3. Hononga Ororongo
The 308P MkII offers flexible input options for various audio sources.
- Whakauru XLR Whakauru: For professional audio interfaces, mixers, or other equipment with XLR outputs. Connect an XLR cable from your audio source to the BALANCED INPUT (XLR) on the monitor.
- Balanced 1/4" TRS Input: For audio interfaces, mixers, or other equipment with 1/4" TRS outputs. Connect a 1/4" TRS cable from your audio source to the BALANCED INPUT (1/4" TRS) on the monitor.
Using balanced connections (XLR or TRS) is recommended to minimize noise and interference, especially with longer cable runs.

Figure 3: Rear panel connections and controls of the JBL Professional 308P MkII.
4.4. Input Sensitivity
The rear panel features an INPUT SENSITIVITY switch (+4dBu / -10dBV). Set this switch to match the output level of your audio source. For professional equipment, +4dBu is typically used. For consumer-level equipment, -10dBV is often appropriate.
4.5. Acoustic Adjustments
The 308P MkII includes controls to fine-tune its acoustic response to your listening environment.
- BOUNDARY EQ: Adjusts the low-frequency response to compensate for speaker placement near walls or corners. Experiment with settings to achieve a neutral bass response.
- HF TRIM: Adjusts the high-frequency output to match room acoustics or personal preference.
5. Nga Tohutohu Whakahaere
- Whakahiko: After all connections are made, switch the POWER switch on the rear panel to the ON position. The JBL logo on the front will illuminate.
- Mana Rōrahi: Adjust the VOLUME knob on the rear panel to a suitable listening level. It is recommended to start with a low volume and gradually increase it.
- Whakarongo: Begin playback from your audio source. Adjust the volume as needed from both your source and the monitor's volume control.
Ataata 1: Kua mutu te manaview of the JBL Professional Studio Monitor, demonstrating its features and design.
6. Tiaki
- Te horoi: Use a soft, dry cloth to clean the exterior of the monitor. Avoid using abrasive cleaners or solvents.
- Whakahau: Ensure adequate airflow around the monitor to prevent overheating. Do not block the rear port or any ventilation openings.
- Rokiroki: If storing the monitor for an extended period, keep it in a dry, dust-free environment, preferably in its original packaging.
7. Te Raru
- Kore Oro:
- Check if the monitor is powered on and the power cable is securely connected.
- Verify that the audio cables are correctly connected to both the monitor and the audio source.
- Ensure the volume knob on the monitor is not set to minimum.
- Check the input sensitivity switch (+4dBu / -10dBV) matches your audio source.
- Confirm your audio source is playing and its output volume is adequate.
- Oro korikori:
- Reduce the volume level on both the monitor and your audio source.
- Tirohia mēnā kua pakaru ngā taura ororongo.
- Ensure the input signal is not too hot (clipping) from your audio source.
- Haruru, Haruru rānei:
- Ensure all audio connections are balanced (XLR or TRS).
- Try connecting the monitor and audio source to the same power outlet.
- Move audio cables away from power cables.
8. Whakatakotoranga
| Āhuahira | Whakatakotoranga |
|---|---|
| Momo Kaikorero | 2-Way Powered Studio Aroturuki |
| Woofer Diamita | 8 Inihi |
| Diamita Tweeter | 1 Inihi |
| AmpMana Hiko | 112 Watts (Custom Class-D) |
| Whakauru Voltage | 100-240 volts |
| Hangarau Hononga | Balanced XLR, 1/4" TRS |
| Hunga Hua | 12.1"D x 10"W x 16.5"H |
| Taumaha Tūemi | 17.87 Pauna |
| Rauemi | Polyvinyl Chloride (PVC) |
| Tae | Pango |
| Kaihanga | JBL Ngaio |
9. Pūtāhui me te Tautoko
The JBL Professional 308P MkII comes with a Limited Warranty. For specific details regarding warranty coverage, duration, and how to obtain service, please refer to the warranty card included with your product or contact JBL Professional customer support. Keep your proof of purchase for warranty claims.


