1. Kupu Whakataki
This manual provides detailed instructions for the safe and effective operation of your BENNING CM 12 True RMS Digital Power Clamp Multimeter. Please read this manual thoroughly before using the device and keep it for future reference. The BENNING CM 12 is designed for demanding measurement tasks in industrial and commercial environments, offering precise measurements of AC, AC+DC True RMS, inrush current, and more, with data logging and Bluetooth connectivity.
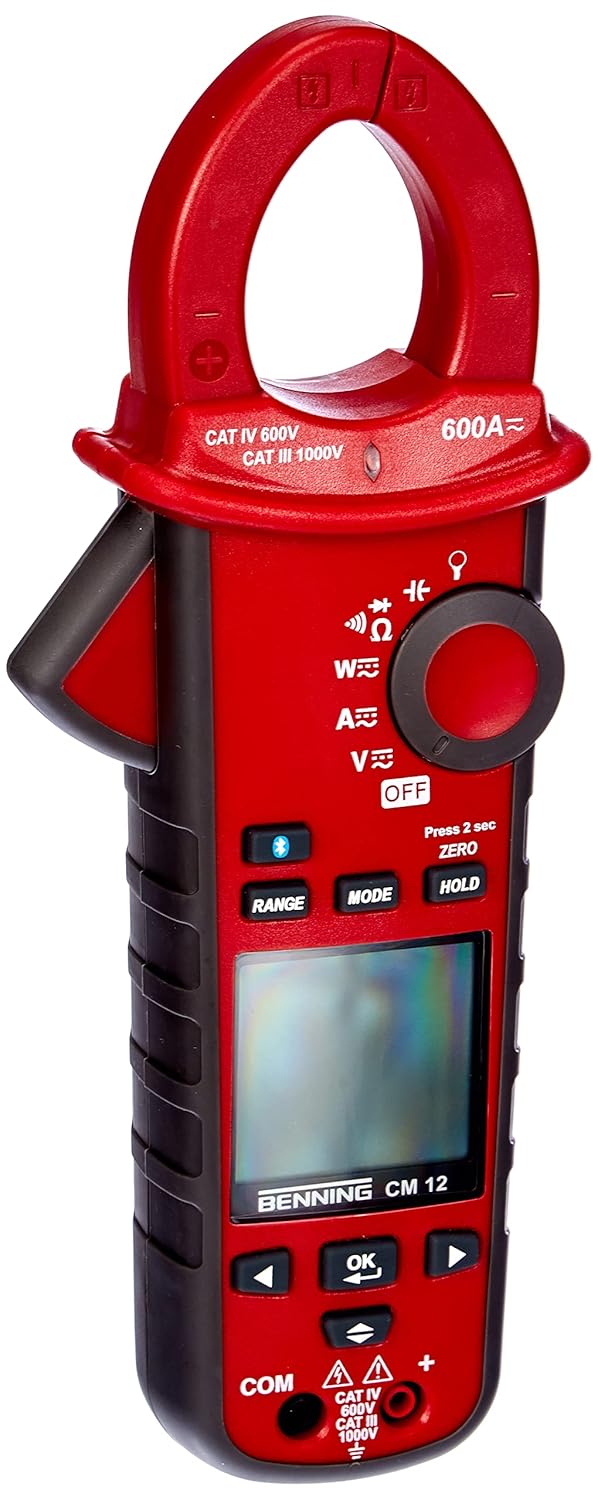
Whakaahua 1: The Benning CM 12 True RMS Digital Power Clamp Multimeter. This image displays the main unit with its red casing, clamp jaw, display screen, and control buttons.
2. Nga korero haumaru
Always observe the following safety precautions to prevent personal injury and damage to the instrument:
- Kaua e whakamahia te mita ki te ahua kua pakaru, ki te whakararu ranei te whakamaarama o te arataki whakamatautau.
- Ensure the correct function and range are selected before making measurements.
- Kaua e neke ake i nga tepe whakaurunga morahi mo tetahi mahi.
- Kia tupato ki te mahi tahi me te voltagneke atu i te 30V AC RMS, 42V tihi, 60V DC rānei, nā te mea he mōrearea ru ēnei.
- Momotuhia i nga wa katoa te hiko ki te ara iahiko ka tuku i nga puia teitei katoatage capacitors before performing resistance, continuity, diode, or capacitance tests.
- Kia mau ki nga ture haumaru o te rohe me te motu.
3. Waenga Hua
The BENNING CM 12 package includes the following items:
- BENNING CM 12 Mana Mamati Clamp Imita maha
- Nga Tohu Whakamatau (Whero me te Pango)
- Pūhiko AAA (6 kei roto)
- Te Kawe i te Keehi
- Pukapuka Kaiwhakamahi (tenei tuhinga)

Whakaahua 2: Red and black test leads. These leads are used for voltage, resistance, continuity, and other measurements.

Whakaahua 3: Six AAA batteries. These batteries power the Benning CM 12 multimeter.

Whakaahua 4: Black carrying case. This case provides protection and portability for the multimeter and its accessories.
4. Tatūnga
4.1. Tāuta Pūhiko
- Kimihia te uhi o te wahanga pākahiko kei muri o te taputapu.
- Whakamahia he huriwiri hei whakatuwhera i te wahanga pākahiko.
- Insert six (6) AAA batteries, ensuring correct polarity as indicated inside the compartment.
- Whakakapia te uhi o te wahanga pākahiko ka mau ki te huri.
4.2. Hia Tuatahi
Turn the rotary switch to any measurement function (e.g., V~ for AC Voltage) to power on the device. The display will illuminate, indicating the device is ready for use.
5. Nga Tohutohu Whakahaere
The BENNING CM 12 offers a variety of measurement functions. Select the desired function using the rotary switch.
5.1. AC/DC Current Measurement (Clamp Taumahi)
- Turn the rotary switch to the 'A~' (AC Current) or 'A=' (DC Current) position.
- Pehia te clamp trigger to open the jaw.
- Whakakōpirihia he kaiārahi kotahi ki te clamp kauae. Kia tino kati te kauae.
- Pānuihia te uara o nāianei i te whakaaturanga.
- For AC+DC True RMS measurements, ensure the appropriate mode is selected if available via the MODE button.
5.2. Rererangitage Inenga (AC/DC)
- Whakauruhia te taura whakamātautau whero ki te hononga tāuru 'VΩ' me te taura whakamātautau pango ki te hononga tāuru 'COM'.
- Turn the rotary switch to 'V~' (AC Voltage) or 'V=' (DC Voltagme).
- Honoa ngā taura whakamātautau kia whakarara ki te ara iahiko, ki te wāhanga rānei e whakamatautauria ana.
- Pānuihia te voltage uara kei runga i te whakaaturanga.
5.3. Resistance and Continuity Measurement
- Ensure the circuit is de-energized before measurement.
- Insert test leads as for voltage inenga.
- Turn the rotary switch to 'Ω' (Resistance/Continuity).
- Honoa nga kaiarahi whakamatautau puta noa i te waahanga.
- For continuity, the meter will beep if resistance is below approximately 30Ω - 100Ω.
5.4. Whakamātautau Diode
- Me whakarite kia whakakorea te hiko o te ara iahiko.
- Insert test leads as for voltage inenga.
- Turn the rotary switch to the 'Diode' symbol.
- Connect the red lead to the anode and the black lead to the cathode of the diode. A forward voltage drop (approx. 0.8V) will be displayed. Reverse the leads for an open circuit reading.
5.5. Inrush Current Measurement
This function measures the initial surge of current when a device (e.g., motor, lamp) is first turned on.
- Turn the rotary switch to the 'A~' position.
- Press the 'INRUSH' button (if dedicated) or activate via 'MODE' button.
- Clamp the meter around the power conductor of the device.
- Turn on the device to measure the inrush current.
5.6. Power Measurement (W) and Power Factor
The BENNING CM 12 can simultaneously detect current (A) and voltage (V) to calculate active power (W) and power factor in AC/DC networks.
- Turn the rotary switch to the 'W' (Power) position.
- Connect the test leads for voltage measurement and clamp the jaw around the current conductor.
- The display will show active power (W) and power factor.
5.7. Data Logger Function (LOG) and Bluetooth Interface
The device features a data logger capable of storing 10,000 readings with a sampling rate from 1 second to 10 minutes. It also includes a Bluetooth interface for data connection to smartphones or tablets via the "BENNING MM-CM Link" app.
- Download and install the "BENNING MM-CM Link" app from your device's app store (iOS and Android compatible).
- Activate Bluetooth on your smartphone/tablet and on the BENNING CM 12 (refer to the device's specific button for Bluetooth activation, usually a dedicated button or a long press of 'MODE').
- Pair the device with the app.
- Use the app to configure logging parameters (sampling rate, start/stop logging) and to view/export recorded data.
5.8. Low-Pass Filter (HFR)
The HFR (High-Frequency Rejection) low-pass filter is used for accurate measurements on clocked motor drives or other noisy environments by filtering out high-frequency interference.
- Activate the HFR filter via a dedicated button or by pressing the 'MODE' button in relevant measurement functions (e.g., AC Voltage or Current).
- The display will typically show an indicator when the filter is active.
5.9. Total Harmonic Distortion (THD) Measurement
The THD function assesses network quality by measuring the total harmonic distortion of voltage or current waveforms.
- Select the THD function using the rotary switch or 'MODE' button in AC Voltage/Current modes.
- Connect the meter as appropriate for voltage inenga o naianei ranei.
- The display will show the THD value.
5.10. Two-Pole Rotary Field Testing
This function is used to determine the phase sequence in three-phase systems.
- Turn the rotary switch to the 'Rotary Field' symbol (if dedicated) or select via 'MODE' button in a relevant AC voltage mahi.
- Connect the test leads to two phases of the three-phase system.
- The display will indicate the phase sequence (e.g., L1-L2, L2-L3).
6. Tiaki
6.1. Te horoi
Mukua te keehi me te panuiamp kakahu me te hopi horoi ngawari. Kaua e whakamahi i ngā mea whakakoi, i ngā whakarewa rānei. Me whakarite kua whakawetohia te taputapu, ā, kua momotu mai i ngā ara iahiko i mua i te horoinga.
6.2. Whakakapinga Pūhiko
When the low battery indicator appears on the display, replace the batteries as described in Section 4.1. Remove batteries if the device will not be used for an extended period to prevent leakage.
6.3. Rokiroki
Store the multimeter in its carrying case in a cool, dry environment, away from direct sunlight and extreme temperatures. Remove batteries for long-term storage.
7. Te Raru
| Raruraru | Take pea | Rongoā |
|---|---|---|
| Kaore te mita i te hiko. | Nga pākahiko kua mate, kua he ranei te whakaurunga. | Tirohia te polarity pākahiko; whakakapi pākahiko. |
| Karekau he panui, he "OL" ranei (Te nui te utaina) i whakaatuhia. | Incorrect range selected, open circuit, or measurement exceeds range. | Select appropriate range, check circuit connections, ensure measurement is within device limits. |
| Ko nga panui kore tika. | Poor test lead connection, external interference, or low battery. | Ensure secure connections, move away from strong electromagnetic fields, replace batteries. |
| Nga take hononga Nihokikorangi. | Bluetooth not activated on device/phone, app issues, or out of range. | Ensure Bluetooth is on for both devices, restart app, move closer to the meter. |
8. Whakatakotoranga
| Āhuahira | Taipitopito |
|---|---|
| Tau tauira | CM 12 |
| Momo Ine | True RMS (AC, AC+DC) |
| Runganui o naianei | Ae |
| Utaina Profile Te tuhi | Yes (single-phase and three-phase) |
| Te Inenga Mana | Active Power (W), Power Factor |
| Whakamātautau Tonu | 30 Ω - 100 Ω |
| Whakamatau Diode | 0.8 V |
| Rotary Field Testing | Rua-pou |
| Tātari Uru-iti | HFR (High-Frequency Rejection) |
| Harmonic Measurement | THD (Tapeke Harmonic Distortion) |
| Raraunga Raraunga | 10,000 readings, 1s - 10min sampreiti ling |
| Atanga | Bluetooth (iOS and Android app "BENNING MM-CM Link") |
| Puna Mana | 6 pākahiko AAA (kei roto) |
| Hunga Hua | 11.42 x 5.12 x 2.76 inihi |
| Taumaha Tūemi | 1.3 Pauna (590 Karamu) |
| Kaihanga | Benning |

Whakaahua 5: Ahu view of the Benning CM 12 Multimeter, indicating its approximate height of 11 inches (27 cm).
9. Nga Korero Whakaputanga
BENNING products are manufactured to high-quality standards. For specific warranty terms and conditions, please refer to the warranty card included with your product or visit the official BENNING webpae. Puritia to tohu hoko mo nga kereme whakamana.
10. Tautoko Kiritaki
If you encounter any issues or have questions regarding your BENNING CM 12, please contact BENNING customer support. You can find contact information on the official BENNING webte waahi, ma te tohatoha ranei o to rohe.
- Webpae: www.benning.de (Tirohia koa to rohe webpae)
- Īmēra: Tirohia te webpae mō ngā īmēra whakapā motuhake.
- Waea: Tirohia te webpae mō ngā nama waea motuhake.


