Kupu Whakataki
The Keter Tool Trolley with 3 Drawers is a versatile and robust storage solution designed for organizing tools and small parts. This unit features three spacious drawers, an adjustable system, and integrated carry handles for easy portability. It is equipped with swivel castors and brakes for mobility and stability. The trolley is ideal for workshops, garages, and various home improvement projects, providing efficient organization and accessibility for your equipment.
Nga korero haumaru
Please read and understand all safety instructions before assembling or using the Keter Tool Trolley. Failure to follow these instructions may result in injury or damage to the product.
- Tepe Taumaha: Do not overload modules beyond the maximum weight limit of 20 kg (44 lbs) per module. Exceeding this limit can cause structural damage or instability.
- Ira whakawiri: Be aware of potential pinch points when opening or closing drawers. Keep hands and fingers clear of moving parts.
- Castors with Brakes: Always engage the brakes on the swivel castors when the trolley is stationary to prevent unintended movement. Use caution when moving the trolley on uneven surfaces.
- Huihuinga: Follow all assembly instructions carefully. Ensure all components are securely fastened before use.
- Pūmautanga: Place the tool trolley on a flat, stable surface. Avoid placing heavy items on the top surface if the trolley is not designed to support them, especially when drawers are open.
- Nga tamariki me nga kararehe: Keep children and pets away from the trolley during assembly and operation to prevent accidents.
Rarangi Waehanga
Manatokohia kei te noho nga waahanga katoa i mua i te tiimata o te huihuinga.
- Main Trolley Frame (1 unit)
- Drawers (3 units)
- Removable Trays (16 units)
- Swivel Castors with Brakes (4 units)
- Integrated Carry Handles (2 units, typically part of the frame)
- Assembly Hardware (screws, clips, etc. - quantity as per specific model)

Whakaahua 1: View of an open drawer with 16 removable bins.
Tatūnga me te Runanga
Follow these steps to assemble your Keter Tool Trolley.
- Wewete Waenga: Carefully remove all parts from the packaging and lay them out on a clean, flat surface. Refer to the Components List to ensure all parts are present.
- Tāpirihia ngā Kātara: Securely attach the four swivel castors to the base of the trolley frame. Ensure they are firmly in place and can rotate freely.
- Kōkuhu Kaiutuutu: Slide each of the three drawers into their designated slots within the trolley frame. Ensure they slide smoothly and are properly aligned.
- Place Removable Trays: Distribute the 16 removable trays into the drawers as desired for organizing small items. These trays can be rearranged or removed based on your storage needs.
- Modular Stacking (Optional): If you have multiple Keter "Workshop" units, they can be stacked and secured using the integrated side latches for a larger storage system. Ensure units are properly aligned and latched before stacking.

Figure 2: Modular stacking capability of Keter "Workshop" units.
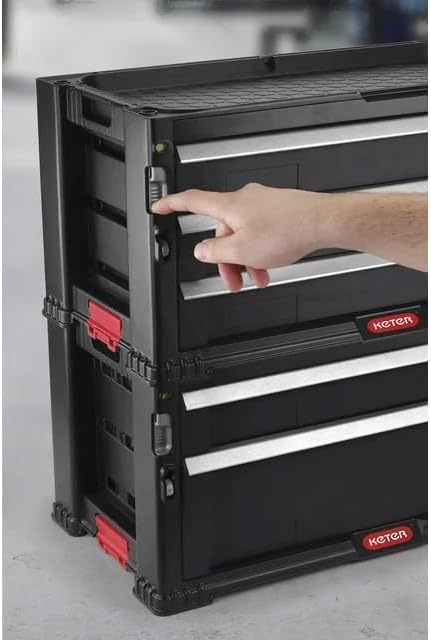
Figure 3: Engaging the side latch for secure stacking.
Nga Tohutohu Whakahaere
- Te neke i te Trolley: To move the trolley, disengage the brakes on the swivel castors. Use the integrated carry handles for easy maneuvering.
- Securing the Trolley: Once the trolley is in the desired location, engage the brakes on the swivel castors to prevent accidental movement.
- Accessing Drawers: Pull the drawer handles to open. Push firmly to close until the drawer is fully seated.
- Using Removable Trays: The 16 removable trays can be used to sort and store small items like screws, nuts, bolts, and other components. They can be easily lifted out for access or cleaning.
- Uta ana: Distribute weight evenly across the drawers. Do not exceed the 20 kg maximum weight per module.

Figure 4: Utilizing integrated carry handles for portability.
Te tiaki
Regular maintenance will ensure the longevity and optimal performance of your Keter Tool Trolley.
- Te horoi: Wipe down the trolley and drawers with a damp cloth and mild detergent. Avoid abrasive cleaners or solvents that could damage the polypropylene material.
- Kiriata Kaiutuutu: Periodically check the drawer slides for any debris or obstructions that might hinder smooth operation. Clean as necessary.
- Kaihoko: Inspect the swivel castors regularly for wear and tear. Ensure they rotate freely and the brakes engage effectively. Clean any accumulated dust or hair from the castor wheels.
- Tirohanga Whānui: Routinely check all connections and fasteners to ensure they remain tight and secure.
Raparongoā
| Raruraru | Take pea | Rongoā |
|---|---|---|
| He uaua ki te whakatuwhera, ki te kati ranei nga pouaka. |
|
|
| Trolley does not move smoothly. |
|
|
| Trolley is unstable. |
|
|
Whakatakotoranga
| Waitohu | Ketere |
| Tau tauira | 237791 |
| Hunga Hua | 59 x 29 x 26 henimita (23.23"H x 11.42"W x 10.24"H) |
| Tae | Pango |
| Rauemi | Polypropylene (PP) |
| Tuhinga o nga Kaitoi | 3 |
| Ipu Tangohanga | 16 |
| Weight Limit per Module | 20 kg (44 lbs) |
| Taumaha Tūemi | 4.82 pauna |
| Huihuinga e hiahiatia ana | Ae |
| Āhuahira Motuhake | Lockable (referring to the ability to secure stacked modules) |
Pūtāhui me te Tautoko
For warranty information or technical support, please contact Keter customer service directly. Details regarding specific warranty periods and terms are typically provided with your purchase documentation or can be found on the official Keter webpae.
Mo etahi atu awhina, tirohia te Toa Keter i runga i a Amazon tirohia ranei ki nga korero whakapā kei roto i to kete hua.