1. Kupu Whakataki
Thank you for choosing the ANENG Q1 9999 Counts True RMS Digital Multimeter. This device is designed for safe and accurate measurement of various electrical parameters. It features True RMS measurement, Non-Contact Voltage (NCV) detection, auto/manual ranging, and an EBTN black display with an analog bar graph for enhanced readability. Please read this manual thoroughly before use to ensure proper operation and safety.
2. Nga korero haumaru
WARNING: To avoid possible electric shock, fire, or personal injury, please read all safety information before you use the product.
- Always ensure the multimeter is in the correct function and range for the measurement being performed.
- Kaua e neke ake i nga uara whakauru morahi mo tetahi mahi.
- Tirotirohia nga arataki whakamatautau mo te whakamaarama kua pakaru, te whakarewa ranei kua kitea i mua i te whakamahi. Whakakapihia mena kua pakaru.
- Do not use the multimeter if it appears damaged or if it is not operating properly.
- Kia tūpato i te wā e mahi ana me te voltagkei runga ake i te 30V AC RMS, te tihi 42V, te 60V DC ranei. Ko enei voltaghe morearea ohorere.
- Momotuhia i nga wa katoa nga arataki whakamatautau mai i te ara iahiko i mua i te huri i nga mahi me nga awhe.
- Replace batteries as soon as the low battery indicator appears to avoid incorrect readings.
- Kia mau ki nga ture haumaru o te rohe me te motu.
3. Hua Neke Atuview
The ANENG Q1 multimeter is a versatile tool for electrical measurements. Below is an image illustrating the device and its included accessories.

Image 3.1: ANENG Q1 Digital Multimeter and included accessories, including test leads, temperature probe, and storage bag.
The device features a large EBTN display, function buttons, and input jacks for test leads.

Whakaahua 3.2: Mua view of the ANENG Q1 Multimeter, highlighting the display, function buttons, and input terminals.
4. Tatūnga
4.1 Tāuta Pūhiko
The ANENG Q1 multimeter requires two 1.5V AA batteries (not included). To install or replace batteries:
- Ensure the multimeter is powered off and disconnect all test leads.
- Kimihia te uhi o te wahanga pākahiko kei muri o te taputapu.
- Whakamahia he tīwiri hei wetewete i te tīwiri e mau ana i te taupoki.
- Remove the cover and insert two AA batteries, observing correct polarity (+/-).
- Whakakapia te uhi o te wahanga pākahiko ka whakamau i te huri.
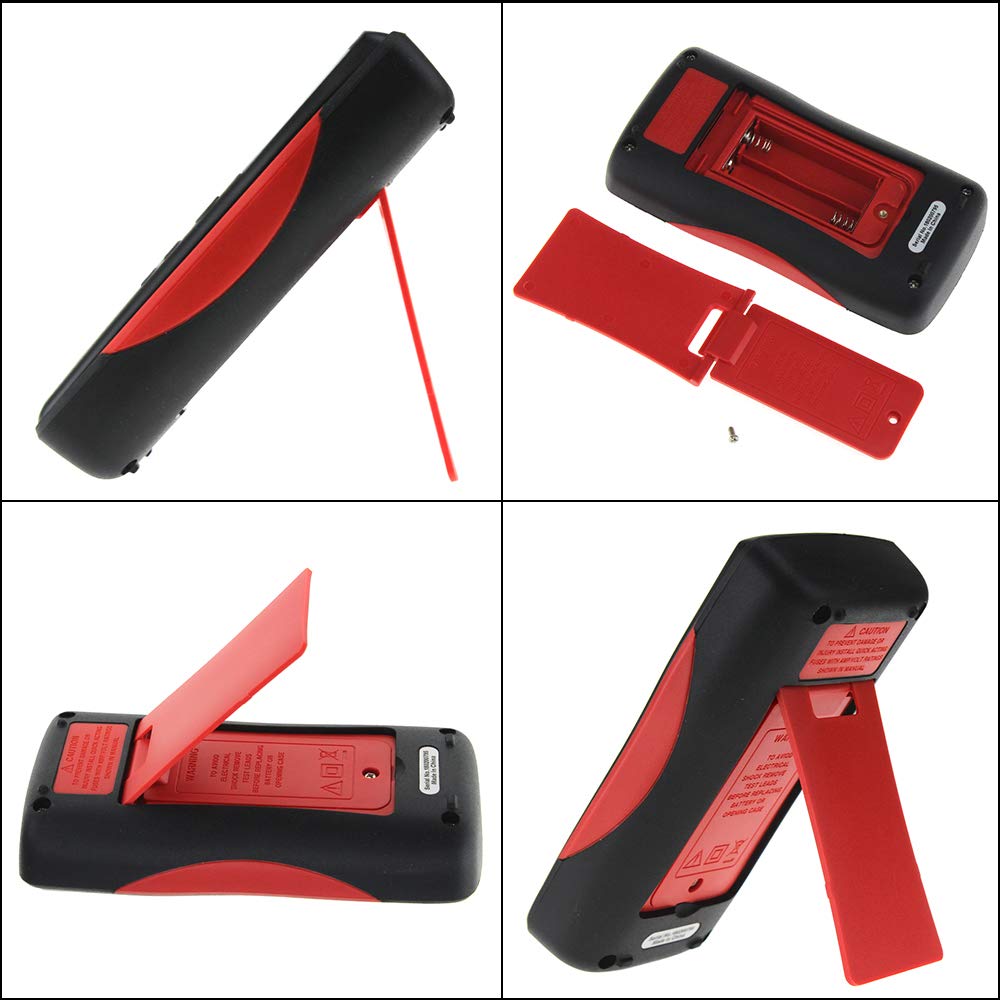
Whakaahua 4.1: Whakamuri view of the multimeter, illustrating the battery compartment and the integrated kickstand.
4.2 Te hono i nga kaiarahi Whakamātautau
The multimeter comes with two standard test probes and a 16-in-1 multifunctional test line set. Always connect the black test lead to the COM (Common) jack. Connect the red test lead to the appropriate input jack based on the measurement type:
- VΩHz-+ jack for Voltage, Resistance, Frequency, Diode, and Continuity measurements.
- mA jack for milliampinenga o naianei.
- μA jack for microampinenga o naianei.
- 10A MAX jack for high current measurements (up to 10A).

Image 4.2: Included test leads and various accessories, such as alligator clips and fine-point probes.
5. Nga Tohutohu Whakahaere
The ANENG Q1 features both auto-ranging and manual-ranging capabilities. Press the PANUI button to switch between auto and manual modes. In manual mode, press PANUI repeatedly to cycle through available ranges.
5.1 Hiko / Whakaweto
Patohia me te pupuri i te MANA button (red circle with line) for more than 2 seconds to turn the multimeter on or off. The device also features an Auto Power Off function to conserve battery life.
5.2 Te Ine AC/DC Voltage
- Tūhono i te mata whakamātautau pango ki te COM Jack me te whakamatautau whero arahi ki te VΩHz-+ koki.
- Turn on the multimeter. The device will typically default to auto-ranging voltage inenga.
- Touch the test probes to the circuit points where voltage me ine.
- Pānuihia te voltage value on the display. The multimeter automatically detects AC or DC voltage.
5.3 Te Ine i te Iahiko AC/DC
- NUI: Ensure the circuit is de-energized before connecting the multimeter in series.
- Tūhono i te mata whakamātautau pango ki te COM koki. Honoa te mata whakamatautau whero ki te mA, μA, ranei 10A MAX jack depending on the expected current.
- Insert the multimeter in series with the circuit where current is to be measured.
- Re-energize the circuit.
- Pānuihia te uara o nāianei i te whakaaturanga.
5.4 Te Ine Atete
- Tūhono i te mata whakamātautau pango ki te COM Jack me te whakamatautau whero arahi ki te VΩHz-+ koki.
- Me mohio kua whakakorehia te hiko, te waahanga ranei i mua i te ine i te parenga.
- Touch the test probes across the component to be measured.
- Panuihia te uara aukati kei runga i te whakaaturanga.
5.5 Te Ine i te Puakaha
- Tūhono i te mata whakamātautau pango ki te COM Jack me te whakamatautau whero arahi ki te VΩHz-+ koki.
- Me whakarite kua tukuna katoatia te pūnga iahiko i mua i te ine kia kore ai e pakaru te ine maha.
- Pā atu ki ngā pūwero whakamātautau puta noa i ngā pito o te pūnga hiko.
- Panuihia te uara capacitance kei runga i te whakaaturanga.
5.6 Te Ine i te Pāmahana
- Connect the temperature sensor (thermocouple) to the VΩHz-+ a COM jacks, observing polarity if applicable.
- Place the tip of the temperature sensor on or near the object whose temperature is to be measured.
- Read the temperature value on the display. The unit can be switched between Celsius and Fahrenheit.
5.7 Whakapā-kore Voltage (NCV) Rapunga
Mā te mahi NCV ka taea te kite i te vol ACtagme te kore e pā tika ki ngā kaiarataki.
- Pehia te NCV button to activate the NCV mode.
- Nekehia te tihi o te mita maha ki te taha o te ara iahiko, o te putanga hiko rānei.
- The display will show an increasing number of bars and an audible beep will indicate the presence and strength of AC voltage.

Image 5.1: The multimeter performing a Non-Contact Voltage (NCV) test near a power strip, indicated by the signal icon on the display.
5.8 Te Whakamātautau me te Haere Tonu o te Diode
These functions are typically accessed through the VΩHz-+ jack and a dedicated button or range selection.
- Whakamatau Whakatautau: Connect the red lead to the anode and the black lead to the cathode of the diode. The display will show the forward voltagtaka. Hurihia ngā taura hei tirotiro mēnā he ara iahiko tuwhera.
- Whakamātautau Tonu: Touch the probes to the two points of the circuit. A continuous beep indicates a low resistance path (continuity).
6. Tiaki
6.1 Te horoi
Mukua te keehi me te panuiamp kakahu me te horoi ngawari. Kaua e whakamahi i te abrasive me te whakarewa. Kia noho kore he paru me te makuku nga pito whakauru.
6.2 Whakakapinga Pūhiko
Refer to Section 4.1 for battery replacement instructions. Replace batteries promptly when the low battery indicator appears on the display.
6.3 Whakakapinga Puka
The multimeter is protected by internal fuses. If the current measurement function stops working, the fuse may need replacement. Fuse replacement should only be performed by qualified personnel. Refer to the specifications for fuse ratings.
7. Te Raru
- Kāore he whakaaturanga, he whakaaturanga ngoikore rānei: Tirohia te tāutanga o te pākahiko, ā, ka whakakīia. Whakakapia ngā pākahiko mēnā e tika ana.
- Ngā pānui hē: Ensure test leads are properly connected, the correct function/range is selected, and the batteries are not low.
- Kāore te ine o nāianei e mahi ana: Check the fuse. If blown, replace with a fuse of the correct rating.
- "OL" or "OVER" on display: Indicates an overload or out-of-range measurement. Select a higher range or ensure the input is within the device's limits.
8. Whakatakotoranga
| Tawhā | Awhe/Uara |
|---|---|
| Momo Whakaatu | Digital Display, 9999 Counts, EBTN Black Display, Analog Bar Graph |
| Te kaha | 9.99nF / 99.99nF / 999.9nF / 9.99µF / 99.99µF / 999.9µF / 9.999mF |
| Voltage (AC/DC) | 99.99mV / 999.9mV / 9.999V / 99.99V / 999.9V |
| Current (AC/DC) | 99.99µA / 999.9µA / 99.99mA / 999.9mA / 9.999A |
| Ātete | 99.99Ω / 999.9Ω / 9.999kΩ / 99.99kΩ / 999.9kΩ / 9.999MΩ / 99.99MΩ |
| Auautanga | 99.99Hz / 999.9Hz / 9.999kHz / 99.99kHz / 999.9kHz / 5MHz |
| Te pāmahana | -20°C ~ 1000°C / -4°F ~ 1832°F |
| Whakamatau Diode | Ae |
| Tonu | Ae |
| Huringa Mahi | 1% - 99% |
| Sampreiti reiti | 3 wa ia hekona |
| Mana | 2 x 1.5V AA pākahiko |
| Aratau Mahi | Awhe / Awhe Awhe |
| Te Waahi Mahi | 0-40°C |
| Te haumākū whakahaere | ≤ 75% RH |
| Tikanga Rokiroki | -20 ~ 60°C |
| Rokiroki Haumākū | ≤ 80% RH |
| Whakatauranga Haumaru | 600V CAT III, 1000V CAT II (inferred) |
9. Pūtāhui me te Tautoko
Specific warranty information is not provided in the product details. For warranty claims or technical support, please contact the retailer or manufacturer directly. Keep your purchase receipt as proof of purchase.


