1. Nga korero haumaru
Please read and understand all safety information and operating instructions before using this multimeter. Failure to follow these instructions may result in electric shock, fire, or damage to the meter.
- Always ensure the test leads are properly connected and the function switch is set to the correct range before making any measurements.
- Kaua e ngana ki te ine voltages or currents exceeding the maximum rated values for this meter.
- Kia tino tupato i te wā e mahi ana me ngā ara iahiko ora. Teitei te kahataghe mea morearea pea ēnei.
- Never open the meter casing unless specifically instructed for battery or fuse replacement. Ensure test leads are disconnected before opening.
- Whakakapia te pākahiko ina puta te tohu pākahiko iti kia tika ai ngā pānui.
- Kaua e whakamahia te mita ki te ahua kua pakaru, ki te whakararu ranei te whakamaarama o te arataki whakamatautau.
Whakaahua 1: Whakamuri view of the Rebel MIE-RB-830 Multimeter, showing the battery compartment cover and a warning label. The label advises removing test leads before opening the case to avoid electrical shock and to install fuses with correct amp/volt ratings. It also indicates the power supply is a 9V battery, type NEDA 1604 9V 6F22.
2. Hua Neke Atuview
The Rebel MIE-RB-830 is a compact, battery-operated digital multimeter designed for measuring DC/AC voltage, DC current, resistance, diode, and transistor (hFE) values. It is suitable for general electrical testing and troubleshooting.
2.1. Nga Taonga
- Digital Multimeter Unit
- Nga Tohu Whakamatau (Whero me te Pango)
- 9V Battery (may be included or sold separately)
- Pukapuka Kaiwhakamahi (tenei tuhinga)

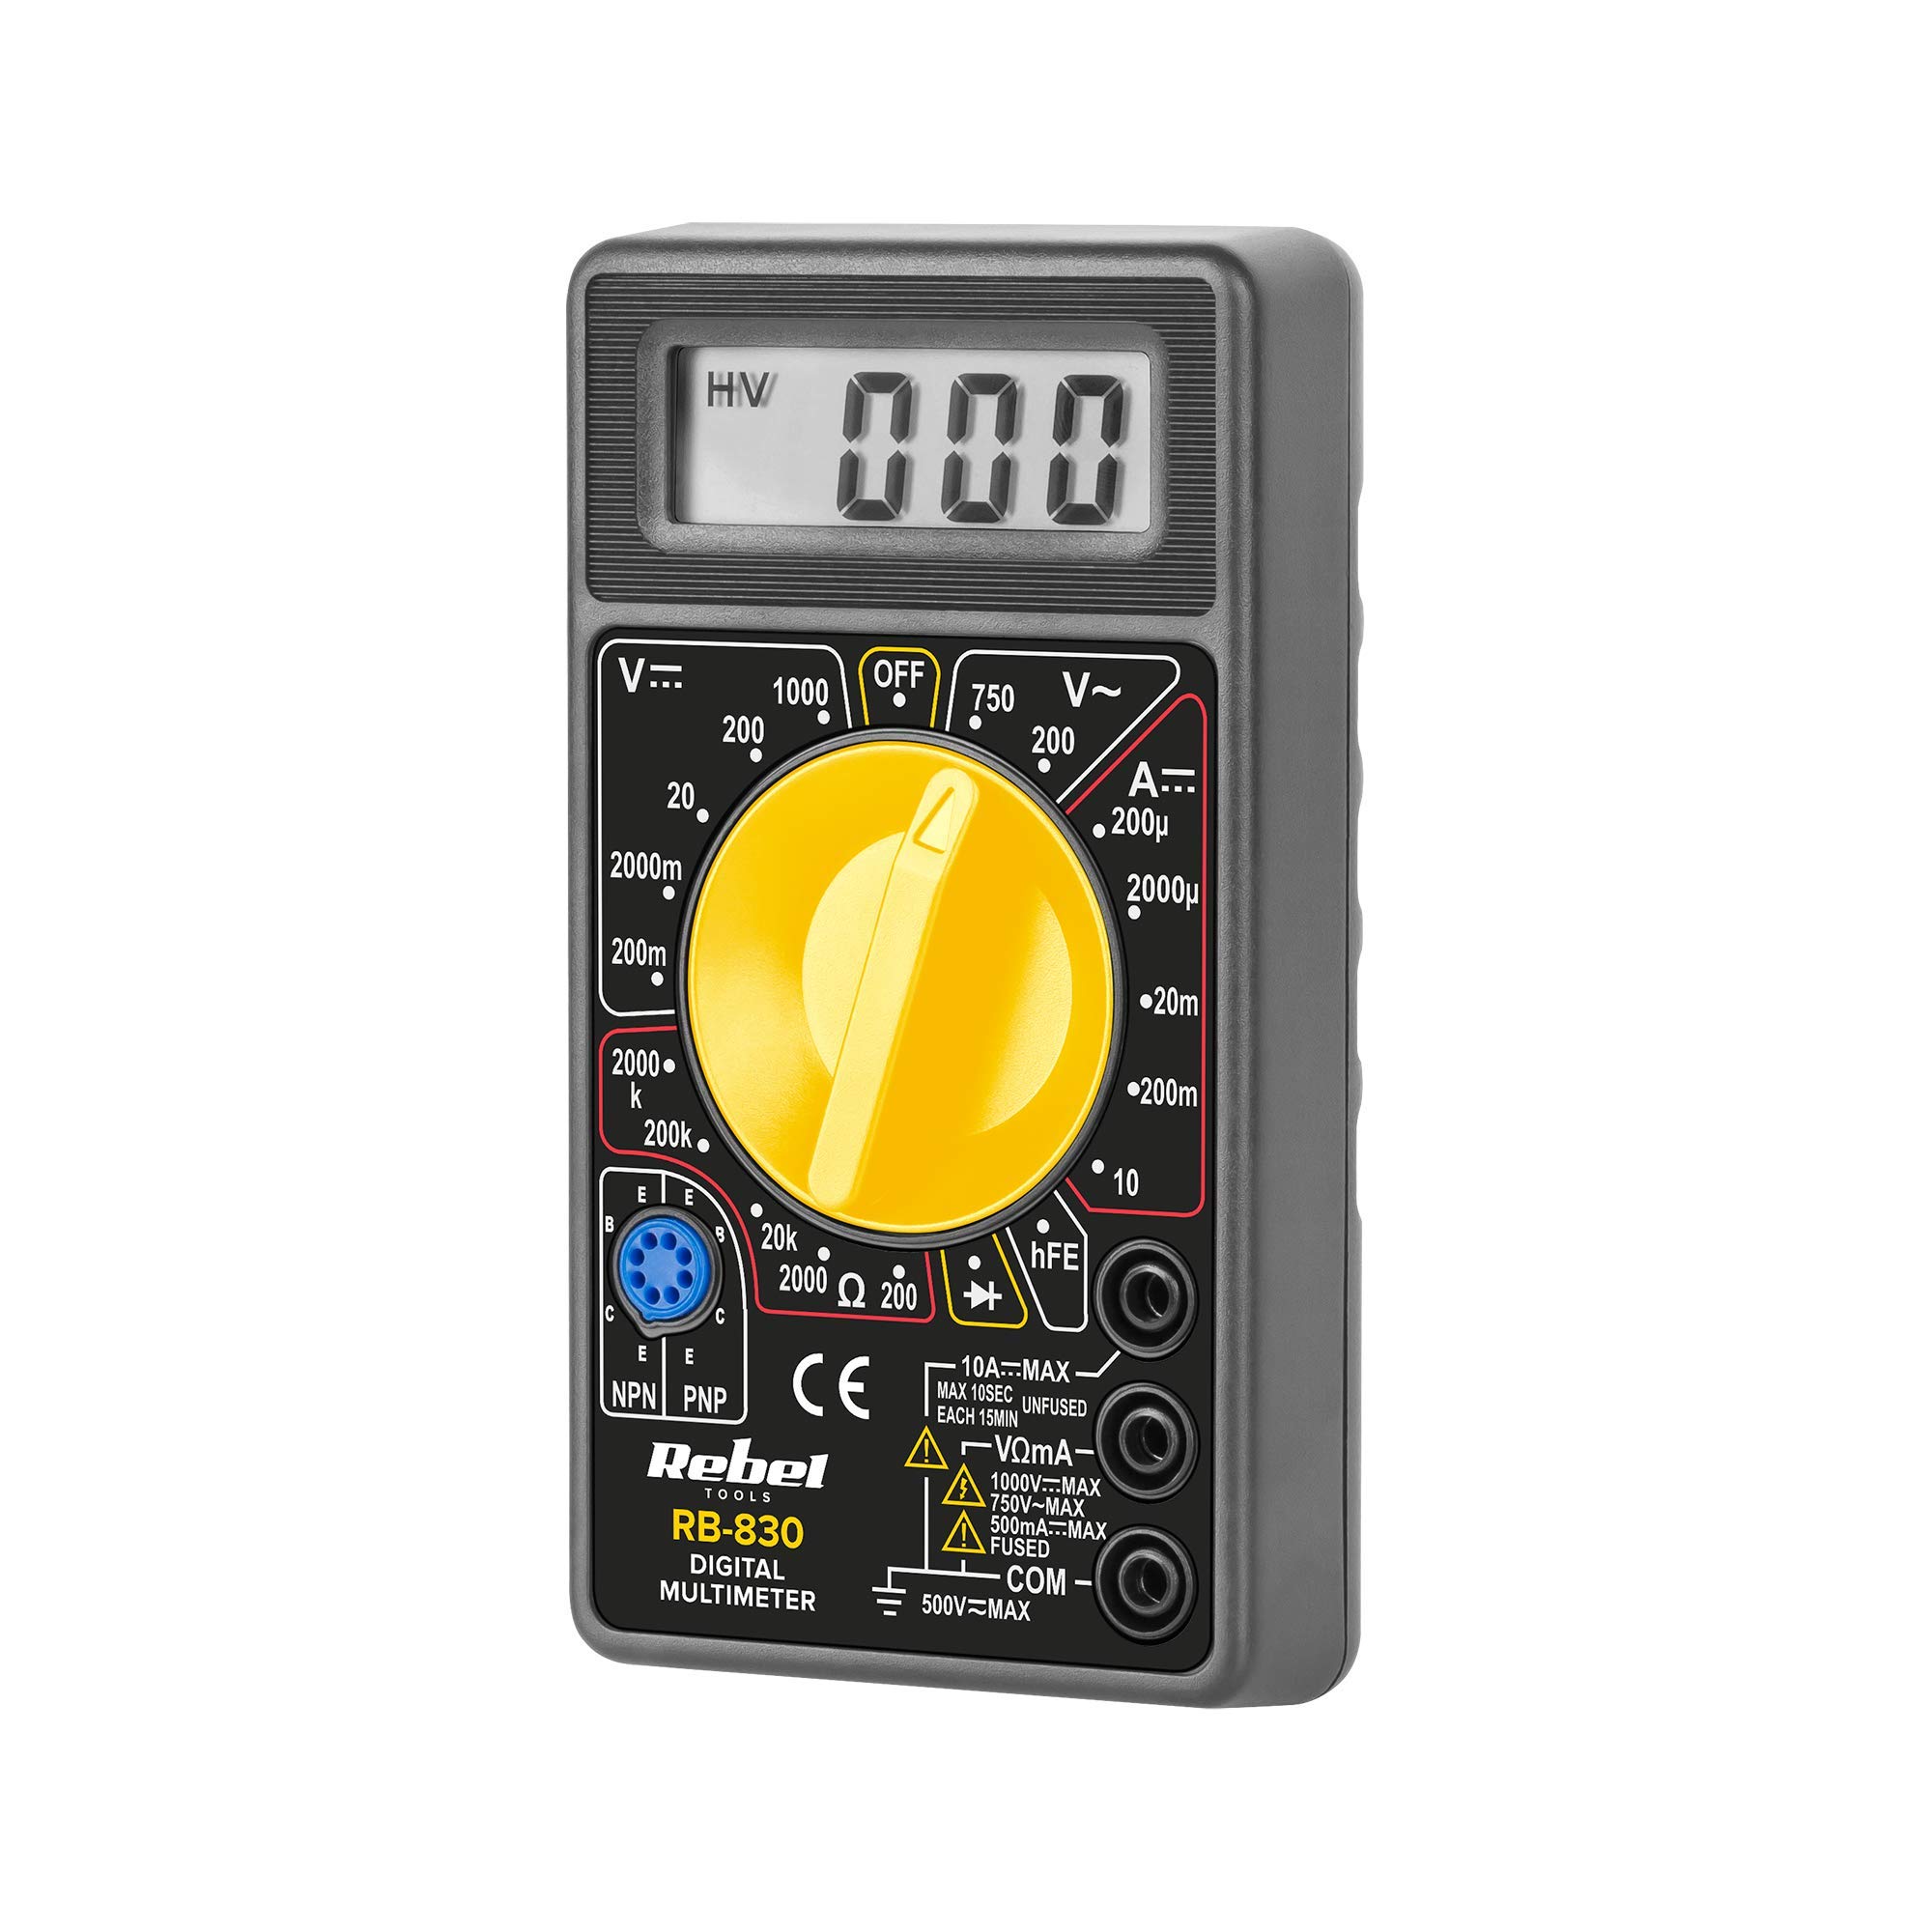
Whakaahua 2: The Rebel MIE-RB-830 Digital Multimeter shown with its accompanying red and black test leads. The multimeter features a large LCD display and a rotary function switch.

Whakaahua 3: Kati-ake view of the red and black test leads. These leads are essential for connecting the multimeter to the circuit under test.
3. Tatūnga
3.1. Tāuta Pūhiko
- Me mohio kua whakawetohia te mita maha ka momotuhia nga arahi whakamatautau katoa.
- Locate the battery compartment cover on the back of the meter (refer to Figure 1).
- Unscrew the retaining screw(s) and carefully remove the cover.
- Insert a new 9V battery (NEDA 1604 or 6F22 type), observing the correct polarity (+ and -).
- Whakakapia te taupoki o te wāhanga pākahiko ka whakau ki te/ngā tīwiri.
3.2. Te hono i nga Kaitohu Whakamatau
- Honoa te whero test lead to the "VΩmA" input jack.
- Honoa te pango test lead to the "COM" (common) input jack.
- For current measurements exceeding 200mA (up to 10A), connect the red test lead to the "10A" input jack.
4. Nga Tohutohu Whakahaere
4.1. Kōwhiringa Mahi
Turn the rotary switch to the desired measurement function and range. Always start with a higher range if the approximate value is unknown to prevent overloading the meter.
4.2. Measuring DC Voltage (V–)
- Whakatakotoria te pana hurihuri ki te DC Voltage e hiahiatia anatage (V–) range (e.g., 20V, 200V).
- Honoa te taura whakamātautau whero ki te taha pai (+) o te ara iahiko, me te taura whakamātautau pango ki te taha kino (-).
- Pānuihia te voltage uara i runga i te whakaaturanga LCD.
4.3. Te Ine AC Voltage (V∼)
- Tautuhia te huri hurihuri ki te Vol AC e hiahiatia anatage (V∼) range (e.g., 200V, 750V).
- Honoa ngā taura whakamātautau puta noa i te hiko ACtage puna.
- Pānuihia te voltage uara i runga i te whakaaturanga LCD.
4.4. Measuring DC Current (A–)
Tupato: To measure current, the meter must be connected in series with the circuit. Never connect the meter in parallel with a voltage source when in current mode, as this can damage the meter and the circuit.
- Set the rotary switch to the desired DC Current (A–) range (e.g., 20mA, 200mA, 10A).
- For currents up to 200mA, ensure the red lead is in the "VΩmA" jack. For currents up to 10A, move the red lead to the "10A" jack.
- Open the circuit where current is to be measured and connect the meter in series.
- Pānuihia te uara o nāianei i runga i te whakaaturanga LCD.
4.5. Measuring Resistance (Ω)
Tupato: Ensure the circuit or component under test is de-energized before measuring resistance.
- Set the rotary switch to the desired Resistance (Ω) range (e.g., 200Ω, 2kΩ, 200kΩ).
- Honoa nga arataki whakamatautau puta noa i te waahanga, iahiko ranei hei ine.
- Pānuihia te uara ātete i runga i te mata LCD.
4.6. Diode Test (→|–)
- Set the rotary switch to the Diode Test (→|–) position.
- Connect the red test lead to the anode of the diode and the black test lead to the cathode.
- Ka whakaatuhia te rōrahi whakamua e te whakaaturangatagte maturuturunga hiko (te tikanga 0.5V ki te 0.8V mō ngā taio hiko silicon).
- Reverse the leads. The display should show "OL" (Open Loop) for a good diode.
4.7. Transistor (hFE) Test
- Tautuhia te huri hurihuri ki te tuunga hFE.
- Tautuhia mena he NPN, he PNP ranei te transistor.
- Insert the transistor's emitter, base, and collector leads into the corresponding sockets on the hFE test socket.
- Read the hFE (DC current gain) value on the display.
5. Tiaki
5.1. Whakakapinga Pūhiko
Ina puta te tohu pākahiko iti ki te mata, whakakapia te pākahiko 9V e ai ki te whakaahuatanga i te Wāhanga 3.1. Mā te whakamahi i te pākahiko iti ka hē pea ngā panuitanga.
5.2. Whakakapinga Fuse
If the current measurement function stops working, the fuse may need replacement. This operation should only be performed by qualified personnel.
- Me mohio kua whakawetohia te mita maha ka momotuhia nga arahi whakamatautau katoa.
- Whakatuwheratia te tuara casing of the meter (this may involve more screws than just the battery compartment).
- Locate the blown fuse and replace it with a fuse of the exact same type and rating (e.g., F200mA/250V for mA range, F10A/250V for 10A range). Refer to the internal markings or specifications for precise fuse ratings.
- Carefully reassemble the meter, ensuring all screws are tightened.
5.3. Te horoi
Horoia te mita ki te pānuitangaamp cloth and mild detergent. Do not use abrasives or solvents. Keep the meter dry.
6. Te Raru
| Raruraru | Take pea | Rongoā |
|---|---|---|
| Kaore he whakaaturanga, he whakaaturanga ngoikore ranei | He iti te pākahiko kua mate ranei | Whakakapihia te papahiko 9V. |
| Ko nga korero e he ana | Low battery; Incorrect range selection; Poor test lead connection | Replace battery; Select appropriate range; Ensure leads are firmly connected. |
| Ko te inenga o naianei kaore e mahi | Blown fuse; Incorrect lead connection for current | Replace fuse (see Section 5.2); Ensure red lead is in "VΩmA" or "10A" jack as appropriate. |
| "OL" (Taumaha rawa) e whakaaturia ana | Measured value exceeds selected range; Open circuit (for resistance/continuity) | Select a higher range; Check circuit for breaks. |
7. Whakatakotoranga
| Mahi Ine | Awhe | Tika |
|---|---|---|
| DC Voltage (V–) | 200mV, 2V, 20V, 200V, 1000V | ±(0.5% + 2 mati) |
| AC Voltage (V∼) | 200V, 750V | ±(1.2% + 10 mati) |
| DC Current (A–) | 200µA, 2mA, 20mA, 200mA, 10A | ±(1.0% + 2 mati) |
| Ātete (Ω) | 200Ω, 2kΩ, 20kΩ, 200kΩ, 2MΩ | ±(0.8% + 2 mati) |
| Whakamatau Diode | Ae | Whakamua Voltage maturuturu |
| Transistor (hFE) Test | Ae | hFE value |
| Tuku Hiko | 9V Battery (NEDA 1604 or 6F22) | |
| Whakaatu | 3½ Digit LCD, Max. 1999 | |
| Ahu | Whakatata 13.5 x 10 x 4 cm | |
| Taumaha | Approx. 107 grams (without battery) | |
| Te Waahi Mahi | 0°C ki te 40°C (32°F ki te 104°F) | |
| Paemahana Rokiroki | -10°C ki te 50°C (14°F ki te 122°F) | |
| Paerewa Haumaru | CE, RoHS |
8. Pūtāhui me te Tautoko
This Rebel MIE-RB-830 Digital Multimeter is covered by a standard manufacturer's warranty against defects in materials and workmanship. Please refer to the warranty card included with your purchase or contact your retailer for specific warranty terms and conditions.
For technical support or service inquiries, please contact the point of purchase or visit the official Rebel webpae mo nga korero whakapā.


