1. Kupu Whakataki
Thank you for choosing the Rebel RB-0005 Weather Station. This device provides accurate indoor and outdoor temperature readings, indoor humidity, and features a clock, calendar, and alarm function. This manual will guide you through the setup, operation, and maintenance of your new weather station to ensure optimal performance.
2. Nga korero haumaru
- Kaua e tukuna te taputapu ki te wera nui, te ra tika, te makuku nui ranei.
- A ape i te tuku, te tuku ranei i te taputapu ki nga paanga kaha.
- Tiakina te taputapu mai i te wai me etahi atu wai.
- Makahia nga pākahiko kua whakamahia kia rite ki nga ture o te rohe.
- Kaua e ngana ki te wetewete, ki te whakatika ranei i te taputapu. Whakapa atu ki nga kaimahi whai mana mo te ratonga.
- The outdoor sensor cable should be handled with care to prevent damage.
3. Ihirangi mokete
Tirohia ngā mea kei roto i te kete ina wetewetehia:
- 1x Rebel RB-0005 Weather Station Main Unit
- 1x Wired Outdoor Temperature Sensor
- 1x Manual Kaiwhakamahi (tenei tuhinga)
Note: 1x AAA battery is required for operation and is not included in the package.
4. Nga Hua o te Hua
- Indoor and Outdoor Temperature Measurement
- Indoor Humidity Measurement
- Mahi Maramataka
- Mahi Whakaoho
- Whakaatu Karaka 12/24
- Memory Function for Highest and Lowest Temperature Readings
- Clear and Easy-to-Read LCD Display
- Whakamahia Pūhiko mo te Kawe
5. Hua Neke Atuview
Familiarize yourself with the main components of your Rebel RB-0005 Weather Station.
5.1 Whakaaturanga o Mua
The large LCD screen displays various information simultaneously:
- IN Temperature: Te pāmahana o roto o nāianei.
- OUT Temperature: Current outdoor temperature from the wired sensor.
- Wā: Current time in 12-hour (AM/PM) or 24-hour format.
- RH%: Current indoor relative humidity.
- Maramataka: Date display (day, month).
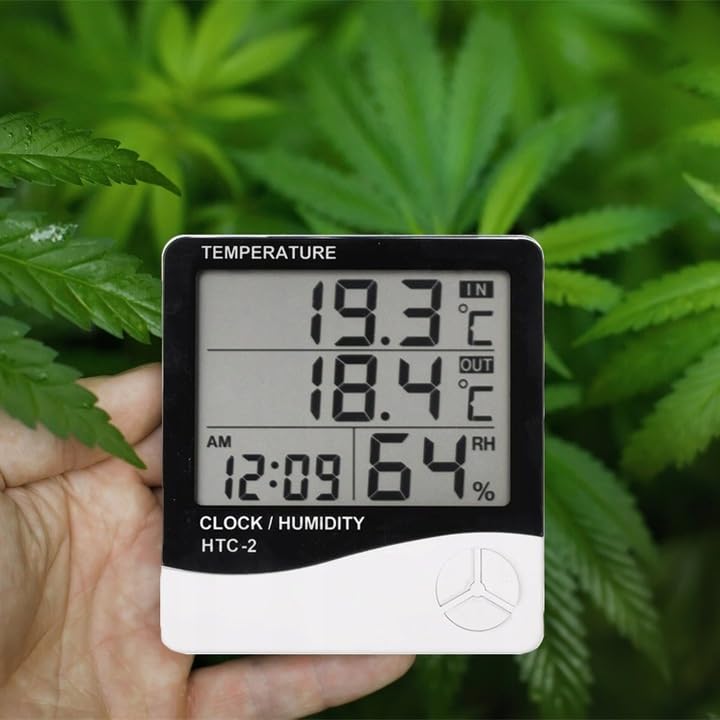
Figure 1: Front display of the weather station showing temperature, time, and humidity readings.

Whakaatu 2: Taipitopito view of the display and control buttons.
5.2 Patene Mana
The device features three control buttons located on the front, below the display:
- AHUNGA: Used to switch between display modes (e.g., time, alarm, calendar) and to enter/exit setting modes.
- ADJ (Adjust): Used to adjust values (e.g., hours, minutes, date) when in setting mode.
- MEMORY: I whakamahia ki view the highest and lowest recorded temperature and humidity values.
5.3 Whakamuri View me te Pūoko
The back of the unit houses the battery compartment, a foldable stand, and the input for the wired outdoor temperature sensor.

Whakaahua 3: Whakamuri view of the weather station with battery compartment and wired sensor.
6. Tatūnga
6.1 Tāuta Pūhiko
- Whakatuwheratia te taupoki o te wāhanga pākahiko kei muri o te waeine matua.
- Insert one (1) AAA battery, ensuring the correct polarity (+/-).
- Close the battery compartment cover securely. The device should power on automatically.
6.2 Te Whakanohonga Pūoko o waho
- Connect the wired outdoor temperature sensor to the designated port on the back of the main unit.
- Carefully route the sensor cable to the desired outdoor location. Ensure the cable is not pinched or damaged.
- Place the sensor in a shaded area, protected from direct sunlight and precipitation, to ensure accurate readings. Avoid placing it near heat sources or vents.

Whakaahua 4: Example placement of the weather station for indoor temperature monitoring.
7. Nga Tohutohu Whakahaere
7.1 Tautuhi Wā me te Rā
- Patohia me te pupuri i te MODE pēhi i te pātene mō te 3 hēkona pea tae noa ki te tīmatanga o te kimo o te whakaaturanga wā.
- Whakamahia te ADJ button to adjust the flashing value (e.g., hours, minutes).
- Pehia te MODE button again to confirm the setting and move to the next value (e.g., minutes, 12/24 hour format, year, month, day).
- Repeat step 2 and 3 until all time and date settings are configured.
- Perehi MODE he wa whakamutunga ki te puta i te aratau tautuhinga.
7.2 Te Whakatakoto i te Whakaoho
- Mai i te whakaaturanga wa noa, pehia te MODE button once to enter alarm display mode (usually indicated by an alarm icon).
- Patohia me te pupuri i te MODE pēhi i te pātene mō te 3 hēkona pea tae noa ki te tīmatanga o te whakaoho.
- Whakamahia te ADJ pātene hei whakarite i te hāora whakaoho e hiahiatia ana.
- Pehia te MODE button to confirm the hour and move to set the minutes.
- Whakamahia te ADJ paatene hei whakarite i te meneti whakaoho e hiahiatia ana.
- Pehia te MODE pātene hei whakaū me te puta atu i te aratau tautuhinga whakaoho.
- Hei whakahohe/whakakore i te whakaoho, pēhia te ADJ button once while in alarm display mode. An alarm icon will appear/disappear on the display.
7.3 Viewing Min/Max Temperature and Humidity
- From the normal display, press the WHAKAMAHI button once to show the maximum recorded indoor/outdoor temperature and indoor humidity.
- Pehia te WHAKAMAHI button again to show the minimum recorded indoor/outdoor temperature and indoor humidity.
- Pehia te WHAKAMAHI pēhi anō i te pātene mō te tuatoru o ngā wā hei hoki ki ngā pānui o nāianei.
- To clear the min/max memory, press and hold the WHAKAMAHI patene mo te 3 hēkona pea viewing the min/max values.
7.4 Ngā Wāhanga Pāmahana Whakawhiti (°C/°F)
While in normal display mode, press the ADJ button once to toggle between Celsius (°C) and Fahrenheit (°F) temperature units.
8. Tiaki
- Te horoi: Horoia te taputapu ki te kakahu ngohengohe, maroke. Kaua e whakamahi i nga kai horoi me nga whakarewa.
- Whakakapinga Pūhiko: Replace the AAA battery when the display becomes dim or the device stops functioning. Follow the battery installation steps in Section 6.1.
- Tiaki pūoko: Ensure the outdoor sensor cable is not damaged. Periodically check the sensor's placement to ensure it remains protected from elements for accurate readings.
9. Te Raru
| Raruraru | Take pea | Rongoā |
|---|---|---|
| No display or dim display. | Low or depleted battery. Incorrect battery polarity. | Replace the AAA battery with a new one, ensuring correct polarity. |
| Outdoor temperature reading is incorrect or "---". | Outdoor sensor cable is disconnected or damaged. Sensor is exposed to direct sunlight or heat source. | Check if the sensor cable is securely connected. Ensure the sensor is placed in a shaded, protected area. Inspect the cable for damage. |
| Kei te hē te Wā/Rā. | Time/Date not set correctly after battery installation. | Refer to Section 7.1 "Setting Time and Date" to adjust. |
| Kare e tangi te whakaoho. | Alarm is not activated. Alarm volume is too low (if adjustable, though this model likely isn't). | Ensure the alarm icon is displayed, indicating it is active (refer to Section 7.2). |
10. Whakatakotoranga
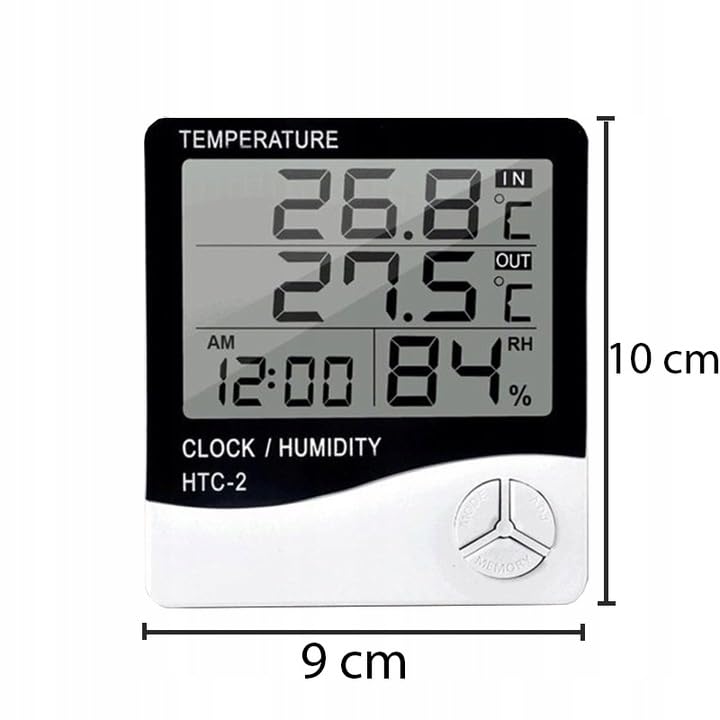
Figure 5: Approximate dimensions of the weather station.
- Tauira: RB-0005
- Waitohu: Rebel
- Puna Hiko: 1x Pūhiko AAA (kaore i whakauruhia)
- Rauemi: Kirihou
- Nga waahanga motuhake: Alarm, Calendar, Min/Max Memory
- Ahu mōkihi: 18 x 12 x 10 cm
- Rahi Hua (hua tata): 9 henimita (Whānui) x 10 henimita (Teitei)
- Rā Wātea Tuatahi: Noema 23, 2020
11. Pūtāhui me te Tautoko
Kei raro tēnei hua i te pūtāhui paerewa a te kaihanga. Mō ngā tikanga me ngā herenga pūtāhui motuhake, tirohia ngā tuhinga i whakaratohia i te wā i hokona ai, whakapā atu rānei ki tō kaihokohoko.
For technical support or inquiries, please contact the Rebel customer service department through their official website or the contact information provided by your retailer.


