Kupu Whakataki
This user manual provides comprehensive instructions for the assembly, operation, maintenance, and troubleshooting of your Keter Store-It-Out MIDI Outdoor Resin Horizontal Storage Shed. Please read this manual carefully before beginning assembly or use to ensure proper functionality and safety. Keep this manual for future reference.

Figure 1: The Keter Store-It-Out MIDI Outdoor Resin Horizontal Storage Shed, showcasing its beige and brown design with a wood-look texture.
Nga korero haumaru
TUpato: This product contains moving parts. Use caution when opening and closing the doors to avoid injury. This product is steel reinforced and may be heavy. Use caution when assembling to avoid injury. This product is designed for ventilation. Do not store flammable or hazardous materials inside. Always follow the manufacturer's instructions for proper assembly, installation, and use.
- Ensure the shed is placed on a level, stable surface.
- Kaua e tukua ngā tamariki kia tākaro i roto, i te taha rānei o te whare tiaki kararehe me te kore e tirotirohia.
- Avoid placing heavy objects on the roof of the shed.
- Tirohia ngā hononga me ngā whakapiri katoa i ia wā, kia mau tonu ai.
Ihirangi mokete
Before beginning assembly, verify that all parts are present and undamaged. If any parts are missing or damaged, do not proceed with assembly. Contact Keter customer support for assistance.
- Wall Panels (various)
- Paewhiri tuanui
- Paewhiri tatau
- Paepae Papa
- Hardware Kit (screws, bolts, hinges, latches)
- Lid Mechanism Components
- Nga Tohutohu Huinga (tenei pukapuka)
Tatūnga me te Runanga
Assembly of the Keter Store-It-Out MIDI shed typically requires two adults and basic household tools such as a screwdriver and possibly a rubber mallet. Follow the steps below for a smooth assembly process.
- Whakapaia te Pae: Choose a flat, level surface for the shed. Clear any debris or obstacles.
- Assemble the Floor: Place the floor panel on the prepared site. Ensure it is correctly oriented.
- Tāpirihia ngā Pane Pakitara: Connect the side and back wall panels to the floor panel, following the interlocking design. Secure with provided fasteners.
- Install Door Frames: Assemble and attach the door frames to the front wall panels.
- Kuaha Maunga: Attach the door panels to the frames using the hinges. Ensure doors swing freely.
- Install Roof Panels: Secure the roof panels to the top of the wall structure.
- Attach Lid Mechanism: Install the lid mechanism, including any hydraulic or spring-assisted components, to allow for smooth opening and closing of the top lid.
- Taki Whakamutunga: Verify all connections are secure and the shed is stable.

Figure 2: A person organizing items inside the Keter shed, demonstrating the spacious interior and accessibility through the front doors and top lid.
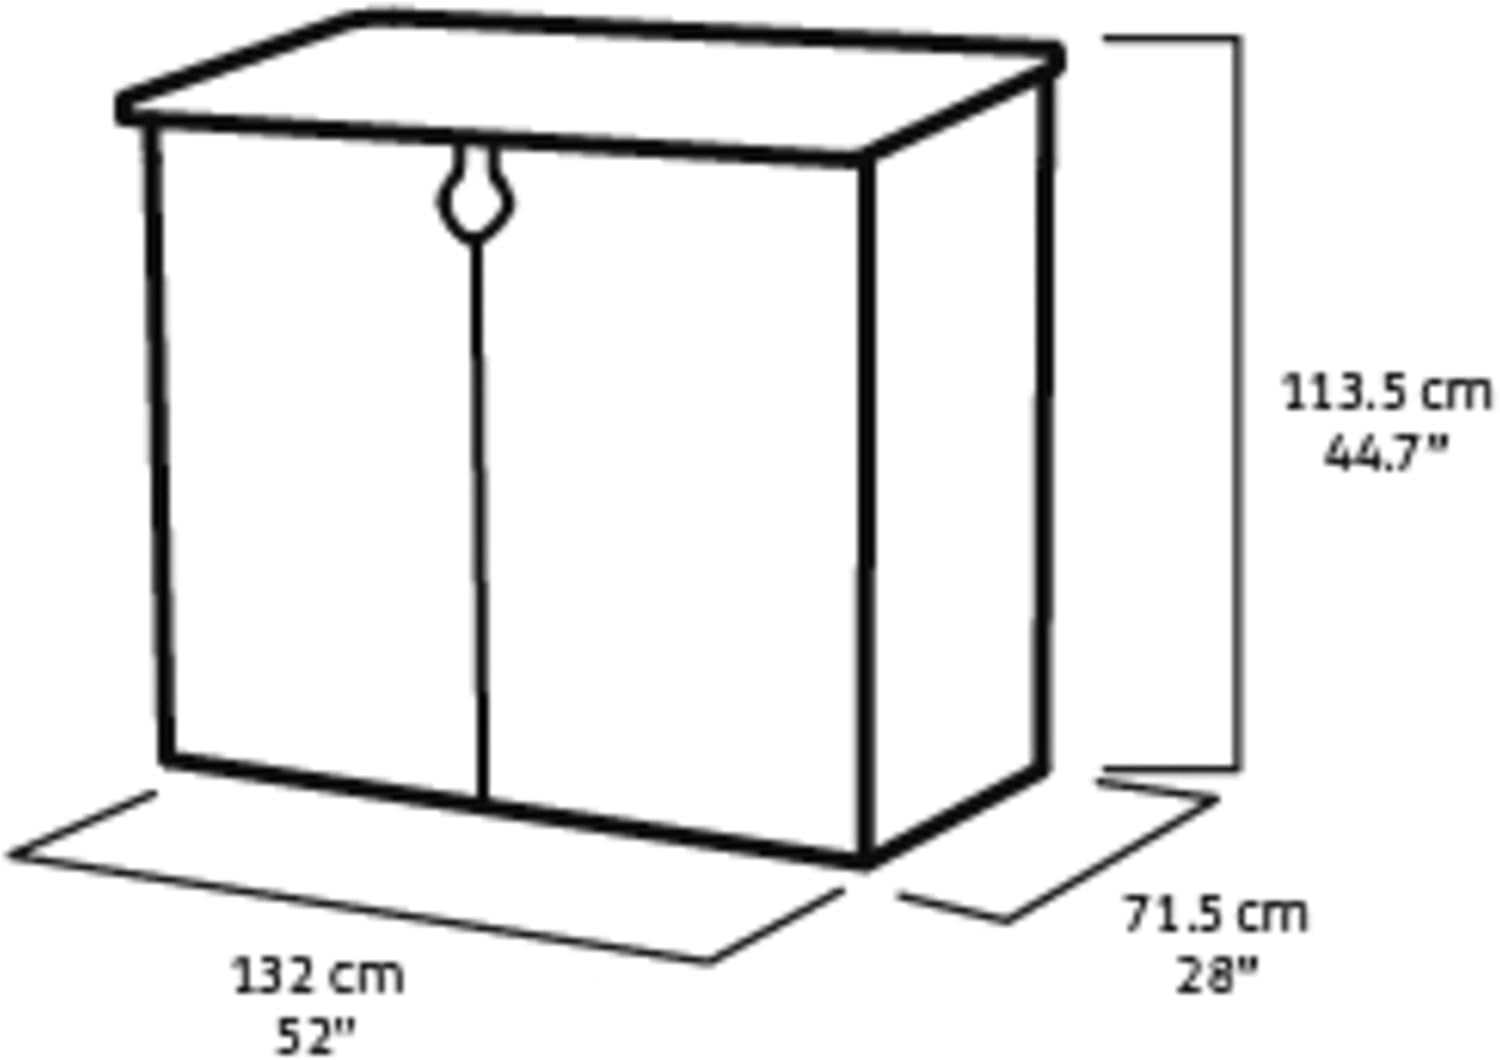
Figure 3: A diagram illustrating the external dimensions of the Keter Store-It-Out MIDI shed in both centimeters and inches, useful for planning placement.
Nga Tohutohu Whakahaere
The Keter Store-It-Out MIDI shed offers convenient access through both its front double doors and a top-opening lid.
- Opening the Front Doors: Unlatch the central locking mechanism (if a padlock is used, remove it first) and pull the doors outwards. The doors can be secured in an open position if needed.
- Opening the Top Lid: Lift the lid from the front edge. The lid is equipped with a piston mechanism for smooth and controlled opening and closing.
- Closing the Shed: Ensure all items are safely inside. Close the top lid first, then close the front doors, ensuring they latch securely. A padlock (not included) can be used on the integrated locking point for added security.

Whakaahua 4: He tata view of a foot operating the lower latch of the Keter shed door, highlighting the convenient foot-operated opening mechanism.

Whakaahua 5: He taipitopito view of the Keter shed's integrated locking mechanism, showing where a padlock can be attached for enhanced security.

Figure 6: The Keter shed's top lid in an open position, revealing the internal support structure and chains that can be used to connect to trash can lids for simultaneous opening.
Te tiaki
The Keter Store-It-Out MIDI shed is designed for low maintenance. Regular cleaning and occasional checks will ensure its longevity.
- Te horoi: To clean the shed, simply wipe it with a damp cloth and mild detergent. Avoid using abrasive cleaners, harsh chemicals, or stiff brushes, as these can damage the resin material.
- Takitaki kaupeka: Periodically inspect the shed for any signs of wear, loose fasteners, or damage, especially after severe weather conditions. Tighten any loose screws.
- Whakahau: The shed is designed with ventilation to prevent moisture buildup. Ensure the vents are not obstructed.

Figure 7: Water beading on the roof of the Keter shed, demonstrating its water-resistant properties and ease of cleaning.

Whakaahua 8: He tata view of the ventilation slats on the side of the Keter shed, designed to ensure air circulation and prevent moisture buildup.
Raparongoā
If you encounter issues with your Keter Store-It-Out MIDI shed, refer to the common problems and solutions below.
| Raruraru | Take pea | Rongoā |
|---|---|---|
| Doors or lid do not close properly. | Shed is not on a level surface; obstruction in the door path; loose hinges. | Ensure the shed is on a perfectly level surface. Check for any debris or items blocking the doors. Tighten hinge screws. |
| Te rere o te wai i roto i te wharau. | Improper assembly; damaged seals; extreme weather conditions. | Review assembly instructions to ensure all panels are correctly sealed. Check for cracks or damage to the material. Ensure the lid is fully closed. |
| Lid mechanism is stiff or not operating smoothly. | Dust or debris in the mechanism; worn components. | Clean the lid mechanism and hinges. Apply a silicone-based lubricant if necessary. If components are worn, contact customer support. |
Whakatakotoranga
| Āhuahira | Taipitopito |
|---|---|
| Waitohu | Ketere |
| Ingoa Tauira | MIDI Penapena-Kāore-i-te-Whai-atu |
| Tae | Kohuru |
| Rauemi | Polypropylene Resin Plastic & Steel Reinforcement |
| Rahi Hua (D x W x H) | 28.15" D x 51.97" W x 44.69" H (71.5 cm D x 132 cm W x 113.5 cm H) |
| Taumaha Tūemi | 40.7 Pauna (18.46 kg) |
| Raukaha Rokiroki | 30 Cu. Ft. (850 Liters approx.) |
| Taumata Atete Wai | Wai Atete |
| Huihuinga e hiahiatia ana | Ae |
| Can Store | Two 32-Gallon Trash Cans |
| Tautoko Hanga-i roto | For shelf (shelf not included) |
Pūtāhui me te Tautoko
For warranty information or technical support, please contact Keter customer service. Keep your purchase receipt as proof of purchase.
- Kaihanga: Ketere
- Webpae: www.keter.com (Please visit the official Keter webpae mo nga korero whakapā hou me nga rauemi tautoko.)
- Tauira Hua: Te Rokiroki Ka rokiroki
- ASIN: B08PC1F3P1


