Kupu Whakataki
This manual provides comprehensive instructions for the assembly, operation, and maintenance of your ODK 63-inch computer desk. Designed for versatility, this desk offers a spacious and sturdy workspace suitable for home office tasks, writing, or gaming setups. Please read these instructions carefully before beginning assembly or use to ensure proper setup and longevity of your product.

Image: The ODK 63-inch computer desk, showcasing its spacious surface and minimalist design in a home office environment.
Ihirangi mokete
I mua i te huihuinga, me manatoko kei te wātea ngā wāhanga katoa kua whakarārangihia i raro nei, ā, kāore he pakaru. Mena kei te ngaro, kei te pakaru rānei ētahi wāhanga, whakapā atu ki te ratonga kiritaki tonu.
- Computer Desk Top (1)
- Metal Frame Components (Legs, Crossbars, etc.)
- Assembly Tool Kit (Screws, Allen Key)
- Matau Paneoro (1)
- Storage Pouch (1)
- Pukapuka Tohutohu (1)

Image: An illustration detailing the various parts included in the package and a visual guide to the assembly steps.
Whakatupato Haumaru
- Avoid long-term direct sunlight exposure to prevent material degradation.
- Keep the desk away from heat sources to prevent damage.
- Ensure the desk is placed away from sharp objects to avoid scratches or damage to the surface.
- Keep children away from small assembly parts to prevent choking hazards and other injuries.
- Avoid contact with corrosive substances, as they can damage the desk's finish.
- Do not overtighten fasteners during assembly, as this may lead to cracking or damage to the engineered wood board.
Nga Tohutohu Huihuinga
The ODK 63-inch computer desk is designed for straightforward assembly. It is recommended to have two people for certain steps, though one person can typically complete it in approximately 30 minutes. All necessary tools and labeled parts are included.
- Wewete Waenga: Carefully remove all parts from the packaging. Lay them out on a clean, soft surface to prevent scratches. Verify all items against the package contents list.
- Huihuia te Tāpare: Connect the metal frame components (legs and crossbars) using the provided screws and Allen key. Ensure all connections are aligned correctly. Do not fully tighten screws at this stage.
- Āpiti Papamahi: Carefully place the desktop onto the assembled metal frame. Align the pre-drilled holes on the desktop with the holes on the frame. Secure the desktop to the frame using the appropriate screws.
- Tāutahia te matau paneoro: Attach the headphone hook to the desired side of the desk using the designated screws.
- Attach Storage Pouch: Secure the fabric storage pouch to the side of the desk using its integrated fasteners or hooks.
- Whakamutunga Whakamutunga: Once all parts are in place and the desk is upright, gently tighten all screws to ensure maximum stability. Avoid overtightening.
Nga Tohutohu Whakahaere
Your ODK 63-inch computer desk is ready for use after assembly. Follow these guidelines for optimal functionality:
- Turanga: Position the desk on a level and stable surface to prevent wobbling. Use the adjustable foot pads to compensate for uneven flooring.
- Te Whakamahinga o te Wāhi Mahi: The spacious desktop can accommodate multiple monitors, a laptop, keyboard, mouse, and other office or gaming peripherals. Arrange your items to suit your workflow and comfort.
- Matau waea: Utilize the integrated headphone hook to conveniently store your headphones, bags, or cables, keeping your desktop clear and organized.
- Peke Penapena: The side storage pouch is ideal for holding documents, magazines, or small office supplies, providing easy access and reducing clutter.
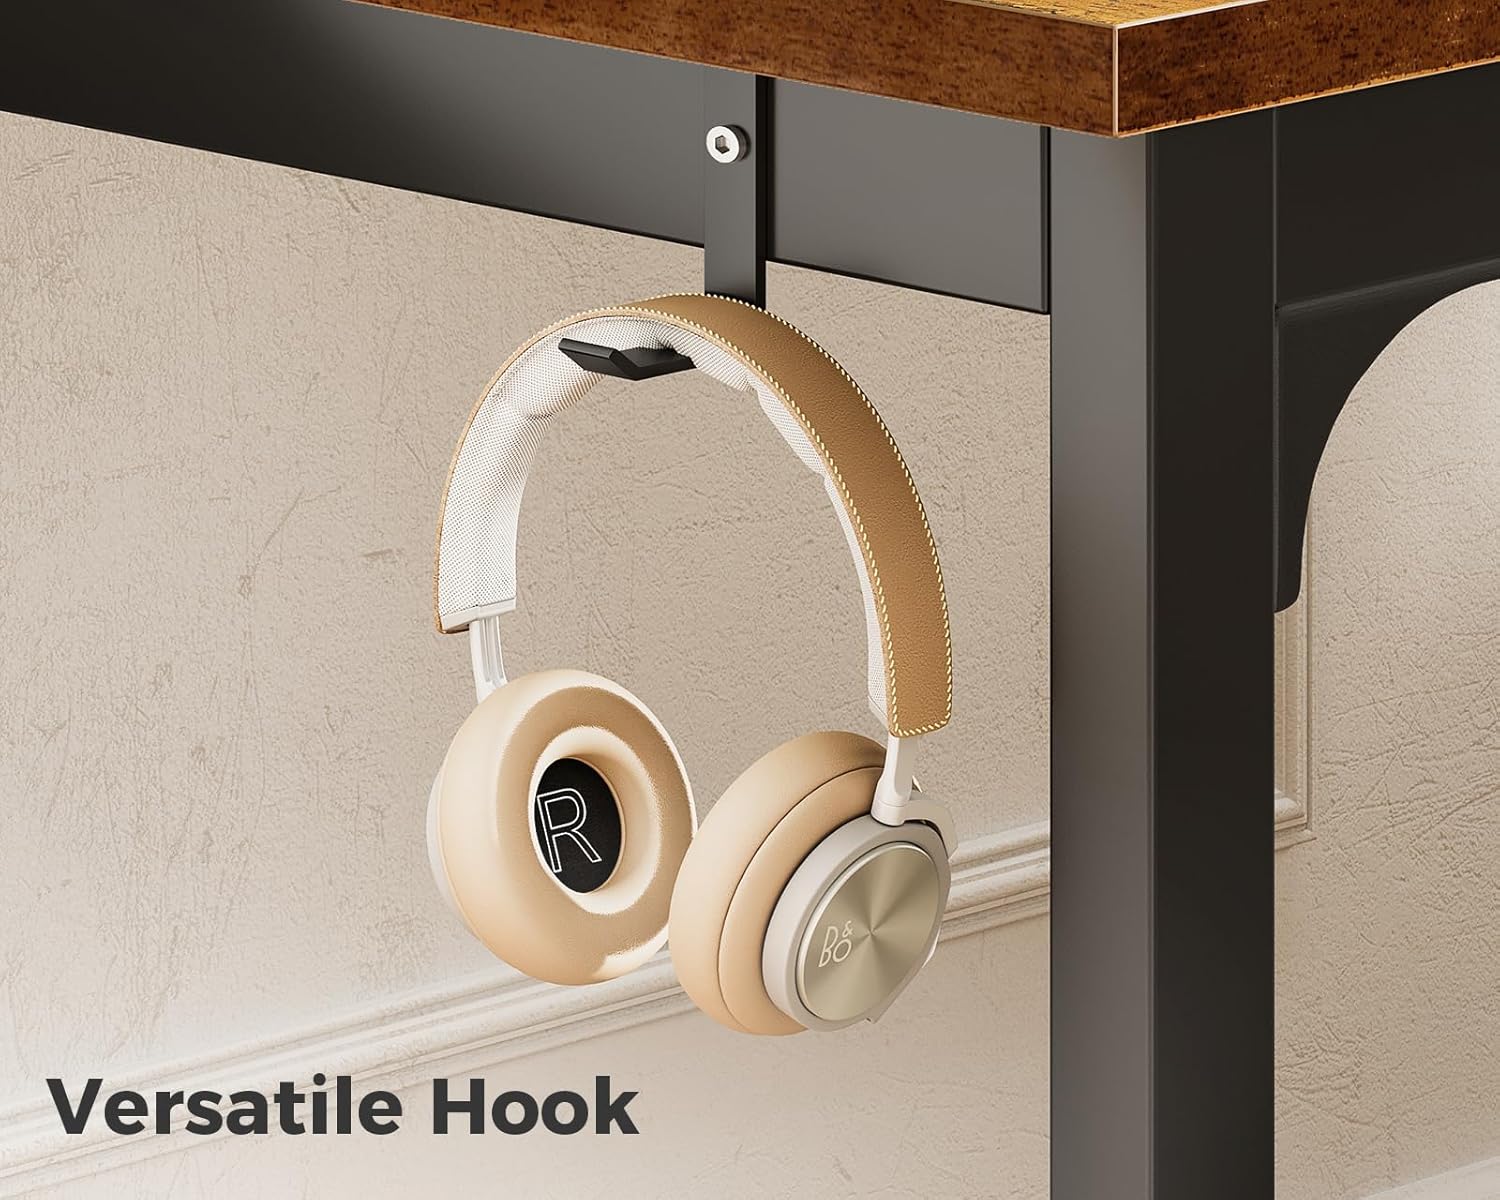
Whakaahua: He taipitopito view of the headphone hook, demonstrating its practical use for hanging headphones.
Te tiaki
Proper care will extend the life and appearance of your ODK computer desk:
- Te horoi: The desk's engineered wood tabletop is waterproof and scratch-resistant. For general cleaning, wipe the surface with a soft, damp cloth. For tougher stains, use a mild soap solution and immediately dry with a clean cloth.
- Aukati i nga matū kino: Do not use abrasive cleaners, strong solvents, or harsh chemicals, as these can damage the desk's finish.
- Takitaki auau: Periodically inspect all screws and fasteners to ensure they remain tight. Retighten any loose connections to maintain the desk's stability.
- Pare Mata: While scratch-resistant, using coasters for drinks and mouse pads for computer mice can further protect the desktop surface.
Raparongoā
If you encounter any issues with your ODK computer desk, refer to the following common solutions:
- Wiriweke tepu:
- Me whakarite kua tino titirihia nga tira hui katoa.
- Me whakarite kei runga i te mata papatahi, ōrite te tēpu.
- Adjust the foot pads at the bottom of the legs to stabilize the desk on uneven floors.
- Nga waahanga kua ngaro, kua pakaru ranei:
- Me ata tirotiro ano i nga taonga kapi katoa.
- If parts are genuinely missing or arrived damaged, contact ODK customer support with your purchase information for assistance.
- He uaua ki te Huihuinga:
- Review the assembly instructions carefully, paying close attention to diagrams and part labels.
- Ensure you are using the correct screws for each step.
- Do not force parts together; if they don't fit, re-check the orientation.
Whakatakotoranga
| Āhuahira | Taipitopito |
|---|---|
| Waitohu | ODK |
| Tau tauira | B010111SPD69USDF-1 |
| Rahi Hua (D x W x H) | 63" x 21.65" x 28.95" |
| Taumaha Tūemi | 28 Pauna |
| Momo Rawa Runga | Rakau Hangaia |
| Momo Rauemi Tapare | Te whakarewa |
| Tae | Vintage |
| Nga waahanga motuhake | Headphone Hook, Adjustable Foot Pads |
| Huihuinga e hiahiatia ana | Ae |
| Nga Utauta Huihuinga | Ae |

Image: A visual representation of the desk's key dimensions and weight capacity.
Pūtāhui me te Tautoko
For detailed warranty information, product support, or to inquire about replacement parts, please refer to the documentation included with your purchase or visit the official ODK webpae. Kei te wātea tā mātou tīma ratonga kiritaki hei āwhina i a koe me ō pātai, ō āwangawanga rānei.