Kupu Whakataki
The Bluesound Powernode is a high-fidelity amplifier designed for the streaming era, integrating powerful amplification with multi-room music streaming capabilities. This manual provides essential information for setting up, operating, maintaining, and troubleshooting your Powernode to ensure optimal performance and enjoyment of your audio system.
Tatūnga
Follow these steps to set up your Bluesound Powernode:
- Wewete pouaka me te Whakanoho: Carefully remove the Powernode from its packaging. Place the unit on a stable, flat surface with adequate ventilation. Ensure it is away from direct sunlight, heat sources, and moisture.

Mua view of the Bluesound Powernode, showcasing its compact design and top panel controls.
- Hononga Kaikōrero: Connect your passive speakers to the speaker terminals on the rear of the Powernode. Ensure correct polarity (+ to + and - to -) for both left and right channels. The Powernode features 2 x 80 watts of HybridDigital ampwhakarangatira.

The Powernode positioned next to a bookshelf speaker in a home environment, demonstrating its integration into a sound system.
- Hononga ki te Hiko: Plug the provided power cable into the Powernode's AC input and then into a wall outlet.
- Hononga Whatunga:
- For a wired connection, connect an Ethernet cable from your router to the LAN port on the Powernode.
- For a wireless connection, the Powernode supports dual-band Wi-Fi. You will configure this using the BluOS Controller app.
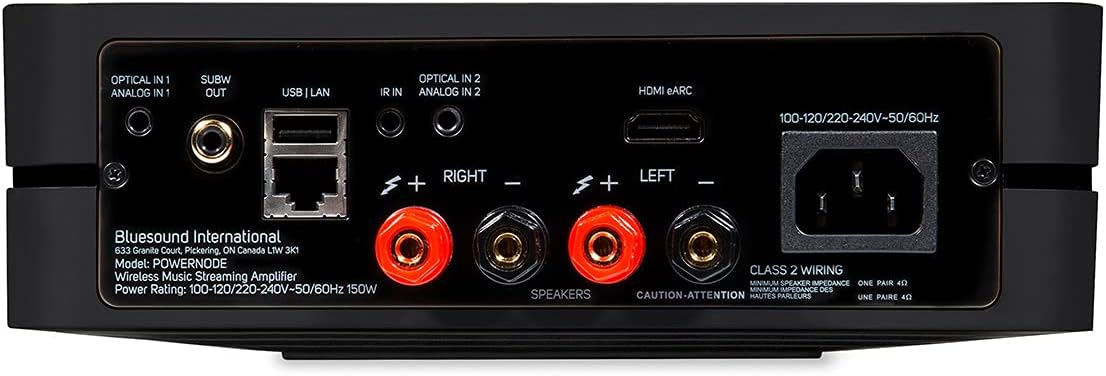
Taipitopito view of the Powernode's rear panel, highlighting the speaker terminals, HDMI eARC, optical, analog, USB, and Ethernet ports.
- BluOS Controller App Installation: Download the BluOS Controller app from your device's app store (iOS, Android, Windows, macOS). This app is essential for controlling your Powernode and accessing streaming services.
- Tatūnga Tuatahi mā te Taupānga: Open the BluOS Controller app and follow the on-screen instructions to connect to your Powernode. The app will guide you through network configuration and initial settings.

Screenshots of the BluOS Controller app on a smartphone, illustrating the setup and music playback interface.
Ka mutu te huaview Ataata
An official product video from Bluesound, providing a visual overview of the Powernode's features and capabilities.
Nga Tohutohu Whakahaere
BluOS Kaiwhakahaere App
The BluOS Controller app is the primary interface for operating your Powernode. It allows you to:
- Browse and play music from various streaming services (e.g., Tidal, Spotify, Qobuz).
- Access your personal local music library.
- Control volume and playback.
- Manage multi-room audio playback with other BluOS-enabled devices.
- Configure settings and updates for your Powernode.
Whakahaerenga Tinana
The Powernode features a top-panel touch control interface with built-in proximity sensing for basic playback control:
- Purei/Tatari: Patohia te paatene waenga.
- Mana Rōrahi: Swipe along the touch bar or use the dedicated volume buttons.
- Riu Tipu: Use the left/right arrow buttons.
- Tatūkē: Access saved presets for quick access to favorite stations or playlists.

Top panel of the Powernode with illuminated touch controls for playback and volume adjustment.
Kōwhiringa Hononga
- HDMI (ARC & eARC): Connect your TV to the HDMI eARC port for high-quality audio from your television.
- Bluetooth aptX HD: Stream audio wirelessly from your Bluetooth-enabled devices with high-resolution support.
- Putanga Puoro: Connect wired headphones to the front 3.5mm jack for private listening.
- Huaputa Subwoofer: Connect an external powered subwoofer for enhanced bass performance.
- AirPlay 2: Stream audio from Apple devices and integrate the Powernode into an Apple HomeKit ecosystem for synchronized multi-room playback.
- Mana Reo: The Powernode is compatible with Amazon Alexa. Enable the BluVoice skill in the Alexa app for hands-free control.
Te tiaki
To ensure the longevity and optimal performance of your Bluesound Powernode, follow these maintenance guidelines:
- Te horoi: Whakamahia he kakahu ngohengohe, maroke hei horoi i te taha o waho o te waeine. Kaua e whakamahi i ngā kai horoi whakakoi, ngā ware pi, ngā whakarewa rānei, nā te mea ka kino pea te āhua o te whakaotinga.
- Whakahau: Ensure that the ventilation openings on the unit are not blocked. Proper airflow is crucial to prevent overheating.
- Whakahōu Pūmanawa: Regularly check for and install software updates via the BluOS Controller app. These updates often include performance improvements, new features, and bug fixes.
- Hurihanga Hiko: If the unit becomes unresponsive, disconnect the power cable from the wall outlet, wait for 30 seconds, and then reconnect it.
Raparongoā
If you encounter issues with your Powernode, refer to the following common troubleshooting steps:
| Raruraru | Rongoa pea |
|---|---|
| Karekau he oro mai i nga kaikorero. |
|
| Powernode not connecting to network. |
|
| BluOS app cannot find Powernode. |
|
| Kounga oro ngoikore, he hapa rānei. |
|
For more detailed troubleshooting or persistent issues, please refer to the official Bluesound support webpaetukutuku, whakapā atu ranei ki ta raatau ratonga kaihoko.
Whakatakotoranga
- Tauira: N330BLKUNV
- Ampwhakarangatira: 2 x 80 Watts HybridDigital™
- Tukatuka: Papaaho-whā 1.8GHz ARM Cortex A53
- DAC: 32-bit/384kHz Premium DAC Design
- Hononga: Dual-band Wi-Fi, Gigabit Ethernet, 2-way Bluetooth aptX HD, HDMI (ARC & eARC), Optical, Analog, USB
- Ahu (W x H x D): 8.66 x 2.76 x 7.48 inihi (220 x 70 x 190 mm)
- Taumaha: 6.98 pauna (3.17 kg)
- Ratonga Ipurangi Tautoko: Access to internet radio stations, cloud music services, and personal local music library.
- Tikanga Mana: BluOS Controller App (iOS, Android, desktop), Top-panel touch controls, IR input, Voice (Amazon Alexa).
Pūtāhui me te Tautoko
Your Bluesound Powernode comes with a manufacturer's warranty. Please refer to the included Quick Start Guide or visit the official Bluesound webpae mo nga korero me nga kupu whakamana.
For technical support, product registration, or to access frequently asked questions, please visit the Bluesound support portal:
The original packaging includes a Quick Start Guide to assist with initial setup.


