1. Hua Neke Atuview
The Rfiver Mobile TV Stand is a versatile and portable solution designed to hold most 23-inch to 60-inch LCD, LED, OLED, Plasma, Smart Fire flat screens, curved TVs, computer monitors, or weatherproof outdoor televisions. It features a sturdy all-metal construction, adjustable height, a removable media shelf, and smooth-rolling, lockable wheels for easy mobility.
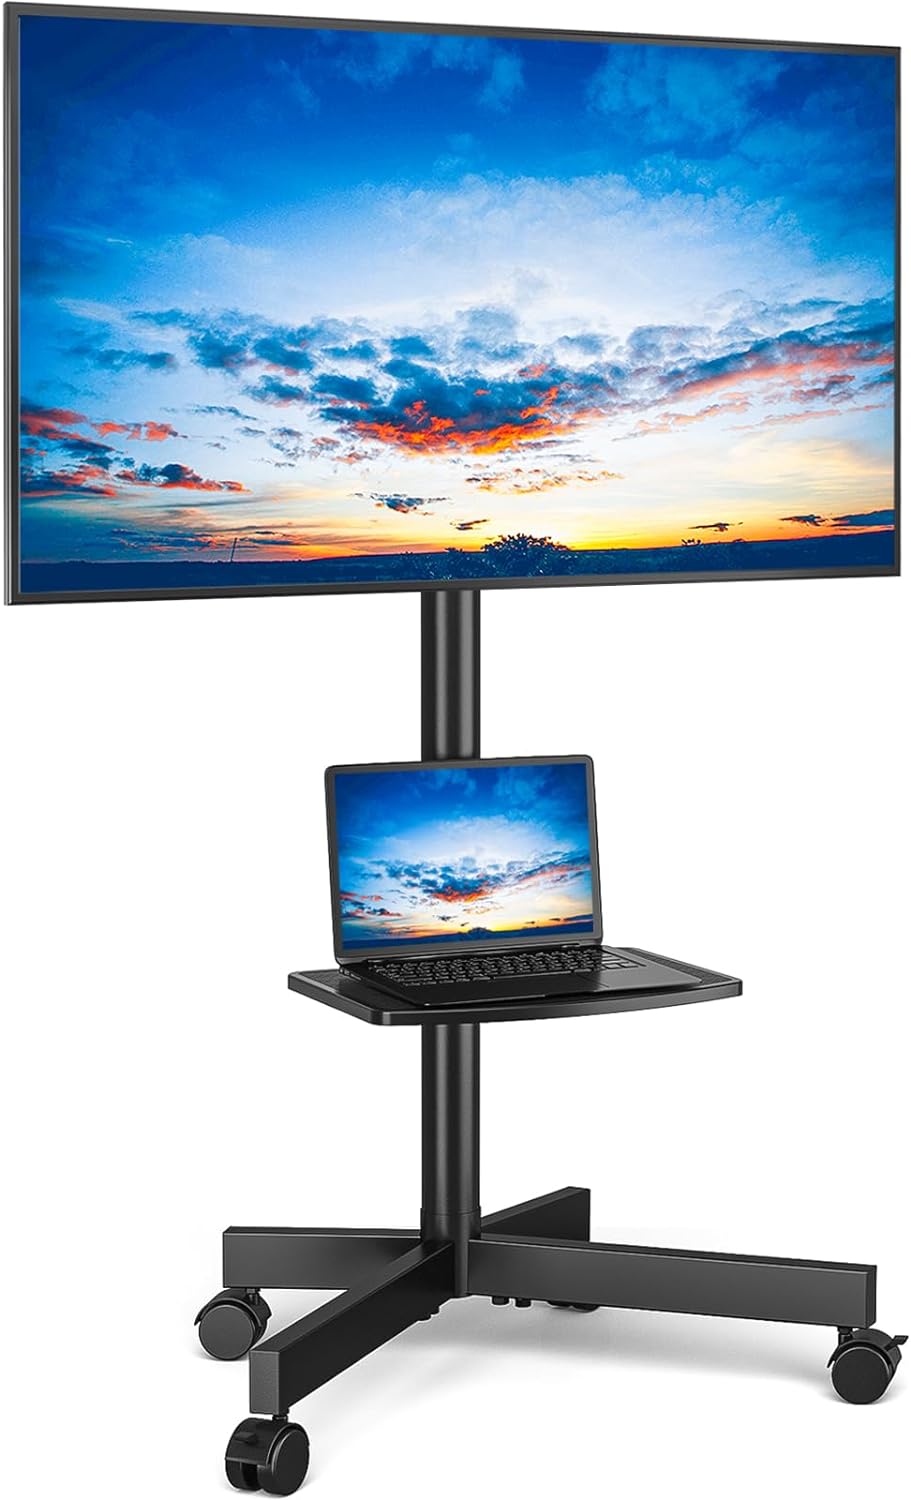
Figure 1: Rfiver Mobile TV Stand with a television and a laptop on its adjustable shelf.
2. Nga waahanga matua
- Portable Universal Design: Fits most 23" to 60" flat/curved panel screens with max VESA 400x400mm (16"x16"). Ideal for various rooms and outdoor use.
- Hanganga Kaha me te Uu: All-metal build with mounting brackets supporting up to 88 lbs. Safety screws provide additional load-bearing security.
- Ka taea te whakarite ViewTe wheako: Versatile TV brackets and a solid media shelf offer height adjustment. The shelf can hold laptops, DVD players, gaming systems, speakers, or other AV equipment.
- Te nekeneke Whakarei ake: Equipped with smooth-rolling wheels, two of which are lockable, allowing for easy movement across carpets or hard floors and secure positioning.
- Huihuinga ngawari: Components are neatly packed with clear, step-by-step instructions for straightforward setup.
3. Ihirangi mokete
Please ensure all parts are present before beginning assembly. Refer to the included parts diagram for identification.
- Main Support Pole(s)
- X-Shaped Base with Wheels
- TV Mounting Brackets (Left & Right)
- Adjustable Media Shelf
- Topenga Whakahaere Taura
- Assembly Hardware (Screws, Washers, Spacers, Allen Wrench, Wrench)
- Pukapuka Tohutohu
4. Tatūnga me te Runanga
Assembly is straightforward. Lay out all parts and follow the instructions carefully. It is recommended to have a clear, flat workspace.
4.1 Te Huihui i te Tūāpapa
- Attach the X-shaped base components together using the provided screws.
- Securely attach the rolling wheels to the ends of the X-shaped base. Ensure the two lockable wheels are positioned at the front for easy access.
- Insert the main support pole into the center of the assembled base and fasten it securely.
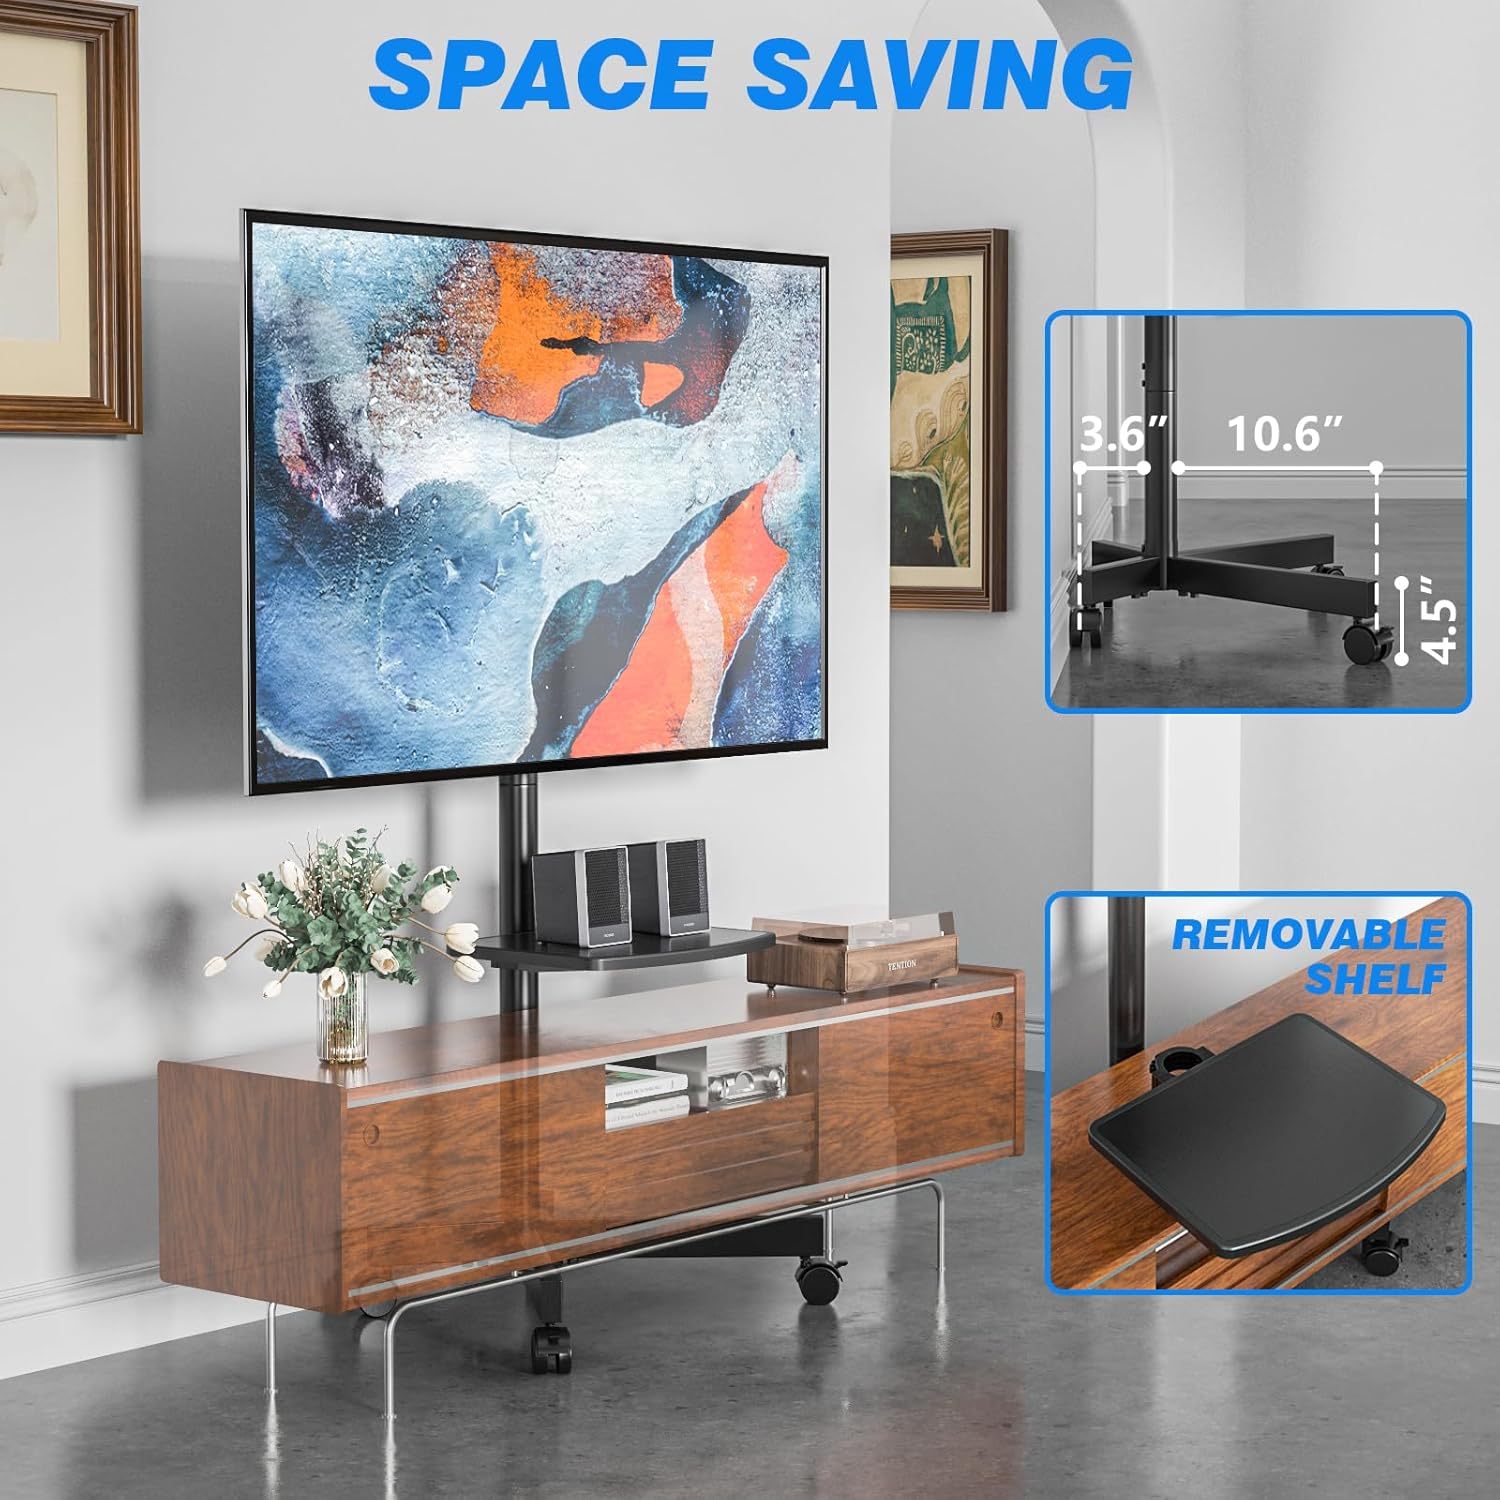
Figure 2: Assembly diagram for the base and main pole.

Figure 3: Detail of the lockable wheel mechanism.
4.2 Attaching the TV Mounting Brackets
- Attach the TV mounting brackets to the back of your television using the appropriate VESA screws and spacers. Ensure the brackets are level and securely fastened to your TV's VESA pattern (up to 400x400mm).
- Carefully lift the TV with the attached brackets and hook them onto the main support pole's mounting plate.
- Secure the TV to the stand's mounting plate using the safety screws or locking mechanisms provided.
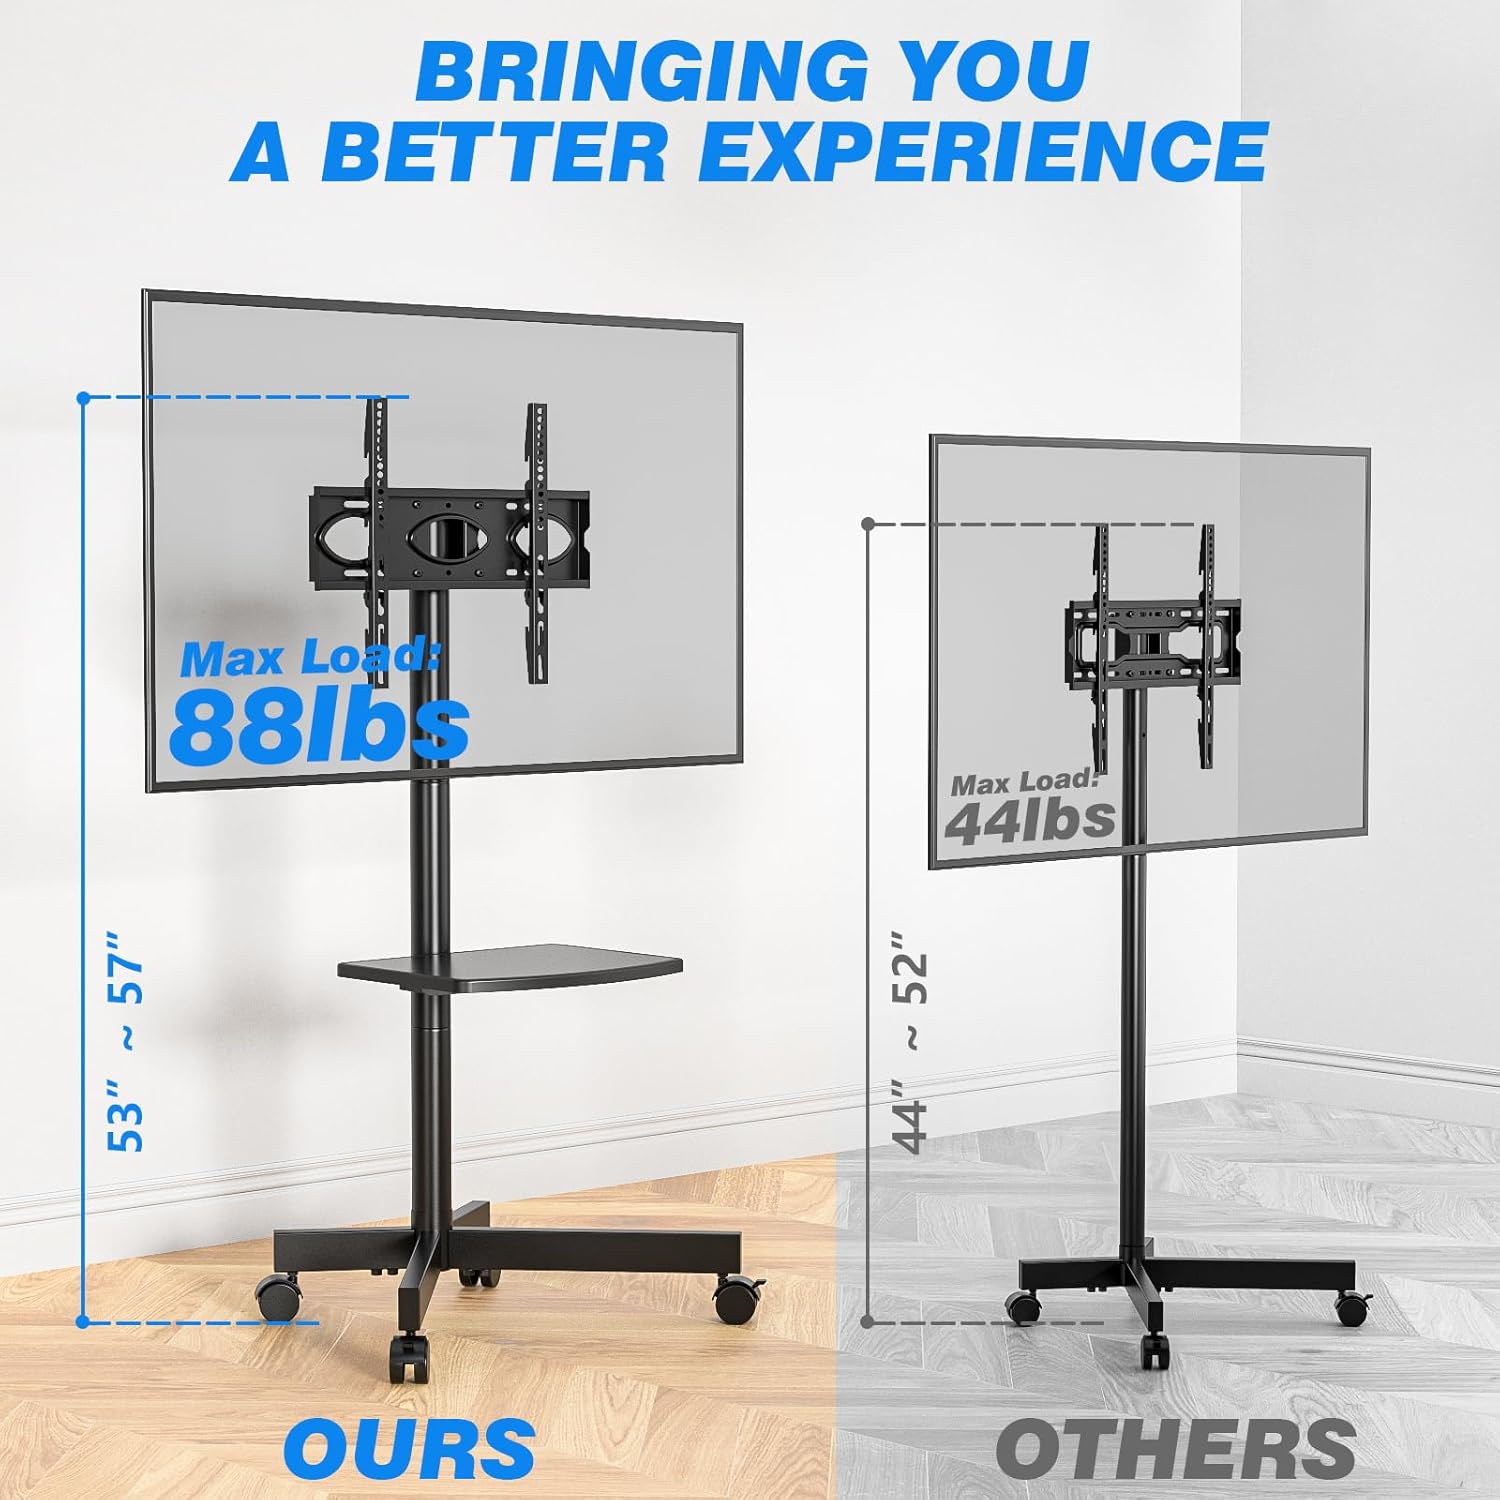
Figure 4: VESA compatibility and maximum load capacity (88 lbs) for the TV stand.
4.3 Installing the Media Shelf
- Attach the media shelf to the main support pole at your desired height. The shelf is adjustable, allowing you to customize its position.
- Tighten the shelf's securing mechanism to ensure it is stable.

Figure 5: The adjustable media shelf, capable of holding various devices.
4.4 Whakahaere taura
Use the provided cable management clips to route and secure your TV and device cables along the main support pole. This helps maintain a tidy appearance and prevents tripping hazards.

Figure 6: Organize cables using the integrated clips for a neat setup.
5. Nga Tohutohu Whakahaere
5.1 Moving the TV Stand
To move the TV stand, ensure all cables are clear of the wheels. Unlock the two front wheels by pressing down on their locking levers. Gently push or pull the stand to its desired location. Once in place, lock the wheels to prevent accidental movement.

Figure 7: The wheels can be locked and unlocked for secure positioning or easy movement.
Video 1: Demonstration of the TV stand's sturdy and mobile design, showcasing its ease of movement and stability.
5.2 Adjusting TV Height and Tilt
The TV mounting brackets allow for height adjustment along the main pole. Loosen the securing bolts on the brackets, slide the TV to the desired height, and then re-tighten the bolts firmly. The mount also supports a tilt range of +5 to -2 degrees for optimal viewnga koki.

Figure 8: Adjust the TV height and tilt for a better viewte wheako.
Video 2: A user demonstrates how they utilize the mobile TV cart, highlighting its versatility.
6. Tiaki
- Regularly check all screws and bolts to ensure they remain tight, especially after moving the stand.
- Clean the metal surfaces with a soft, dry cloth. Avoid abrasive cleaners that may damage the finish.
- Keep the wheels free of debris to ensure smooth rolling.
7. Te Raru
| Raruraru | Take pea | Rongoā |
|---|---|---|
| He wiri te tu. | Hononga wetekina. | Check and tighten all screws and bolts, especially on the base and pole connections. |
| Karekau nga wira e tere haere ana. | Debris in wheels or locked. | Clear any debris from the wheels. Ensure wheel locks are disengaged. |
| TV not level. | Mounting brackets uneven. | Adjust the leveling screws on the TV mounting brackets. |
| TV too heavy/large. | Exceeds weight/VESA limits. | Ensure your TV's weight is within 88 lbs and VESA pattern is 400x400mm or smaller. |
8. Whakatakotoranga
- Waitohu: Rfiver
- Tauira: MT2004
- Rauemi: Korotahi Steel
- Tae: Pango
- Taumaha Tūemi: 13.26 pauna
- Rahi Hua: 21.2 x 16.1 x 56 inihi
- Rahi TV Hototahi: 23" ki te 60"
- Morahi Hototahi VESA: 400x400mm (16"x16")
- Maximum TV Weight Capacity: 88 lbs
- Taumaha Papa: 22 lbs
- Koki Hoa: +5 to -2 Degrees
- Te maha o nga whata: 1
9. Pūtāhui me te Tautoko
The Rfiver Mobile TV Stand comes with a 5-Year manufacturer warranty. For any questions, concerns, or support needs, please contact Rfiver customer service or visit the official Rfiver store.
Rfiver Store: Visit the Rfiver Store on Amazon


