1. Kupu Whakataki
The AIYIMA DAC A6 is a high-fidelity Digital-to-Analog Converter (DAC) designed to enhance your audio experience. It features advanced decoding capabilities, multiple input options, and Bluetooth 5.0 for wireless audio streaming. This manual provides detailed instructions for setting up and operating your DAC A6.
2. Nga waahanga matua
- DSD512 32bit/768kHz USB Decoding: Supports high-resolution audio formats up to DSD512 and PCM 32bit/768kHz.
- ESS SABRE ES9038Q2M HiFi Decoding: Utilizes a high-performance ESS SABRE DAC chip for exceptional sound quality and low total harmonic distortion (THD).
- Atanga USB XMOS XU208: Features the XMOS second-generation XU208 chip with a custom driver for Windows 7 and higher, ensuring optimal high-resolution audio support, including DSD Native.
- Bluetooth 5.0 with HD Transmission: Equipped with a CSR8675 Bluetooth chip, supporting LDAC, AAC, SBC, aptX, aptX-LL, and aptX-HD audio codecs for high-quality wireless streaming.
- Multiple Digital Audio Inputs: Offers versatile connectivity with Bluetooth, PC-USB, Coaxial, and Optical inputs.
3. Ihirangi mokete
Tena koa tirohia te pouaka mo nga mea e whai ake nei:
- AIYIMA DAC A6 Unit
- Mana Mamao x 1
- Pūurutau Hiko (DC 12V)
- Tauira USB
- Antenna Nihokikorangi
- Pukapuka Kaiwhakamahi (tenei tuhinga)
4. Hua Neke Atuview
4.1 Paewhiri Mua

Image: Front panel of the AIYIMA DAC A6, showing the OLED display, volume knob, power/mode button, and IR receiver.
- Pihi Mana / Aratau: Press to power on/off, short press to switch input modes.
- Whakaatu OLED: E whakaatu ana i te tāuru o nāianei, sampte tere o te oro, me te taumata rōrahi.
- Matapihi Rōrahi: Hurihia hei whakatika i te rōrahi.
- Kaihoko IR: Mō ngā tohu mana mamao.
4.2 Paewhiri Whakamuri

Image: Rear panel of the AIYIMA DAC A6, showing DC 12V power input, RCA L/R outputs, Coaxial input, Optical input, PC-USB input, and RF antenna connector.
- DC 12V Whakauru: Tūhonohia te pūurutau hiko kua whakaratohia.
- RCA L/R Output: Hono atu ki tetahi ampkaikorero kaha ranei.
- Tāuru Coaxial: Whakauru ororongo matihiko.
- Tāuru Optical: Whakauru ororongo matihiko.
- Tāuru PC-USB: Connect to a computer for USB audio.
- Antenna RF: Connect the Bluetooth antenna for wireless reception.
4.3 Mana Mamao
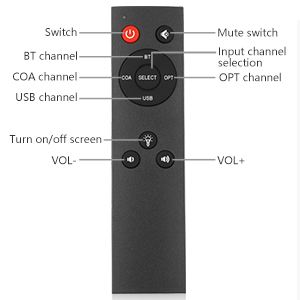
Image: Layout of the AIYIMA DAC A6 remote control, showing buttons for power, mute, input selection (BT, COA, OPT, USB), screen on/off, and volume up/down.
- Whakawhiti: Whakawera/whakaweto.
- Wahangu: Wahangu/whakakore ororongo.
- Tīpakonga Hongere Whakauru: Buttons for BT, COA, OPT, USB.
- Turn on/off screen: Toggles the OLED display.
- VOL +/-: Te whakatika i te rahinga.
5. Tohutohu Tatūnga
- Honoa te Pūihi Nihokikorangi: Screw the provided Bluetooth antenna into the RF connector on the rear panel.
- Tūhono Putanga Ororongo:
- For active speakers: Connect the RCA L/R OUTPUT of the DAC A6 directly to your active speakers using RCA cables.
- For passive speakers with an amplifier: Connect the RCA L/R OUTPUT of the DAC A6 to the input of your amplifier. Then, connect your passive speakers to the ampputanga a liifier.

Image: Diagram illustrating connection options for the DAC A6 to active speakers or an amppūoko hiko me ngā kaikōrero kore mahi.
- Honoa te Tāuru Ororongo: Kōwhiria tētahi o ngā tikanga whakauru e whai ake nei:
- PC-USB: Connect a USB cable from your computer to the PC-USB input on the DAC A6.
- Kotahi: Honoa he taura coaxial mai i tō pūtake oro ki te tāuru COAX.
- Optical: Connect an optical cable from your audio source to the OPT input.
- Nihokikorangi: Ensure the Bluetooth antenna is connected.
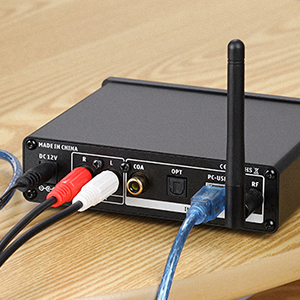
Image: Close-up of the PC-USB input on the DAC A6, showing a USB cable connected.
- Hono Hono: Connect the DC 12V power adapter to the DAC A6 and then plug it into a power outlet.
5.1 PC-USB Driver Installation (Windows)
For Windows 7 or higher, a custom driver is required for optimal performance, especially for DSD Native playback. Please visit the AIYIMA official website to download the latest driver for the DAC A6.
6. Nga Tohutohu Whakahaere
- Hiko Whakaka/Weto: Press the Power/Mode button on the front panel or the "Switch" button on the remote control.
- Tīpakohia te Aratau Whakauru:
- Short press the Power/Mode button on the front panel to cycle through inputs (Bluetooth, PC-USB, Coaxial, Optical).
- Alternatively, use the dedicated input buttons (BT, COA, OPT, USB) on the remote control.
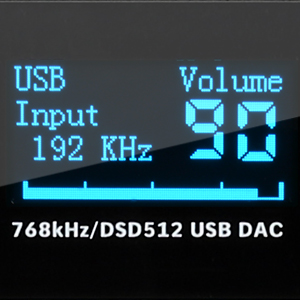
Image: Close-up of the power/mode button on the DAC A6.
- Whakaritea Rōrahi: Rotate the volume knob on the front panel or use the VOL+/- buttons on the remote control. The OLED display will show the current volume level.

Image: Close-up of the OLED display showing "USB Input 192 KHz Volume 90".
- Tauira Nihokikorangi:
- Select Bluetooth input mode on the DAC A6. The OLED display will indicate "BT Input".
- On your mobile device, search for Bluetooth devices and select "BT HIFI AUDIO" to pair.
- Once connected, you can stream audio wirelessly to the DAC A6.

Image: A smartphone displaying Bluetooth settings, showing "BT HIFI AUDIO" as a discoverable device, next to the DAC A6.
- OLED Display Control: Use the "Turn on/off screen" button on the remote to toggle the OLED display.
6.1 Setting TV Optical/Coaxial Output
If there is no audio output when connecting your TV via optical or coaxial, you may need to adjust your TV's audio settings.
- Navigate to your TV's "System Settings" or press the remote control's [Settings] key.
- Find "Sound" or "Audio Output" settings and select "Optical Fiber" or "Coaxial Output".
- After setting, if there is still sound from the TV's internal speakers, adjust the TV volume to 0 using the TV remote control.
- Note: Some TVs may automatically disable internal speakers when external speakers are detected, resulting in no sound from the TV itself.
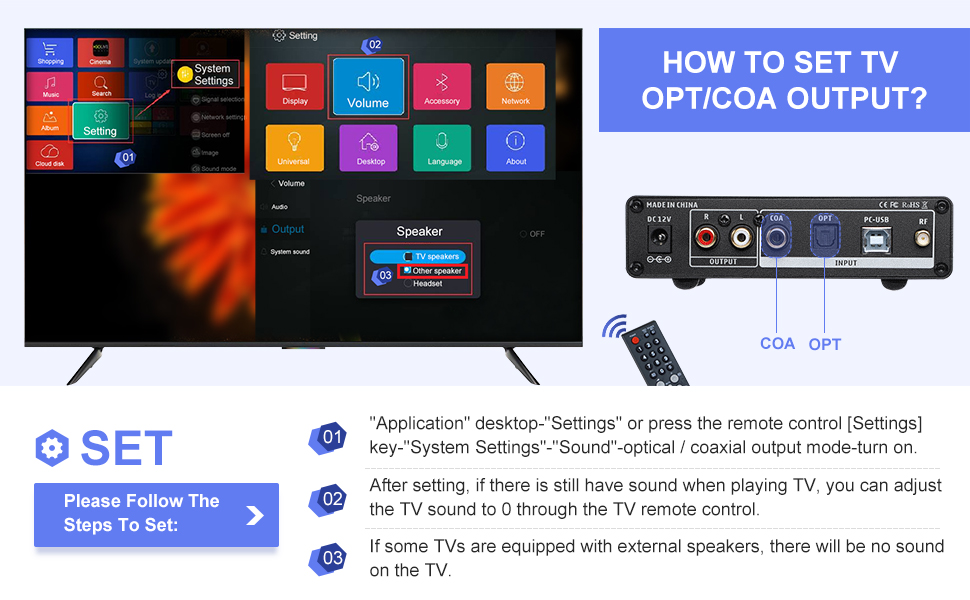
Image: A visual guide showing TV menu navigation to adjust sound output settings for optical/coaxial connections.
6.2 Whakaaturanga Ataata
Video: An official product video demonstrating the AIYIMA DAC A6 Decoder Receiver in use, showcasing its connectivity and audio playback.
7. Whakatakotoranga
| Āhuahira | Whakatakotoranga |
|---|---|
| Waitohu | AIYIMA |
| Tau tauira | DAC-A6 |
| Tukunga Mōrahi Voltage | 12 Volts |
| Momo Atanga | Coaxial, USB, Whatu, Nihokikorangi |
| Te maha o nga hongere | 2 |
| Hunga Hua | 5.24"L x 4.92"W |
| Taumaha Tūemi | 1.54 pauna |
| PC-USB Sampreiti reiti | 32bit/768kHz, DSD512 |
| Tautoko Nihokikorangi | APT-X HD, APT-X LL, LDAC, AAC, SBC |
| Whakautu auau | 10Hz-40kHz (±3db) |
| Kororirori | ≤0.0006% |
Whakaahua: Rear view of the DAC A6 with dimensions and a table of key specifications including input types, output, Bluetooth support, frequency response, distortion, net weight, PC-USB sampling rate, and working voltage.
8. Te Raru
- Kore Putanga Oro:
- Me whakarite kia honoa nga taura katoa.
- Verify the correct input mode is selected on the DAC A6.
- Check the volume levels on both the DAC A6 and your connected ampkaikōrero.
- If using TV optical/coaxial, ensure the TV's audio output settings are correctly configured (see "Setting TV Optical/Coaxial Output" section).
- For PC-USB, confirm the driver is installed and the DAC A6 is selected as the audio output device in your computer's sound settings.
- Intermittent Audio or Noise (PC-USB):
- Ensure the PC-USB driver is correctly installed and up to date, especially for Windows 11.
- Whakamātauria he tauranga USB rereke, he taura USB ranei.
- Minimize other USB devices connected to the computer.
- Nga Take Hononga Nihokikorangi:
- Me whakarite kia mau te antenna Nihokikorangi.
- Verify the DAC A6 is in Bluetooth input mode.
- Delete "BT HIFI AUDIO" from your device's paired list and try pairing again.
- Ensure your device is within range of the DAC A6.
- Haruru ngunguru, haruru ngunguru rānei:
- This can sometimes be caused by electromagnetic interference. Try repositioning the DAC A6 unit, its power cable, and audio cables away from other electronic devices or power sources.
- Consider using shielded audio cables.
- If using a linear power supply, ensure it is properly grounded and positioned.
9. Pūtāhui me te Tautoko
AIYIMA products are designed for reliability and performance. For warranty information, technical support, or service inquiries, please refer to the official AIYIMA website or contact your local dealer. Keep your purchase receipt as proof of purchase.
For further assistance, you may visit the AIYIMA store on Amazon: AIYIMA Store.


