1. Kupu Whakataki
The ACEMIC VT-5 is a portable wireless microphone system designed specifically for violins, suitable for various performances including stage and street settings. It features digital wireless audio transmission, ensuring clear sound quality and freedom of movement.
Ihirangi mokete
- VT-5 Transmitter with integrated microphone
- VT-5 Receiver (6.35mm plug-on type)
- Tauira Whakatau USB

Image 1.1: ACEMIC VT-5 Wireless Microphone System showing the transmitter with microphone and the plug-on receiver.
2. Tohutohu Tatūnga
2.1 Attaching the Microphone Transmitter to the Violin
- Carefully open the clip on the microphone transmitter unit.
- Attach the clip securely to the edge of your violin, ensuring it does not obstruct playing or damage the instrument's finish.
- Adjust the flexible gooseneck of the microphone to position the microphone head optimally for sound capture, typically near the f-hole or bridge.

Image 2.1: The VT-5 microphone transmitter securely clipped onto the body of a violin.

Whakaahua 2.2: He tata view of the microphone's clip, designed for secure attachment to the violin.
2.2 Te hono i te Kaiwhiwhi
- Locate a 6.35mm (1/4 inch) input jack on your mixer, amplifier, or active speaker.
- Plug the VT-5 receiver directly into this input jack. Ensure a firm connection.
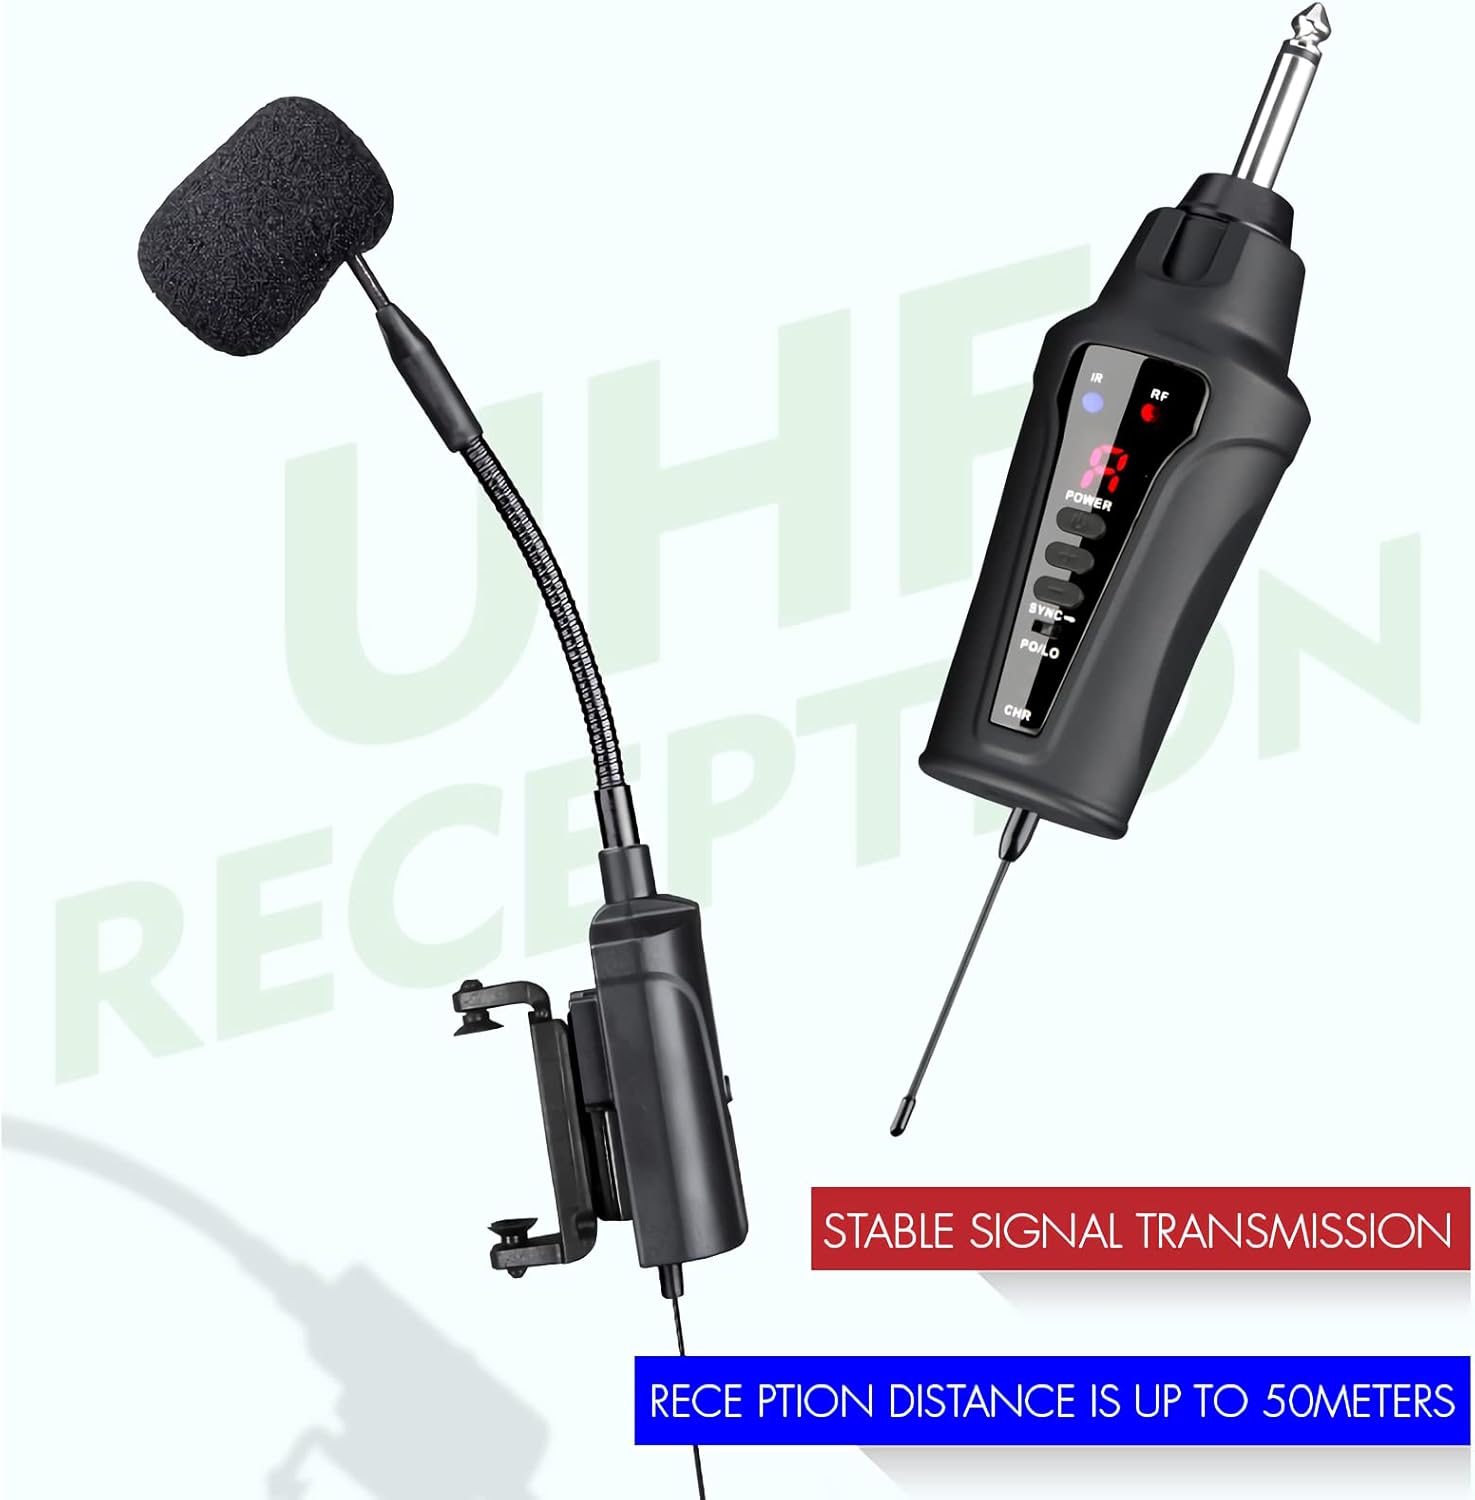
Image 2.3: The VT-5 receiver connected to an audio mixer, ready for sound transmission.

Image 2.4: The VT-5 receiver plugged into an amplifier, illustrating direct connection capability.
2.3 Te Whakakā me te Honohono
- Press and hold the power button on both the transmitter and the receiver until their respective indicator lights illuminate.
- The system features IR sync for automatic frequency downloading from the receiver. The units should automatically pair.
- If pairing does not occur automatically or if you experience interference, you can manually select one of the 16 pre-set frequencies on both the transmitter and receiver to find a clear channel.
Video 2.1: This video demonstrates the unboxing, powering on, and initial setup of the VT-5 wireless microphone system, including attaching it to a violin and connecting to an ampkaiwhakarewa/whakaranu.
3. Nga Tohutohu Whakahaere
3.1 Mahi Taketake
- Once paired, the system is ready for use. Ensure the volume on your connected mixer or amplifier is set appropriately.
- The digital ID code technology helps to completely solve frequency interference, providing a stable and clear audio signal.
- The portable design allows for freedom of movement, making it ideal for stage performances, street performances, and other dynamic settings.
3.2 Using Multiple Systems
If using multiple VT-5 systems simultaneously, ensure each system is set to a different channel to prevent interference. The system offers 16 selectable frequencies for this purpose.
Video 3.1: This video illustrates the process of setting up and using two separate VT-5 wireless microphone systems concurrently, demonstrating channel separation for multi-instrument use.
4. Tiaki
4.1 Te Whakataki i te Pūhiko
- The transmitter and receiver are powered by 3.7V lithium batteries.
- Connect the provided USB charging cable to the charging ports on both units and a suitable USB power source.
- A full charge provides over 6 hours of continuous use. Charge the units when the battery indicator lights show low power.
4.2 Tiakitanga Whanui
- Keep the units clean and dry. Avoid exposure to extreme temperatures, moisture, or direct sunlight.
- Do not attempt to disassemble or modify the units, as this will void the warranty and may cause damage.
5. Te Raru
Kore Putanga oro
- Me whakarite kei te kā te tuku me te kaiwhiwhi, ā, kua kī katoa hoki te utu.
- Verify that the receiver is correctly plugged into the audio input of your mixer/ampkaikawe
- Check that the selected channel on the transmitter matches the channel on the receiver. Adjust if necessary.
- Confirm that the volume on your mixer/ampkua whakanuia te oro, kāore i whakangūtia.
Interference or Poor Sound Quality
- Change the operating channel on both the transmitter and receiver to avoid interference from other wireless devices.
- Ensure the transmitter and receiver are within the optimal operating range (up to 60m line-of-sight). Obstacles can reduce range.
- Check for any strong electromagnetic interference sources nearby.
Poto Pūhiko Ora
- Ensure the units are fully charged before each use.
- Ka heke te mahi o te pākahiko i roto i te waa me nga huringa utu tukurua.
6. Whakatakotoranga
Image 6.1: Visual representation of the dimensions for the VT-5 microphone transmitter and receiver.
| Āhuahira | Whakatakotoranga |
|---|---|
| Awhe Auautanga | Region dependent (e.g., 902-928MHz) |
| Tuku Ororongo | Ahokore Ahokore |
| Ororongo SampAratau ling | 48KHz |
| Nga Waea Ka taea te whiriwhiri | 16 (Pre-set) |
| Waehere ID | Digital (solves frequency interference) |
| Tukutahi Auautanga | Tukutahi IR |
| Awhe Mahi | Tae atu ki te 60m (tirohanga whānui) |
| Momo hopuoro | Kaipupuri |
| Te Maamaoroorooro | -47 dB ± 2dB |
| Te Mana Whakawhiti | 10mW |
| Putanga Kaiwhiwhi | 6.35mm mono |
| Roopuu | <6ms |
| Whakautu auau | 60Hz - 15KHz ± 2dB |
| Tapeke Harmonic Distortion (THD) | <0.8% (1KHz) |
| Tohu / Tuitahuri Noise | >92dB |
| Te Whiwhi i te Maamaa | -92dBm |
| Tuku Hiko | 3.7V pākahiko Lithium |
| Continuous Use (Battery) | >6 haora |
| Ahu Kaituku | 125*40*20mm |
| Rahi Kaiwhiwhi | 185*20*10mm |
7. Pūtāhui me te Tautoko
For warranty information and technical support, please refer to the documentation provided with your purchase or contact ACEMIC customer service directly. Keep your proof of purchase for any warranty claims.


