1. Kupu Whakataki
Thank you for choosing a Beko appliance. This user manual provides essential information for the safe and efficient operation, installation, and maintenance of your Beko DIN34320 fully built-in dishwasher. Please read these instructions carefully before using your appliance to ensure optimal performance and to prevent any damage or injury.
The Beko DIN34320 is a fully integrated dishwasher designed for seamless installation into your kitchen cabinetry, offering a capacity of 13 place settings and an energy efficiency class E.
2. Nga korero haumaru
Me whai tonu i nga tikanga tiaki haumaru ina whakamahi taputapu hiko hei whakaiti i te tupono o te ahi, te wiri hiko, me te whara ki nga tangata.
- Pānuihia nga tohutohu katoa i mua i te whakamahi i te horoi rihi.
- Ko tenei taputapu he mea mo te kainga anake.
- Kaua e tukua ngā tamariki kia tākaro, kia takaro ki runga, kia takaro rānei i roto i te mīhini horoi rihi.
- Me whakarite kia tika te turanga o te horoi rihi.
- Kaua e whakahaeretia te horoi rihi mena kua pakaru te taura hiko, mono ranei.
- Keep detergents and rinse aid out of the reach of children.
- Me whakamahi noa nga horoi horoi me nga awhina horoi i hangaia mo nga kai horoi rihi.
- Sharp items should be loaded with handles up to prevent cuts.
- Kaua e huakina te tatau i te wā e mahi ana, kei pupuhi mai pea te wai wera.
3. Tatūnga me te Tāuta
He mea nui te whakaurunga tika mo te mahi me te roa o to horoi rihi. E taunaki ana kia whakauruhia e tetahi tohunga hangarau.
3.1 Te Wetewete
Carefully remove all packaging materials. Inspect the dishwasher for any damage that may have occurred during transit. Report any damage to your retailer immediately.
3.2 Positioning and Dimensions
Your Beko DIN34320 is a fully built-in model, designed to be integrated into a standard kitchen cabinet. Ensure the cabinet dimensions match the appliance requirements.

Whakaahua 1: Mua view of the Beko DIN34320 dishwasher, illustrating its design for full integration into kitchen cabinetry.
- Teitei: 82 cm
- Whānui: 60 cm
- Hōhonu: 55 cm
Ensure there is adequate space for water inlet and outlet hoses, and the electrical cable.
3.3 Hononga Wai
Connect the water inlet hose to a cold water supply with a minimum pressure of 0.03 MPa and a maximum of 1 MPa. The water outlet hose should be connected to a drain pipe, ensuring it is not kinked or obstructed.
3.4 Hononga Hiko
Connect the dishwasher to a grounded electrical outlet. The appliance operates on 230 Volts. Ensure the electrical supply meets the specifications of the appliance and local regulations.
3.5 Te Whakataunga Kuaha rūnanga
As a fully integrated model, a custom cabinet door panel must be attached to the front of the dishwasher. Follow the detailed instructions provided in the separate installation template for precise alignment and secure fastening of the panel.
4. Nga Tohutohu Whakahaere
This section guides you through the daily use of your Beko DIN34320 dishwasher.
4.1 Paewhiri Mana Ki rungaview
The Beko DIN34320 features a fully integrated control panel, typically located on the top edge of the dishwasher door. Controls are visible only when the door is open and include program selection buttons, a start/pause button, and an LED display for program status and remaining time.
4.2 Te Uta i te Riu Riu
For optimal cleaning results, load dishes correctly. Scrape off large food particles before loading. Place larger items in the lower basket and delicate items like glasses in the upper basket.

Whakaahua 2: Roto view of the dishwasher, showing the arrangement of the upper and lower baskets, and the cutlery basket.
Whakaahua 3: Example of a loaded dishwasher, illustrating how to arrange various dishes for effective cleaning.
- Me whakarite ka taea e nga ringa rehu te huri noa.
- Place cups, glasses, and small bowls upside down in the upper basket.
- Place plates, larger bowls, and pots in the lower basket.
- Use the cutlery basket for forks, spoons, and knives, placing sharp ends down.
4.3 Te taapiri i te awhina horoi me te horoi
Open the detergent dispenser and add the recommended amount of dishwasher detergent. Close the dispenser lid securely. Check the rinse aid indicator and refill if necessary.
4.4 Te Kowhiri i te Papatono
Your dishwasher offers several wash programs to suit different needs. Common programs include:
- Papatono Eco: Energy-efficient program for normally soiled dishes. (Water consumption: 12.9 L, Duration: 3:25 h:min)
- Papatono Aunoa: Ka whakatika aunoa i te huringa horoi i runga i te taumata o te oneone.
- Other optional cycles are available for specific washing needs.
Refer to the control panel for specific program options and their indicators.
4.5 Te Tīmata i tētahi Kaupapa
Close the dishwasher door firmly. Select your desired program using the program selection buttons. Press the Start/Pause button to begin the cycle. The LED display will show the program status.
4.6 Te Whakamutu i tētahi Kaupapa
Once the program is complete, the dishwasher will signal with an audible alert or a light indicator. Carefully open the door and allow dishes to cool before unloading. Unload the lower basket first to prevent water from dripping onto dry dishes.
5. Tiaki me te Tiaki
Ma te tiaki i nga wa katoa ka pai te whakahaere o to horoi rihi me te roa o tona oranga.
5.1 Whakapai i nga whiriwhiringa
The filter system prevents large food particles from entering the pump. Clean the filters regularly (at least once a week) to ensure optimal washing performance. Remove the lower basket, twist and lift out the filter assembly, rinse under running water, and reassemble.
5.2 Ngā Pūwero Horoi
Check the spray arm nozzles for blockages. If necessary, remove the spray arms and clean the holes with a thin object like a toothpick. Rinse thoroughly and reattach.
5.3 Te horoi o roto me waho
Horoia te roto ki te panuiamp cloth after each use. For the exterior, use a soft, damp kakahu me te horoi ngawari. A ape i te horoi horoi.
5.4 Adding Dishwasher Salt
If your water supply is hard, you may need to add dishwasher salt to the dedicated salt dispenser to prevent limescale buildup. The salt indicator light on the control panel will illuminate when a refill is needed.
6. Te Raru
I mua i te whakapā atu ki te ratonga, tirohia nga take e whai ake nei:
| Raruraru | Take pea | Rongoā |
|---|---|---|
| Kaore te miihini horoi horoi e tiimata | Karekau he hiko; Karekau te kuaha i kati tika; Kāore te hōtaka i tīpakohia. | Tirohia te hononga hiko; Me whakarite kua raka te tatau; Tīpakohia he hōtaka ka pēhi i te Tīmata. |
| He kino nga hua horoi | Te utaina hē; Ngā ringa/tātari rehu kua purua; Kāore i te rawaka te hopi horoi; Te hōtaka hē. | Reload dishes correctly; Clean filters and spray arms; Add more detergent; Select a more intensive program. |
| Kaore te wai e whakaheke | Clogged drain hose/filter; Drain pump malfunction. | Clean filters; Check drain hose for kinks; Contact service if pump is faulty. |
| Haruru nui | Dishes interfering with spray arms; Foreign object in pump; Improper installation. | Whakaritea anō ngā rihi; Tirohia mēnā he mea ke; Kia tika te mīhini horoi rihi. |
If the problem persists after checking these points, please contact Beko customer support.
7. Whakatakotoranga
Detailed technical specifications for the Beko DIN34320 dishwasher.
| Āhuahira | Whakatakotoranga |
|---|---|
| Ingoa Tauira | DIN34320 |
| Waitohu | Peko |
| Momo Tāuta | Fully Built-in / Integrated |
| Te kaha | 13 Tautuhinga Wahi |
| Karaehe Pungao Pungao | E |
| Taumata Haruru | 49 dB (Decibels) |
| Te Whakamahinga Wai (Kaupapa Taiao) | 12.9 rita/huringa |
| Program Duration (Eco Program) | 3:25 (h: min) |
| Ahu (H x W x D) | 82 cm x 60 cm x 55 cm |
| Voltage | 230 Volt |
| Momo Whakaatu | LED |
| Momo Mana | Whakanui Whakauru |
| Rauemi | Te whakarewa |
| Nga Waahanga kei roto | Cutlery basket, Plate rack |
7.1 Tapanga Pungao me te Pepa Korero Hua
The energy label provides key information about the appliance's energy consumption and performance. The product information sheet offers more detailed specifications.

Figure 4: EU Energy Label for the Beko DIN34320 dishwasher.
For detailed product information, including the official product information sheet, please visit the EPREL database:

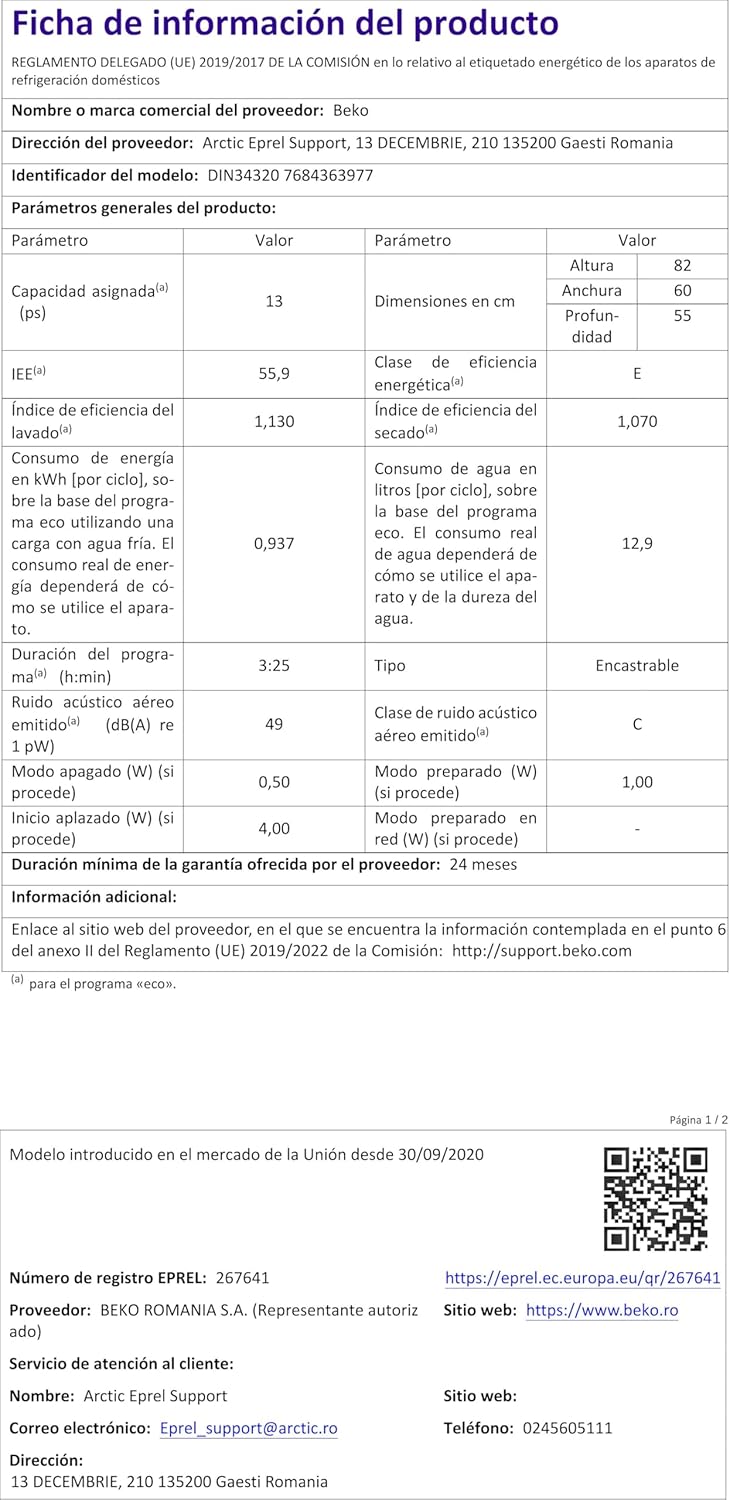
Figure 5: Product Information Sheet (example in French, content is consistent across languages).
8. Pūtāhui me te Tautoko
8.1 Nga Korero Whakaputanga
This Beko dishwasher comes with a minimum warranty period of 24 marama provided by the supplier. Please retain your proof of purchase for warranty claims.
8.2 Tautoko Kiritaki
For technical assistance, spare parts, or warranty service, please contact the authorized service provider:
- Kaiwhakarato Ratonga: Arctic Epel Support
- Īmēra: Eprel_support@arctic.ro
- Waea: 0245605111
- Webpae: https://www.beko.ro
- Wāhi noho: 13 DECEMBRIE, 210 135200 Gaesti Romania