1. Kupu Whakataki
This manual provides detailed instructions for the installation, operation, and maintenance of your PAC RPK5-GM4168CP Integrated Radio Replacement Kit. This kit is designed to upgrade the audio system in 2010-2015 Chevrolet Camaro models (all trim levels), integrating a 6.8” touchscreen double DIN radio with modern features such as Apple CarPlay, Android Auto, and Bluetooth connectivity.
The kit includes a multimedia radio, a replacement dash kit, wiring harness, aftermarket antenna adapter, and a pry tool, ensuring a comprehensive upgrade while maintaining factory features like steering wheel controls and temperature displays.

Figure 1.1: PAC RPK5-GM4168CP kit components including the radio, dash kit, and wiring.
2. He aha kei roto i te Pouaka
Your PAC RPK5-GM4168CP kit includes the following components:
- 6.8” GX-3800 Multimedia Radio Display
- All-in-one Radio Replacement Interface
- Factory-Matched Radio Dash Kit
- RadioPro Interface for 2010-2015 Camaro
- Stinger Dual USB Extension Kit
- Complete Plug-n-Play Installation Harness
- Antenna Adapters for Satellite and AM/FM Radio
- Kitiko Hardware
- GPS Antenna
- Puorooro o waho
- Utauta Pry
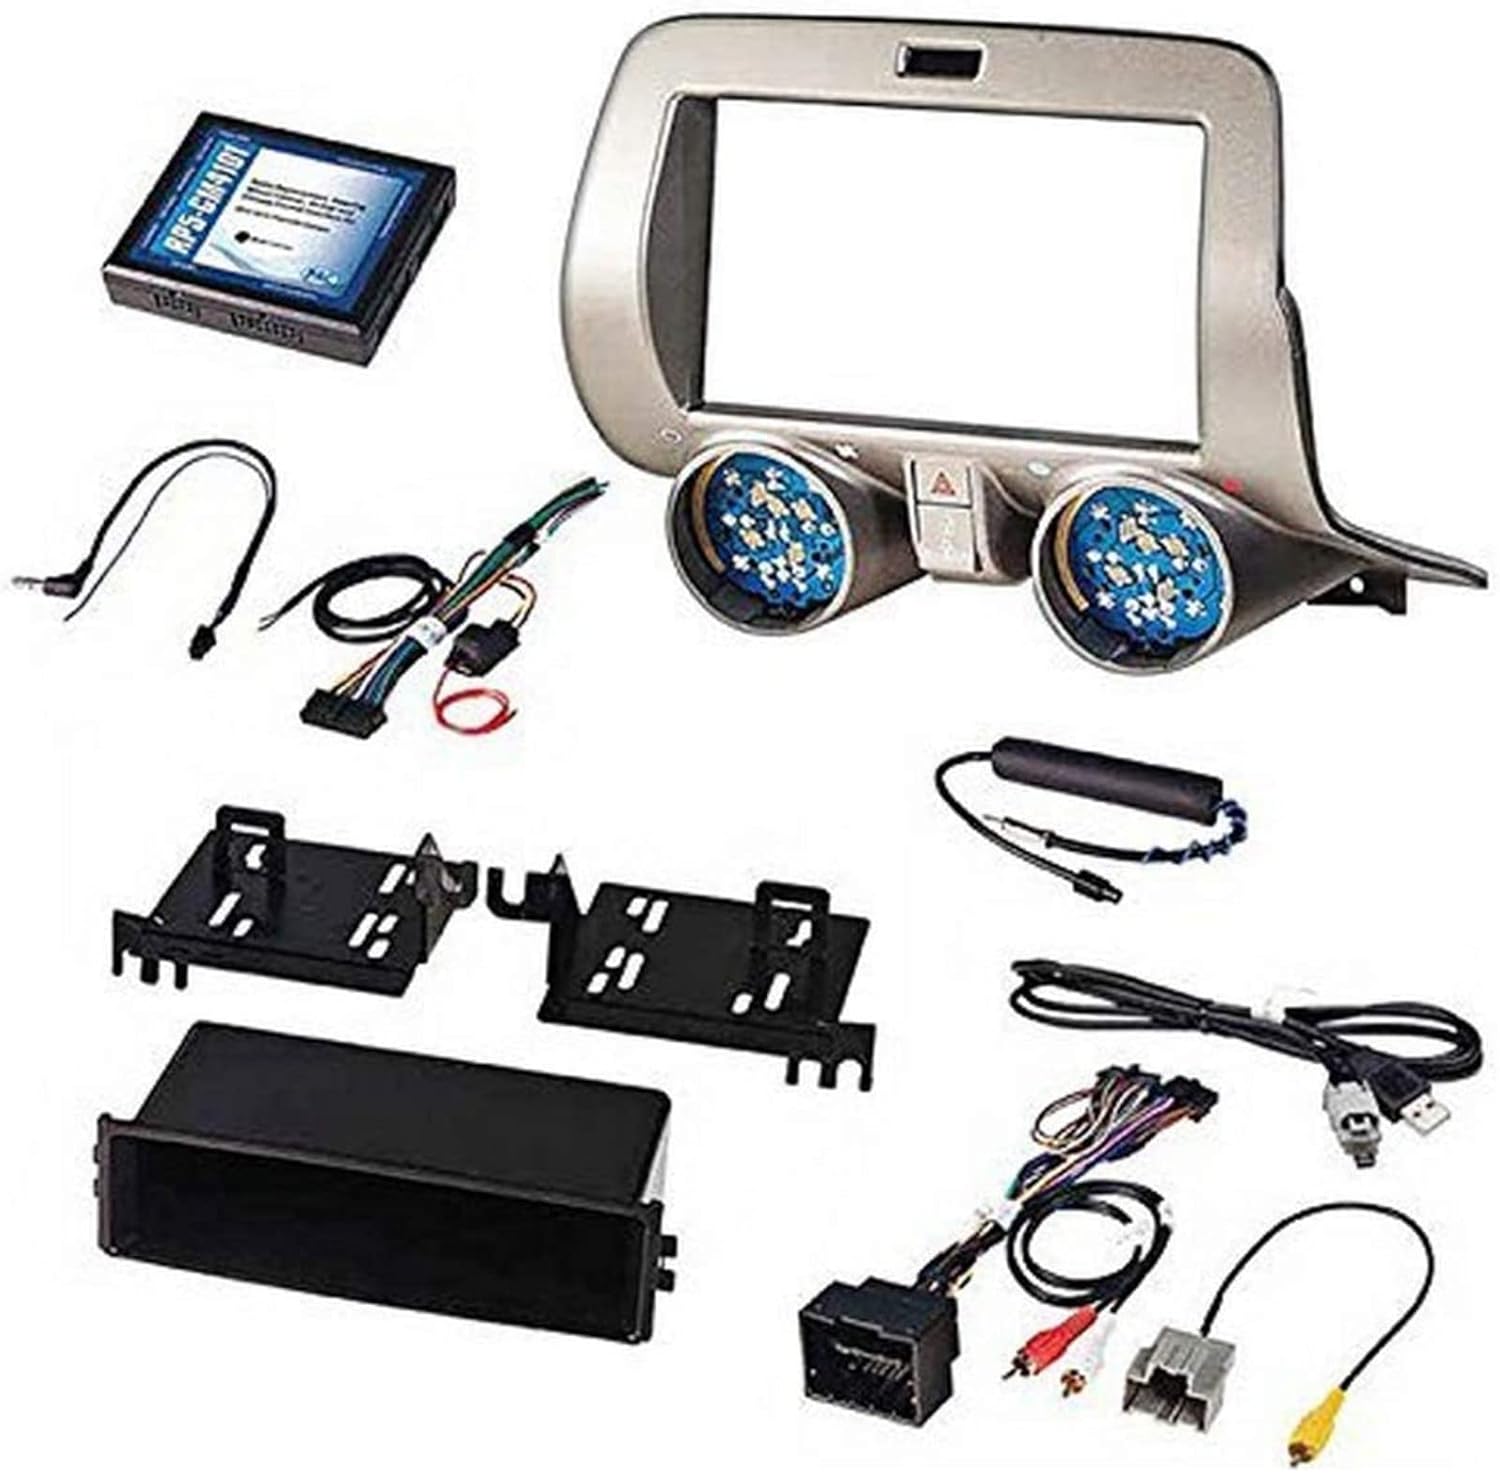
Figure 2.1: All components included in the PAC RPK5-GM4168CP kit, laid out for identification.
3. Tatūnga me te Tāuta
Professional installation is recommended for this product. Ensure the vehicle's battery is disconnected before beginning installation.
3.1 Dash Disassembly
Carefully remove the factory radio and associated dash panels. Use the provided pry tool to avoid damaging interior surfaces. Disconnect all wiring harnesses from the factory components.
Video 3.1: Step-by-step guide on disassembling the Chevy Camaro dashboard for radio replacement.
3.2 Hononga Waea
Connect the PAC wiring harness to the new multimedia radio. Ensure all connections are secure. Connect the antenna adapters and GPS antenna. If retaining factory steering wheel controls, connect the appropriate interfaces as per the detailed wiring diagram.
Video 3.2: Detailed instructions for connecting the radio wiring harness and other components.
3.3 Huihuinga
Once all connections are made and tested, carefully reassemble the dashboard components. Ensure no wires are pinched and all panels snap securely into place.

Figure 3.1: Visual comparison of the Chevrolet Camaro dashboard before and after the radio replacement kit installation.
4. Nga Tohutohu Whakahaere
4.1 Apple CarPlay & Android Auto
Connect your compatible smartphone via USB to access Apple CarPlay or Android Auto. This allows for hands-free calls, text messages, music playback, and navigation directly on the 6.8” touchscreen.

Figure 4.1: Display showing the Apple CarPlay and Android Auto interfaces on the new touchscreen radio.
4.2 Hononga Nihokikorangi
Pair your smartphone via Bluetooth for wireless audio streaming and hands-free calling. The included external microphone ensures clear communication.

Figure 4.2: Icons representing Bluetooth, USB connection, and external microphone features.
4.3 Mana Whakahaere Wira
The kit retains your factory steering wheel controls, allowing you to manage volume, tracks, and calls without taking your hands off the wheel.

Figure 4.3: Illustration of steering wheel controls being used to manage the radio functions.
4.4 Reverse Camera Support
The system supports reverse camera inputs with adjustable parking guidelines, enhancing safety and ease of parking.

Figure 4.4: Screen displaying a reverse camera view me ngā aratohu waka hihiri.
5. Tiaki
To ensure optimal performance and longevity of your radio replacement kit, follow these general maintenance guidelines:
- Whakapai Mata: Whakamahia he kakahu ngohengohe, kore karekau hei muru ata i te mata pa. Mo nga kohukohu pakeke, paku dampen te kakahu ki te wai, ki te horoi mata-haumaru ranei. A ape i nga matū kino, i nga taonga abrasive ranei.
- Whakahōu Pūmanawa: Tirohia i ia wa i te kaihanga website for available software or firmware updates to ensure your system has the latest features and bug fixes.
- Tirohanga Waea: If you experience any issues, a professional should inspect the wiring connections to ensure they remain secure and free from damage.
6. Te Raru
If you encounter issues with your PAC RPK5-GM4168CP kit, consider the following:
- Kore Mana: Tirohia ngā hononga hiko katoa, me te whakarite kei te hono tika te pākahiko o te waka. Me whakarite kei te ora tonu ngā fiusi.
- Kore Ororongo: Confirm speaker connections and audio settings. Ensure the volume is not muted or set too low.
- CarPlay/Android Auto Kaore i te hono: Ensure your smartphone is compatible and connected via a certified USB cable. Check phone settings for CarPlay/Android Auto activation.
- Kāore e Mahi ana ngā Mana o te Wira Uru: Verify the interface module connections and ensure proper programming (if applicable).
- Te Manaaki Reo Irirangi Kino: Check the antenna connection and ensure the aftermarket antenna adapter is correctly installed.
For persistent issues, consult a professional installer or contact PAC technical support.
7. Whakatakotoranga
| Āhuahira | Taipitopito |
|---|---|
| Tau tauira | RPK5-GM4168CP |
| Ahu mōkihi | 16.5 x 13.5 x 12 inihi |
| Taumaha Tūemi | 9.02 pauna (4.1 Kirokaramu) |
| Hangarau Hononga | Nihokikorangi, USB |
| Momo Kaiwhakahaere | Android |
| Āhuahira Motuhake | Pūriterite, Mata pa |
| Pūrere Hototahi | Waea atamai |
| Aratau Putanga Ororongo | Tirooro |
| Whirihoranga Hongere oro a tawhio noa | 4.0 |
| Tae | Pango |
8. Pūtāhui me te Tautoko
This product is covered by a manufacturer's warranty. Please refer to the warranty card included in your packaging for specific terms and conditions. For technical support, troubleshooting assistance, or warranty claims, please contact PAC customer service directly.
Contact information can typically be found on the PAC website or in the documentation provided with your kit.


