Ka mutu te huaview
The HAPPYMODEL X12 AIO 5in1 Flight Controller is an advanced integrated solution designed for FPV (First Person View) drones, particularly suitable for Brushless whoop, Tinywhoop, and Toothpick drone builds. It combines a flight controller, 12A ESC (Electronic Speed Controller), and OPENVTX (Open-source Video Transmitter) into a single compact unit, offering a streamlined and powerful core for your drone.
This flight controller is notable for its integrated features, including an onboard SPI ELRS receiver (supporting ELRS TX module 2.x firmware) or SPI Frsky receiver (supporting Frsky D8/D16, REDPINE, and SFHSS), and Betaflight OSD (On-Screen Display). It supports 1-2S Lipo/LIHV batteries and is engineered to provide excellent RX and VTX range.

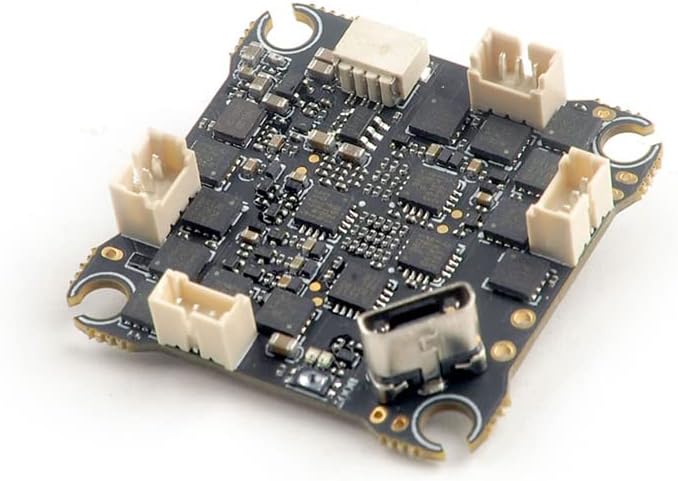
This image shows the compact design of the HAPPYMODEL X12 AIO 5in1 Flight Controller, highlighting its integrated components.
Whakatakotoranga
Below are the detailed specifications for the HAPPYMODEL X12 AIO 5in1 Flight Controller (PNP Version):
| Āhuahira | Value (PNP Version) |
|---|---|
| Ingoa Tūemi | X12 AIO 5-IN-1 Flight controller built-in 12A ESC and OPENVTX |
| Betaflight Firmware Target | CRAZYBEEF4DX |
| GYRO&ACC | ICM20689 |
| On board ESC | 12A 4-IN-1 |
| On board SPI RX | NO (PNP) |
| On board VTX | OpenVTX |
| Mahi Voltage | 1-2S Lipo/LIHV battery |
| Taumaha | 5.1g |
| Rahi | 30mm * 30mm * 8mm |
| Whenua Taketake | Haina |
| Kaihanga | HAPPYMODEL |
| Te Tau Manakohia | 14 tau ki runga ake |
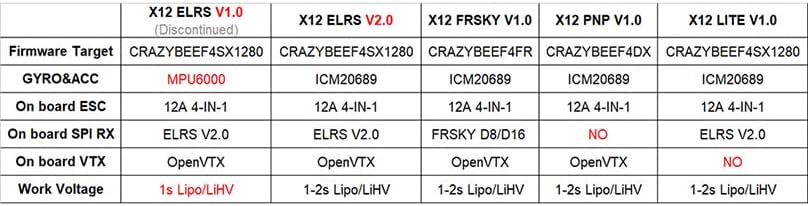
A detailed comparison table outlining the firmware targets, gyroscope, ESC, SPI receiver, VTX, and work voltage for various X12 flight controller versions including ELRS, FRSKY, PNP, and LITE.
Te Tatūnga me te Waea
Proper wiring and setup are crucial for the functionality and safety of your drone. Refer to the diagrams below for correct connections.

This diagram illustrates the connection points for motors (M1-M4), camera signal, 5V output, GND, RX, TX, BAT+, and BUZ+ on the X12 PNP V1.0 flight controller, essential for proper setup.
Ngā Hononga Wāhanga:
- Motika: Connect your drone's motors to the M1, M2, M3, and M4 pads as indicated on the board. Ensure correct motor direction is set in Betaflight.
- Kāmera: Connect your FPV camera's video signal to the 'Camera signal' pad, and its power (typically +5V and GND) to the corresponding pads.
- Pūhiko: Connect your 1-2S Lipo/LIHV battery to the BAT+ and GND pads. Observe polarity carefully.
- Receiver (if external): For external receivers, connect RX and TX pads as per your receiver's protocol (e.g., SBUS, Crossfire). The PNP version does not have an onboard SPI receiver.
- Hopu: If using an external buzzer, connect it to the BUZ+ and BUZ- pads.
- Riwai arahina: Connect compatible LED strips to the LED_STRIP pad for visual indicators.

He koki view of the flight controller, highlighting the USB-C port for connection to a computer for configuration and firmware updates.
Firmware and Configuration:
The X12 AIO flight controller runs on Betaflight firmware. To configure your flight controller, connect it to your computer via the USB-C port and use the Betaflight Configurator software. Ensure you have the correct DFU drivers installed.
- Maamaa te Rorohiko: Download the appropriate Betaflight firmware target (CRAZYBEEF4DX for PNP version) from the official Betaflight GitHub repository. Use the Betaflight Configurator to flash the firmware.
- Tatūnga Tuatahi: Follow the Betaflight Configurator setup wizard to calibrate the accelerometer, configure ESC protocols (e.g., DShot), set up PID tuning, and assign flight modes.
- VTX Setup: The onboard OPENVTX can be configured via Betaflight OSD or SmartAudio/TrampHV. Refer to the Betaflight documentation for VTX table setup.
Te raro view of the flight controller, showing multiple connectors for various peripherals such as motors, receiver, and other accessories.
Nga Tohutohu Whakahaere
Once the flight controller is properly installed and configured, you can proceed with operating your drone.
- Takitaki i mua i te Rererangi: Always perform a visual inspection of your drone before each flight. Check for loose wires, damaged propellers, and secure battery connection.
- Te patu: Arm the motors using the designated switch on your radio transmitter, as configured in Betaflight. Ensure you are in a safe area with no obstacles or people nearby.
- Aratau Rererangi: Utilize the flight modes configured in Betaflight (e.g., Angle, Acro, Air Mode) to suit your flying style and conditions.
- Whakakorea: Disarm the motors immediately after landing or in case of an emergency.
- Mōhiohio OSD: Monitor critical flight data such as battery voltage, current, flight time, and RSSI (Receiver Signal Strength Indicator) via the Betaflight OSD displayed on your FPV goggles or monitor.
Te tiaki
Regular maintenance helps ensure the longevity and reliable performance of your flight controller.
- Te horoi: Periodically clean the flight controller board using a soft brush and isopropyl alcohol to remove dust, dirt, or debris. Ensure no conductive materials are present.
- Tirotiro: Regularly inspect solder joints for cracks or cold joints. Check for any signs of physical damage to components or traces.
- Whakahōu Firmware: Keep your Betaflight firmware updated to the latest stable version to benefit from bug fixes, performance improvements, and new features.
- Rokiroki: When not in use, store the flight controller in an anti-static bag in a dry, cool environment to prevent damage from static electricity or moisture.
Raparongoā
Anei etahi take noa me o raatau otinga ka taea:
- Kore Mana:
- Check battery connection and voltage.
- Inspect power leads for breaks or shorts.
- Verify correct polarity.
- No Signal from Receiver:
- Ensure receiver is properly bound to your transmitter.
- Check receiver wiring to the flight controller (RX/TX pads).
- Verify receiver protocol settings in Betaflight.
- Motors Not Spinning/Spinning Incorrectly:
- Check ESC connections to motors and flight controller.
- Verify ESC protocol (e.g., DShot) in Betaflight.
- Ensure motor direction is correct in Betaflight.
- Check for bent motor shafts or damaged propellers.
- No FPV Video:
- Check camera and VTX wiring.
- Verify VTX channel and power settings in Betaflight OSD or Configurator.
- Ensure FPV goggles/monitor are on the correct frequency.
- Flight Controller Not Connecting to PC:
- Install correct DFU drivers.
- Whakamātauria he taura USB rerekē, tauranga rānei.
- Ensure Betaflight Configurator is up to date.
Pūtāhui me te Tautoko
This product is subject to a return policy allowing for a refund or replacement within 30 days of purchase, as per the seller's terms.
For further support, technical assistance, or to explore other products from HAPPYMODEL, please visit the official HAPPYMODEL store on Amazon:


