1. Kupu Whakataki
This manual provides detailed instructions for the safe and efficient installation, operation, and maintenance of your Link2Home Extend & Tilt TV Wall Mount. Designed for televisions ranging from 42 to 90 inches and supporting up to 154 pounds, this mount offers versatile viewing options with its extendable, swivel, and tilt features. Please read all instructions carefully before beginning installation.
Āhuatanga matua:
- Universal TV Wall Mount for 42" to 90" screen sizes.
- Supports up to 154 pounds.
- Compatible with Flat and Curved Screen TVs & Monitors.
- Profile extends 3.1" to 5.3" from the wall.
- Open architecture for increased ventilation and easy access to wires.
- Adjustable tilt range: +5° to -12°.
- Adjustable swivel range: +5° to -5°.
- Screen level adjustment: +-0.98".
- Easy-grip knobs for quick, toolless tilt and lock.
- Anti-theft locking hole (padlock not included).
- Automatic click-in spring lock for secure hold.
- VESA compatibility: 200x200 mm to 600x400mm.
- Includes all necessary hardware and a built-in level.
- Mounts on wood studs, brick, concrete, and sheetrock/plasterboard walls.
2. Nga korero haumaru
- Raukaha Taumaha: Do not exceed the maximum weight capacity of 154 lbs (70 kg). This mount is designed for use with specified maximum weights. Use with products heavier than the maximum weights indicated may result in instability causing possible injury.
- Rahi Mata: He pai tēnei whakairinga mō ngā pouaka whakaata i waenga i te 42" me te 90".
- Mata Maunga: Me whakarite kia taea e te mata whakairi te tautoko i te taumaha katoa o ngā taputapu me ngā taputapu katoa e piri ana.
- Tāuta Ngaio: If you are unsure about the installation process or the suitability of your wall, consult a qualified professional.
- Hototahitanga VESA: Verify your TV's VESA mounting pattern (distance between screw holes on the back of the TV) is within the supported range of 200x200mm to 600x400mm.
- Utauta: Whakamahia ngā taputapu tika mō te tāutanga. Me mau tonu ngā mōhiti haumaru.
- Tamariki: Tiakina nga tamariki mai i te waahi whakauru.
3. Ihirangi mokete
Your Link2Home Extend & Tilt TV Wall Mount package includes the following components and hardware:
- Huihuinga Pereti Taiepa
- TV Brackets (Left and Right)
- Assorted TV Screws, Washers, and Spacers
- Lag Bolts and Wall Anchors (for various wall types)
- Taumata-i roto
- Cable Ties (for cord management)
- Pukapuka Tohutohu

4. Tatūnga me te Tāuta
Follow these steps carefully to install your TV wall mount:
Step 1: Attach TV Brackets to Your TV
- Carefully place your TV face-down on a soft, clean surface to prevent scratches.
- Tautuhia nga kohao whakapuru VESA kei muri o to pouaka whakaata.
- Select the appropriate screws, washers, and spacers from the provided hardware kit that fit your TV's VESA pattern.
- Attach the left and right TV brackets to the back of your TV, ensuring they are securely fastened. The hooks on the brackets should face upwards.

Step 2: Locate Mounting Position on Wall
- Whakatauhia te teitei e hiahiatia ana mō tō pouaka whakaata.
- Use a stud finder to locate wood studs in your wall. Mark the edges and center of the studs. For brick or concrete walls, ensure you have the correct anchors.
- Hold the wall plate against the wall at your desired height and use the built-in level to ensure it is perfectly horizontal. Mark the pilot hole locations.
Hipanga 3: Whakamauhia te Pereti Pakitara ki te Pakitara
- Drill pilot holes at the marked locations. The size of the drill bit will depend on your wall type (wood, brick, concrete).
- If installing into concrete or brick, insert the appropriate wall anchors into the pilot holes.
- Align the wall plate with the pilot holes and secure it to the wall using the provided lag bolts. Tighten all bolts firmly.

Hipanga 4: Whakairihia te pouaka whakaata ki runga i te pereti pakitara
- Me te āwhina, hikitia mārire te pouaka whakaata ka whakamaua ngā whīra pouaka whakaata e piri ana ki te pereti pakitara.
- Ensure both TV brackets are properly seated and engaged with the wall plate. The automatic click-in spring lock will snap into place for a secure hold.
Ataata Whakauru:
5. Nga Tohutohu Whakahaere
Your Link2Home Extend & Tilt TV Wall Mount offers flexible viewnga koki:
Whakaritea Hoa:
- To adjust the vertical tilt angle (+5° to -12°), loosen the easy-grip knobs on the TV brackets.
- Adjust the TV to your desired tilt angle.
- Tighten the easy-grip knobs to lock the TV in place.
Te Whakatikatika i te Hurihuri:
- The mount allows for a swivel range of +5° to -5°. Gently push or pull the side of the TV to achieve the desired horizontal viewkoki.
Extending/Retracting:
- The mount can extend from 3.1" to 5.3" from the wall. Gently pull the TV forward or push it back towards the wall.

Accessing Wires:
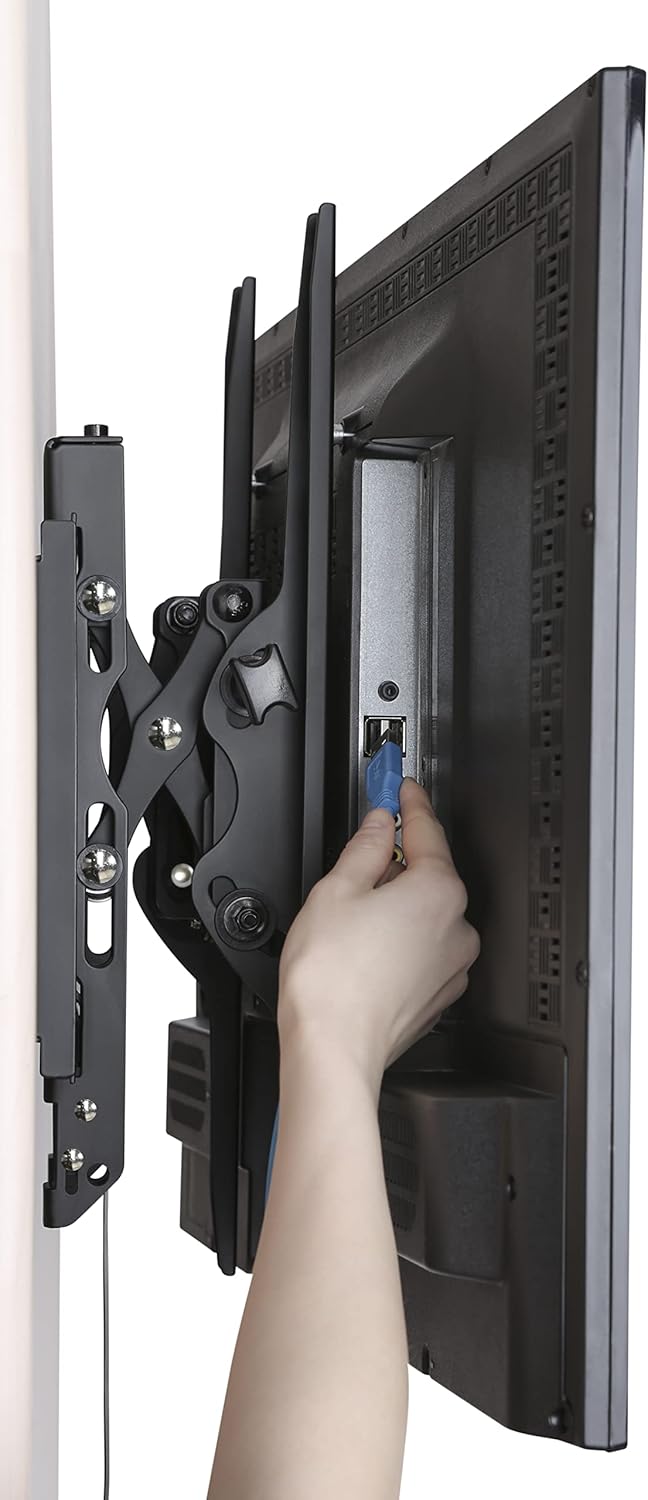
- The extendable profile and open architecture provide easy access to cables and ports on the back of your TV.
6. Tiaki
- Tirotiro auau: Periodically check that all screws and bolts are securely tightened.
- Te horoi: Horoia te maunga ki te kakahu ngohengohe, maroke. Kaua e whakamahi i ngā kaihoroi whakakoi, i ngā whakarewa rānei.
- Whakahinuhinu: Kāore e hiahiatia he hinu whakahinuhinu mō ngā wāhanga e neke ana.
7. Te Raru
- Kāore i te Taumata te Pouaka Whakaata: Use the screen level adjustment feature by twisting the screws on the arms for micro-adjustment. Ensure the wall plate was installed level using the built-in level.
- Uauatanga ki te Whakatika i te Honga/Hurihuri: Ensure the easy-grip knobs are sufficiently loosened before attempting to adjust the tilt. For swivel, apply gentle, even pressure.
- TV Feels Loose: Double-check that all mounting bolts on the wall plate and TV brackets are securely tightened. Ensure the automatic click-in spring lock is engaged.
- Cannot Remove TV from Mount: Pull the release strings located at the bottom of the TV brackets to disengage the locking mechanism.
8. Whakatakotoranga
| Whakatakotoranga | Taipitopito |
|---|---|
| Waitohu | Hono2Home |
| Tauira | B0B72CCPY4 |
| Hototahi Rahi Mata | 42" - 90" |
| Taumaha Taumaha | Tae atu ki te 154 lbs (70 kg) |
| VESA Hototahi | 200x200mm ki te 600x400mm |
| Koki Honga | +5° ki te -12° |
| Koki Hurihuri | +5° ki te -5° |
| Toronga Profile | 3.1" ki te 5.3" |
| Rauemi | Te whakarewa |
| Tae | Pango |
| Momo Whakaeke | Maunga Taiepa |
| Hunga Hua | 28.15 x 8.54 x 3.62 inihi |
| Taumaha Tūemi | 10.38 pauna |
9. Pūtāhui me te Tautoko
The Link2Home Extend & Tilt TV Wall Mount comes with a Pūtāhui Ora. For any questions, technical support, or warranty claims, please refer to the contact information provided in your product packaging or visit the official Link2Home webpae.


