1. Kupu Whakataki
Thank you for choosing the Commax CMV-70S 7-inch LED Intercom System. This manual provides essential information for the safe and efficient installation, operation, and maintenance of your new intercom system. Please read this manual thoroughly before use and keep it for future reference.
2. Nga korero haumaru
- Ensure all electrical connections are made by a qualified professional to prevent electric shock or fire.
- Kaua e whakaatuhia te taputapu ki te wai, ki te makuku, ki ngā pāmahana tino kino rānei.
- Do not attempt to open or repair the unit yourself. Refer all servicing to authorized personnel.
- Use only the specified power supply (AC 100V - 240V).
- Tiakina te waeine mai i te ra tika me nga puna wera.
3. Ihirangi mokete
Manatokohia ko nga mea katoa kei raro nei kei roto i to kete. Mena kei te ngaro, kua pakaru ranei etahi mea, tena koa whakapiri atu ki to kaihoko.
- Commax CMV-70S Monitor Unit
- Maunga Paetahi
- Pukapuka Kaiwhakamahi
- Screws (T)4 x 18mm (4 pcs)
- Screw (M)3 x 6mm (1 pc)
- Connection Cables (2P(1EA), 4P(3EA))
- Door Camera (if included in your specific kit)

Whakaaturanga 3.1: Nga Ihirangi mokete
4. Hua Neke Atuview
The Commax CMV-70S features a 7-inch LED screen and intuitive touch controls for visitor communication and door access. Familiarize yourself with the components of the monitor unit:
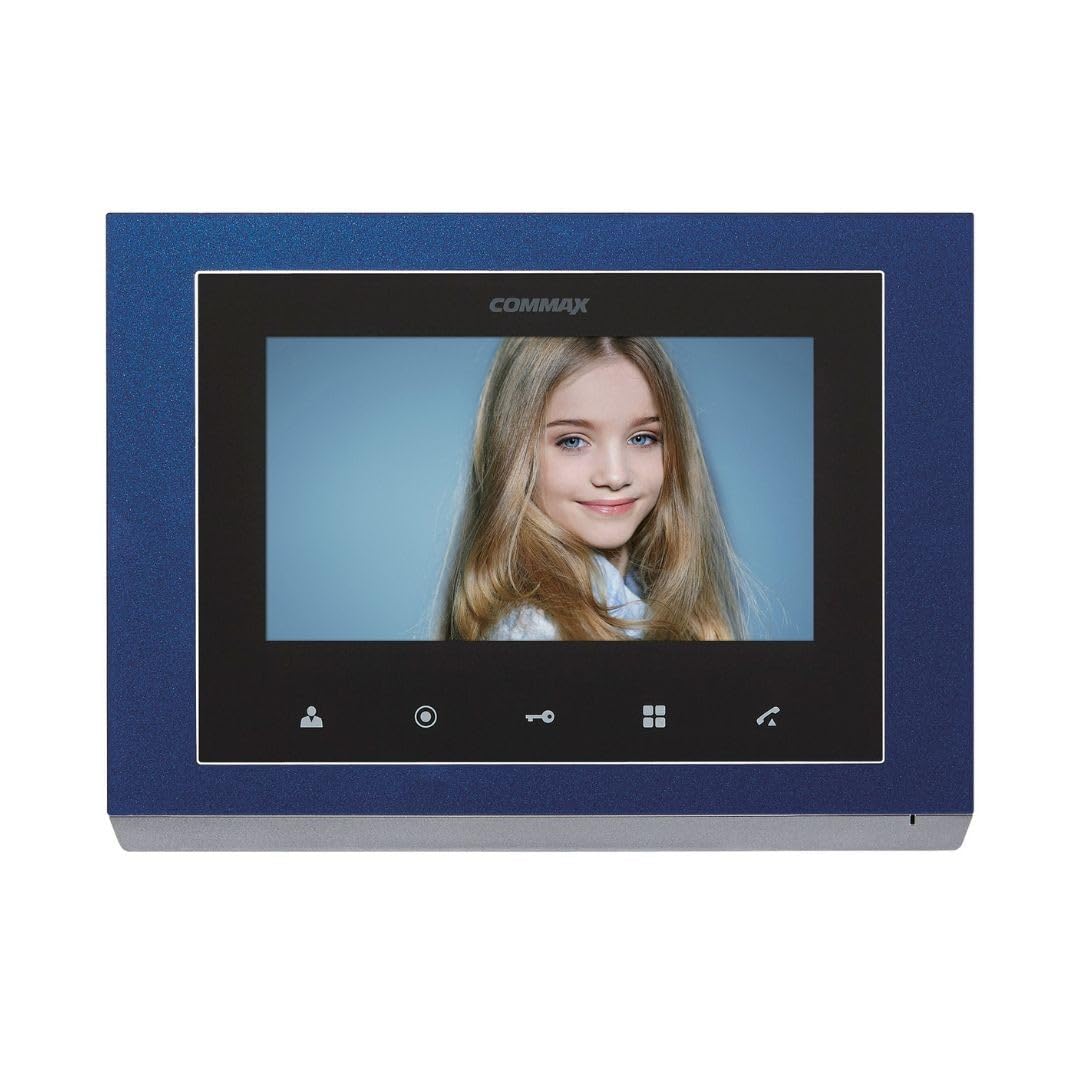
Figure 4.1: Front Panel Components
Nga Wae o mua
| Kao. | Ingoa Wāhanga | Kao. | Ingoa Wāhanga | Kao. | Ingoa Wāhanga |
|---|---|---|---|---|---|
| 1 | 7" TFTLCD | 2 | Kaikōrero | 3 | Pātene aroturuki |
| 4 | Guard and interphone button | 5 | Paatene tuku tuku | 6 | Menu button (touch) |
| 7 | Patene korero | 8 | C-MIC | 9 | Menu button (side) |
| 10 | Pātene tomo | 11 | △ pātene | 12 | ▽ button |
| 13 | Hiko ON/OFF | 14 | Te hono i nga pito |
5. Tatūnga
5.1 Te Whakamau i te Aroturuki
- Choose a suitable location for the monitor, typically near the main entrance or a central area.
- Secure the mounting bracket to the wall using the provided screws. Ensure it is level and firmly attached.
- Connect all necessary wiring to the monitor's connecting terminals (refer to Section 5.2).
- Carefully attach the monitor unit to the mounting bracket.
5.2 Hononga Waea
The CMV-70S system requires professional hardwire installation. Refer to the diagram below for terminal connections. Ensure power is disconnected before making any wiring connections.

Figure 5.1: Connecting Terminals (Rear View)
- Hononga Hiko: Connect the AC 100V - 240V power supply to the designated power terminals.
- Door Camera Connection: Connect the door camera to the 'CAM' terminals. The system supports up to two door cameras.
- Intercom Connection: For multi-unit setups or additional indoor phones, connect them to the 'INTER' terminals.
- Door Lock Release: Connect the electronic door lock to the appropriate terminals for remote release functionality.
This system is expandable up to two screens, two door cameras, and two indoor phones, especially when utilizing Fine View technology for single-house applications.
6. Nga Tohutohu Whakahaere
The Commax CMV-70S is designed for ease of use with its touch-sensitive buttons.
6.1 Nga Mahi Taketake
- Whakautu i te Karanga: When a visitor presses the call button on the door camera, the monitor will ring and display the visitor's image. Press the Talk button (7) to communicate.
- Aroturuki: Pehia te Monitoring button (3) ki view the outside area through the door camera at any time.
- Tukunga o te Kūaha: I a koe e waea ana, e aroturuki ana rānei, pēhia te pātene Door release button (5) ki te iriti i te tatau.
- Intercom/Guard Call: Pehia te Guard and interphone button (4) to initiate a call to another indoor unit or the guard station (if configured).
6.2 Whakatere Tahua
The CMV-70S features both touch and side menu buttons for system settings.
- Pehia te Menu button (touch) (6) or Menu button (side) (9) ki te uru ki nga tautuhinga punaha.
- Whakamahia te △ button (11) a ▽ button (12) ki te whakatere i roto i nga whiringa tahua.
- Pehia te Enter button (10) hei tīpako i tētahi kōwhiringa, hei whakaū rānei i tētahi tautuhinga.
- Ko te Power ON/OFF button (13) controls the unit's power.
7. Tiaki
- Te horoi: Wipe the monitor screen and body with a soft, dry cloth. Do not use abrasive cleaners or solvents.
- Hurihanga Hiko: If the unit is unresponsive, try turning it off using the Power ON/OFF button (13), waiting a few seconds, and then turning it back on.
- Takitaki auau: Takitaki i ia wa i nga hononga waea katoa kia mau ai.
8. Te Raru
If you encounter issues with your Commax CMV-70S, refer to the following common problems and solutions:
| Raruraru | Take pea | Rongoā |
|---|---|---|
| Kaore he ahua o te mata | Power off; Loose connection; Faulty camera | Check power (13); Verify wiring (14); Test camera connection. |
| No sound during call | Volume too low; Faulty speaker/microphone; Loose connection | Adjust volume in menu; Check wiring; Contact support. |
| Door lock not releasing | Incorrect wiring; Faulty lock; Insufficient power | Verify lock wiring; Test lock independently; Ensure adequate power supply. |
| Monitor unresponsive | He hapa pūmanawa; He raruraru hiko | Perform a power cycle (13); Check power connection. |
If the problem persists after trying these solutions, please contact Commax customer support or a qualified technician.
9. Whakatakotoranga
| Āhuahira | Whakatakotoranga |
|---|---|
| Kaihanga | Korahi |
| Tau tauira | CMV-70S |
| Rahi Mata | 7-inihi LED |
| Puna Mana | Corded Electric (AC 100V - 240V) |
| Whakamahi Hiko | 6 Watts |
| Hangarau Hononga | Waea |
| Tikanga Tāuta | Professional Hardwire |
| Pūrere Hototahi | Apartment complex, single house |
| Te Whakawhanui | Up to 2 screens, 2 door cameras, 2 indoor phones (Fine View technology for single house) |
| Nga Waahanga kei roto | Security screen, door camera |
| Taumaha Tūemi | 1.2 Kirokaramu |
| Ahu mōkihi | 30.4 x 24.8 x 6.9 cm |
| Rauemi | Kirihou |
| Tae | Kahurangi |
| Momo Matohi | Motion only |
| Nga Pikohiko e hiahiatia ana | Kao |
10. Pūtāhui me te Tautoko
Commax products are designed for reliability and performance. For warranty information, technical support, or service inquiries, please refer to the warranty card included with your product or visit the official Commax webpae. Puritia to riirii hoko hei tohu mo te hoko mo nga kereme whakamana.


