1. Nga Tohutohu Haumaru Nui
Read all instructions carefully before using the appliance. Failure to follow these instructions may result in electric shock, fire, or serious injury.
- Kaua e rumakina te wae matua, te taura, te mono ranei ki te wai, ki etahi atu wai ranei.
- Ko tenei taputapu ehara i te mea mo te whakamahi ma nga tangata (tae atu ki nga tamariki) he iti te kaha o te tinana, te tairongo, te hinengaro ranei, te kore mohio me te mohiotanga, mena ka tukuna atu ki a raatau te tirotiro, te tohutohu ranei mo te whakamahi i te taputapu e te tangata e whai mana ana mo to raatau haumaru. .
- Me whakarite te voltage tohua ana i te taputapu e haangai ana ki to pou hiko a rohetage i mua i te hono i te taputapu.
- Kaua e ārai i ngā pūaha hau. Me waiho he wāhi nui huri noa i te taputapu kia pai ai te rere o te hau.
- Always place the appliance on a stable, level, and heat-resistant surface.
- Wewetehia te taputapu mai i te putanga ka kore e whakamahia, i mua i te horoi. Tukua kia tino whakamatao i mua i te whakahaere.
- Kaua e whakahaere i tetahi taputapu me te taura kua pakaru, te mono ranei, i muri ranei i te kino o te taputapu, kua pakaru ranei i tetahi ahua.
- Kaua e tukua te taura hiko kia iri ki runga i te tapa o te teepu, porotiti ranei, pa atu ranei ki nga papa wera.
- Do not use accessories not recommended by the manufacturer, as this may cause injuries or damage to the appliance.
2. Hua Neke Atuview
The Heinner Crystal Clear HAF-B2000FB is a versatile hot air fryer designed for healthy cooking with minimal oil. Its transparent viewing window allows you to monitor your food as it cooks.
2.1. Nga Taonga

Whakaahua 2.1: Koki view of the Heinner Crystal Clear HAF-B2000FB Hot Air Fryer, showing the top control panel and the transparent viewing matapihi.

Whakaahua 2.2: Mua view of the hot air fryer, highlighting the transparent cooking chamber and the handle.
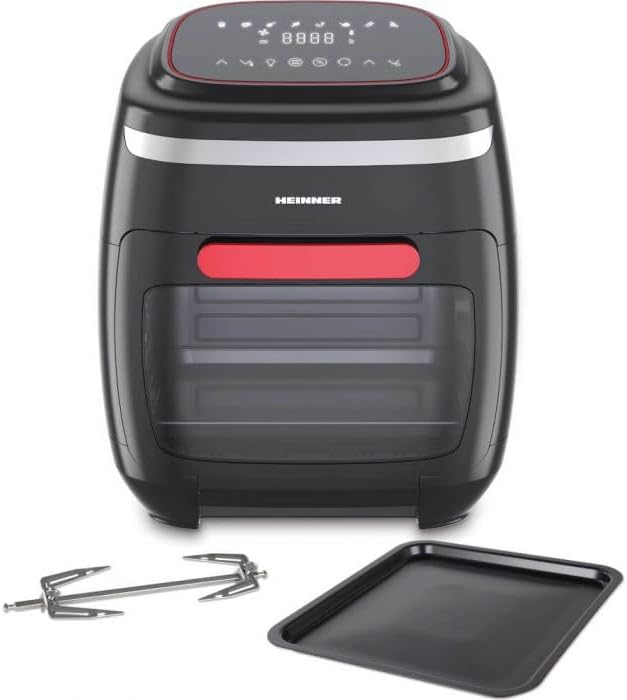
Figure 2.3: The hot air fryer shown with the rotisserie spit and a drip tray, demonstrating some of the included accessories.

Figure 2.4: A collection of accessories including a frying basket, mesh racks, rotisserie spit, and a handle for accessory removal.
- Wāhanga Matua me te Paewhiri Mana Pā Mamati
- Puataata Viewing Matapihi
- Kete Parai Tango
- Mesh Racks (multiple for multi-level cooking)
- Rotisserie Spit me Forks
- Paepae Whakataka
- Accessory Removal Tool
2.2. Nga Mahi Paewhiri Mana
The intuitive touch control panel allows for easy selection of cooking programs, temperature, and time settings.
- Pātene Hiko: Ka whakakā/whakaweto i te taputapu.
- Te Whakarerekenga Pawera: Increases or decreases cooking temperature.
- Tautuhinga Matama: Whakaritea te wa tunu kai.
- Kōwhiringa Papatono: Ka huri i roto i nga kaupapa tunu kai e 8.
- Pātene Māmā: Illuminates the interior of the cooking chamber.
- Pātene Rotisserie: Activates or deactivates the rotisserie rotation function.
- Pātene Tīmata/Tatari: Ka timata, ka whakataa ranei te huringa tunu kai.
3. Tatūnga me te Whakamahi Tuatahi
3.1. Te wetewete
- Me ata tango i nga taonga kapi katoa, tae atu ki nga kiriata whakamarumaru, whakapiripiri ranei.
- Inspect the appliance and all accessories for any signs of damage. Do not use if damaged.
- Puritia te takai mō te penapena, mō te whakakorenga rānei a muri ake nei.
3.2. Cleaning Before First Use
- Horoia te waho o te waahanga matua ki te ma, damp kakahu.
- Wash all removable accessories (frying basket, mesh racks, drip tray, rotisserie spit, etc.) with warm soapy water.
- Horoia rawatia ka whakamaroke katoa i nga waahanga i mua i te whakahiato.
3.3. Whakanoho
Place the hot air fryer on a stable, level, and heat-resistant surface. Ensure there is at least 10-15 cm (4-6 inches) of clear space around the back and sides of the appliance for proper ventilation. Do not place it directly against a wall or under cabinets.
4. Nga Tohutohu Whakahaere
4.1. Mahi Taketake
- Monohia te taura hiko ki tētahi putanga hiko kua honoa ki te whenua. Ka tiaho te mata mō te wā poto.
- Press the Power button to turn on the digital display.
- Prepare your food and place it inside the frying basket or on the appropriate rack/rotisserie spit.
- Carefully insert the basket/rack/spit into the appliance, ensuring it is securely in place.
- Select a preset program by pressing the program icon, or manually set the desired temperature and time using the adjustment buttons.
- Pēhia te pātene Tīmata/Tatari hei tīmata i te huringa tunu kai.
4.2. Te Whakamahi i ngā Papatono Kua Tautuhi Anō
The fryer comes with 8 convenient preset programs for common dishes such as fries, chicken, fish, and more. Simply press the corresponding program icon on the control panel. The appliance will automatically set the optimal temperature and time for that program. You can adjust these settings manually if needed after selecting a preset.
4.3. Manual Temperature and Time Setting
To set temperature and time manually, press the temperature or time adjustment buttons. Use the '+' and '-' icons to increase or decrease the values. The temperature range is typically from 80°C to 200°C (175°F to 400°F) and the timer can be set up to 60 minutes.
4.4. Mahi Rotisserie
For rotisserie cooking (e.g., whole chicken, roasts), secure the food onto the rotisserie spit using the forks. Insert the assembled spit into the designated slots inside the appliance. After setting the cooking time and temperature, press the rotisserie button on the control panel to activate the rotation. This ensures even cooking and browning.
4.5. Viewing Window and Light
Ko te maramara viewing window allows you to monitor cooking progress without opening the door, which helps maintain consistent cooking temperature. Press the light button on the control panel to illuminate the interior of the cooking chamber for better visibility.
5. Tiaki me te Whakapai
Mā te horoi i ia wā ka tino pai te mahi, ā, ka roa ake te ora o tō parai hau wera.
5.1. Whakapai Whanui
- Wewetehia te taputapu i nga wa katoa ka tuku kia whakamatao i mua i te horoi.
- Horoia te taha o waho o te waahanga matua ki te ngohengohe, damp kakahu. Kaua e whakamahi i nga taputapu horoi, i nga papa horoi ranei.
- Clean the interior of the cooking chamber with a soft, damp cloth and a mild detergent. For stubborn residue, a non-abrasive sponge can be used.
5.2. Whakapai Taonga
All removable accessories, including the frying basket, mesh racks, drip tray, and rotisserie spit, are dishwasher safe. Alternatively, they can be washed by hand with warm soapy water and a non-abrasive sponge. Ensure all parts are thoroughly dried before reassembly or storage.
5.3. Rokiroki
When not in use, store the appliance in a cool, dry place. Ensure the power cord is neatly wrapped and secured to prevent damage.
6. Te Raru
If you encounter any issues with your hot air fryer, please refer to the following table for common problems and solutions.
| Raruraru | Take pea | Rongoā |
|---|---|---|
| Kaore e huri te taputapu. | Not plugged in; Power outlet not working; Appliance not properly assembled. | Ensure plug is securely inserted into a working outlet; Check circuit breaker; Ensure frying basket/door is fully closed. |
| Ko nga kai kaore i rite te maoa. | Overloaded basket; Insufficient cooking time/temperature; Food not shaken/turned. | Do not overload the basket; Increase cooking time or temperature; Shake or turn food halfway through cooking. |
| He paowa ma e puta mai ana i te taputapu. | Grease residue from previous use; Fatty ingredients; Excess oil. | Clean the appliance thoroughly, especially the heating element; Drain excess fat from food before cooking; Use less oil. |
| Ko te kai kaore i te kirikiri. | Too much moisture in food; Not enough oil; Overcrowding. | Pat food dry before cooking; Lightly coat with oil; Cook in smaller batches. |
7. Whakatakotoranga
- Tauira: HAF-B2000FB
- Waitohu: HEINIRA
- Mana: 2000 W
- Raukaha: 4.5 rita
- Ahu (L x W x H): 33.9 x 37.7 x 32.4 cm
- Tikanga Mana: Paa
- Papatono: 8 Tautuhi Papatono
- ASIN: B0CT8ZDX1B
8. Pūtāhui me te Tautoko
For detailed warranty information, terms, and conditions, please refer to the warranty card or documentation included with your purchase. In case of technical issues, questions, or to request service, please contact HEINNER customer support through the contact details provided in your product packaging or on the official HEINNER webpae.
Please retain your proof of purchase (receipt or invoice) as it will be required for any warranty claims.


