1. Kupu Whakataki
The Pronomic DX-50 USB MKII is a professional 4-channel DJ mixer designed for a wide range of applications, including discos, parties, restaurants, and presentations. Its user-friendly design ensures that both experienced and less experienced users can fully utilize its features. This manual provides detailed instructions for setting up, operating, and maintaining your mixer.
Key features include a recording function, integrated Bluetooth interface, USB player with transport controls, and multiple input channels.
2. Nga Tohutohu Haumaru Nui
- Pānui Tohutohu: Pānuihia ngā tohutohu haumaru me ngā tohutohu whakahaere katoa i mua i te whakamahinga o te hua.
- Pupuri Tohutohu: Kia mau ki nga tohutohu haumaru me te whakahaere mo nga korero a meake nei.
- Whakarongo Whakatupato: Kia mau ki nga whakatupato katoa mo te hua me nga tohutohu whakahaere.
- Whai Tohutohu: Whaia nga tohutohu whakahaere me te whakamahinga katoa.
- Te wai me te makuku: Do not use this apparatus near water (e.g., bathtub, washbowl, kitchen sink, laundry tub, wet basement, or swimming pool).
- Whakahau: Kaua e araia nga whakatuwheratanga hau. Tāutahia kia rite ki nga tohutohu a te kaihanga.
- wera: Kaua e whakauruhia ki te taha o nga puna wera penei i nga radiators, nga rehita wera, nga umu, me etahi atu taputapu (tae atu ki ampkaiwhakaora) e whakaputa ana i te wera.
- Nga Puna Hiko: Use only power sources specified by the manufacturer.
- Tiaki Mana-Taura: Tiakihia te taura hiko kia kaua e hikoi, ka kowhakina mai ranei, ina koa ki nga moko, nga waahi waatea, me te waahi ka puta mai i te taputapu.
- Te horoi: Horoia ki te kakahu maroke anake.
- Ratonga: Kaua e ngana ki te mahi i tenei hua i a koe ake na te mea ko te whakatuwhera me te tango i nga uhi ka pa ki a koe ki te voli kinotage, etahi atu morearea ranei. Tukuna nga ratonga katoa ki nga kaimahi ratonga whai tohu.
3. Ihirangi mokete
Please check that all items listed below are included in your package. If any items are missing or damaged, contact your dealer immediately.
- Pronomic DX-50 USB MKII DJ Mixer
- Power Adapter (AC 12V)
- USB Stick (32 GB, if included in your specific bundle)
- Pukapuka Kaiwhakamahi (tenei tuhinga)
4. Hua Neke Atuview
Familiarize yourself with the various controls and connections on your DX-50 USB MKII mixer.
4.1 Mana Paewhiri Mua
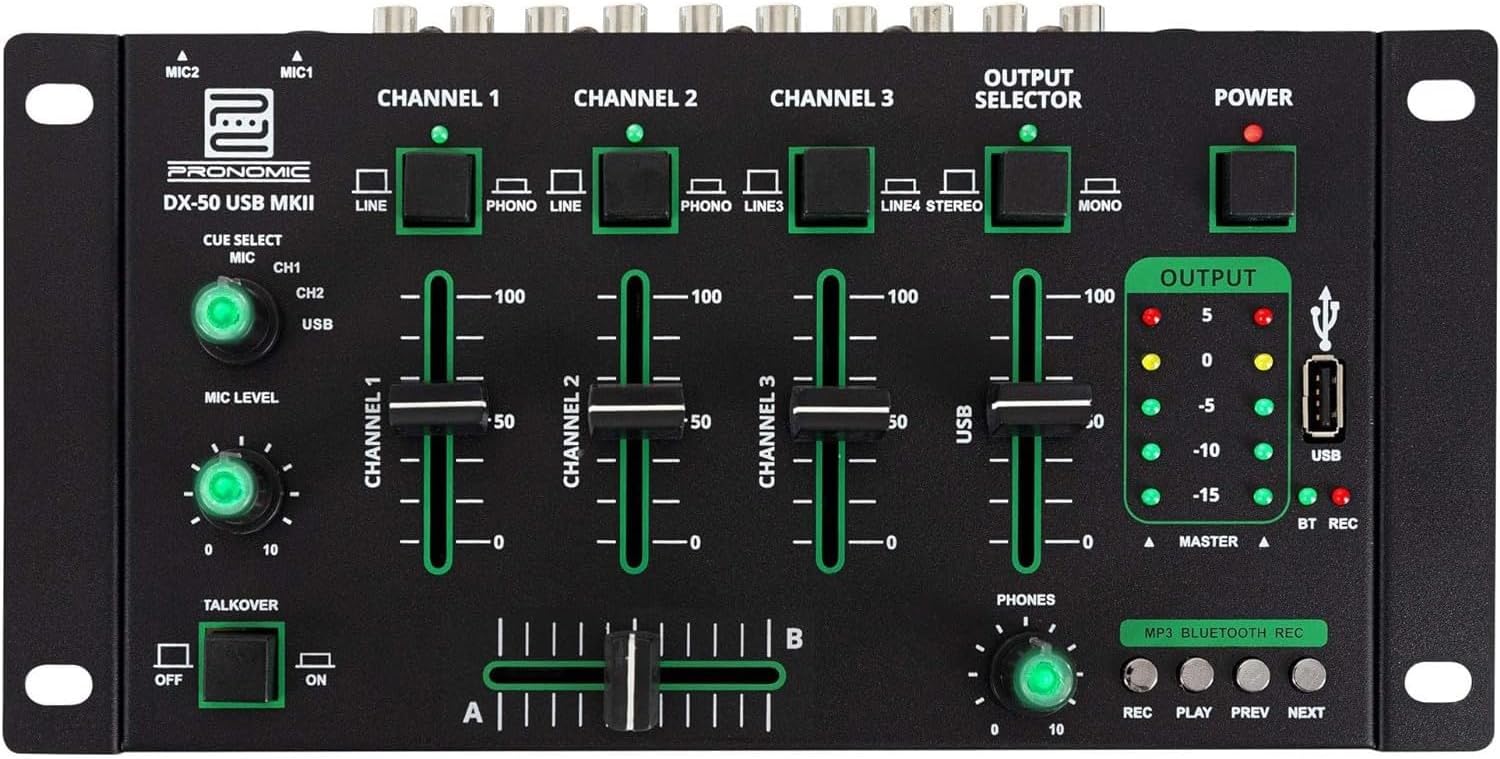
- MIC 1/2 Inputs: Connect microphones.
- Channel 1-4 Input Selectors: Switch between LINE, PHONO, or USB/Bluetooth inputs for each channel.
- Nga Maama Channel: Adjust the volume level for each channel.
- CUE Select Buttons: Route specific channels to the headphone output for monitoring.
- MIC Level Knob: Adjust the volume of the microphone inputs.
- Whakawhiti Kōrero: Activates the talkover function, which automatically lowers music volume when speaking into the microphone.
- Kōwhiringa Putanga: Choose between Stereo or Mono master output.
- Whakawhiti Kaha: Ka whakakā/whakaweto i te mīhini whakaranu.
- Nga mita Taumata Huaputa: LED indicators showing the master output level.
- Tauranga USB: Connect a USB drive for MP3 playback and recording.
- MP3/Bluetooth/REC Player Controls: Buttons for Play/Pause, Previous, Next, and Record functions for the integrated player.
- Poro Taumata Waea: Whakaritea te rōrahi o te putanga o te taringa.
- Crossfader (A/B): Blends between channels assigned to A and B.
4.2 Hononga Paewhiri Whakamuri

- AC 12V Power Input: Tūhonohia te pūurutau hiko kua whakaratohia ki konei.
- Waea Putanga: 6.3mm jack mo te hono i nga taringa.
- MASTER OUT L/R (RCA): Connect to your main ampkaiwhakaoho, kaikorero hiko ranei.
- Channel 1 & 2 Inputs (RCA Line/Phono): Connect turntables (Phono) or other line-level devices (CD players, media players). Use the front panel selector to switch.
- Channel 3 & 4 Inputs (RCA Line): Connect line-level devices.
- MIC 1 & 2 Inputs (6.3mm Jack): Connect microphones.
5. Tatūnga
Follow these steps to set up your Pronomic DX-50 USB MKII mixer:
- Hononga Hiko: Ensure the mixer's power switch is in the OFF position. Connect the supplied AC 12V power adapter to the "AC 12V" input on the rear panel of the mixer. Plug the adapter into a suitable power outlet.
- Master Output Connection: Connect the "MASTER OUT L/R" RCA outputs on the rear panel to the inputs of your ampkaiwhakaoho, kaikorero hiko ranei.
- Hononga Pūrere Whakauru:
- Ngā tēpu hurihuri: Connect turntables to the "CHANNEL 1" or "CHANNEL 2" RCA inputs. Set the corresponding input selector on the front panel to "PHONO".
- CD Players/Line Devices: Connect CD players, media players, or other line-level devices to "CHANNEL 1", "CHANNEL 2", "CHANNEL 3", or "CHANNEL 4" RCA inputs. Set the corresponding input selector on the front panel to "LINE".
- Pūorooro: Connect microphones to the "MIC 1" or "MIC 2" 6.3mm jack inputs on the rear panel.
- Hononga Puoro: Connect your headphones to the "PHONES" 6.3mm jack on the rear panel.
- USB Drive (Optional): If using a USB drive for playback or recording, insert it into the "USB" port on the front panel.
- Whakahiko: Once all connections are made, switch the mixer's power switch to the ON position. The power indicator LED will illuminate.
6. Nga Tohutohu Whakahaere
6.1 Te Whakaranu Taketake
- Tīpako Tāuru: For each channel, use the input selector switch (LINE/PHONO/USB/BT) to choose the desired audio source.
- Adjust Channel Volume: Use the vertical faders for each channel to adjust its individual volume level.
- Putanga Matua: Monitor the "OUTPUT" LED meters and adjust the master volume knob (if present, otherwise rely on channel faders and amplifier volume) to achieve a suitable overall output level without clipping.
- Whakawhitiwhiti: Use the crossfader to smoothly transition between channels assigned to A and B. Channels 1 and 2 are typically assigned to the crossfader.
6.2 Whakamahinga Waorooro
- Connect your microphone to one of the MIC inputs on the rear panel.
- Adjust the "MIC LEVEL" knob on the front panel to control the microphone's volume.
- Talkover Function: Activate the "TALKOVER" switch to automatically reduce the volume of the music when you speak into the microphone. This is useful for announcements.
6.3 Te Purei me te Hopuoro USB
- Purei Whakahoki USB: Kōkuhu puku USB kei roto MP3 files into the "USB" port. Select "USB" as the input source for the dedicated USB channel. Use the "PLAY/PAUSE", "PREV", and "NEXT" buttons to control playback.
- Hopu USB: Press the "REC" button to start recording the master output to the connected USB drive. Press "REC" again to stop recording. Ensure your USB drive has sufficient free space and is formatted correctly (FAT32 is commonly supported).
6.4 Hononga Nihokikorangi
- Whakahohe Nihokikorangi: Select "BT" as the input source for the dedicated Bluetooth channel. The mixer will enter pairing mode.
- Pūrere Takirua: On your Bluetooth-enabled device (smartphone, tablet, etc.), search for available Bluetooth devices. Select "Pronomic DX-50 USB MKII" (or similar name) from the list to pair.
- Purei Ororongo: Once paired, you can play audio from your device through the mixer. Control playback from your device or using the mixer's transport controls (if supported by your device).
6.5 Te Aroturuki me ngā Paneoro
- Connect headphones to the "PHONES" output.
- Use the "CUE SELECT" buttons to choose which channels you want to monitor in your headphones without affecting the main output.
- Adjust the "PHONES" level knob to set your desired headphone volume.
7. Tiaki
- Te horoi: Disconnect the power before cleaning. Use a soft, dry cloth to wipe the surface of the mixer. Do not use liquid cleaners, aerosols, or solvents.
- Rokiroki: Penapenahia te mīhini whakaranu ki te wāhi hauhautanga, maroke, kia matara atu i te rā tika me ngā pāmahana tino kino.
- Fader and Knob Care: Avoid excessive force when operating faders and knobs. Periodically check for dust or debris accumulation around moving parts.
- Whakaha Uepu: Ensure cables are not kinked or strained, which can lead to damage.
8. Te Raru
| Raruraru | Take pea | Rongoā |
|---|---|---|
| Karekau he kaha | Kāore te urutau hiko i hono; Kua whakaweto te pana hiko; Kua pakaru te putanga hiko. | Check power adapter connection; Ensure power switch is ON; Try a different power outlet. |
| No sound from main output | Master volume too low; Amplifier/speakers off or disconnected; Incorrect input selection; Channel faders down. | Increase master volume; Check amplifier/speaker connections and power; Verify correct input selected for channels; Raise channel faders. |
| Kaore he tangi mai i nga taringa | Headphone volume too low; Headphones not connected; No CUE selected. | Increase PHONES level; Connect headphones properly; Press CUE button for desired channel. |
| Ko te Nihokikorangi kaore i te takirua | Mixer not in pairing mode; Device too far; Interference. | Ensure BT input is selected; Bring device closer; Restart mixer and device. |
| Ko te purei USB kaore e mahi | USB drive not inserted correctly; Incorrect file format; USB drive not formatted correctly. | Re-insert USB drive; Ensure files are MP3; Format USB drive to FAT32. |
9. Whakatakotoranga
| Tauira | Pronomic DX-50 USB MKII |
| Te maha o nga hongere | 4 |
| Hangarau Hononga | Nihokikorangi, USB |
| Whakauru Ororongo | RCA (line/phono), 6.3mm microphone, Bluetooth, USB |
| Momo Tuhono Huaputa | RCA (Master Out), 6.3mm (Phones) |
| Puna Mana | Electric Cable (AC 12V adapter) |
| Dimensions (without corner brackets and controls) | 222 x 129 x 28 mm (Whanui x Hohonu x Teitei) |
| Total Dimensions (with corner brackets and controls) | 267 x 136 x 51 mm (Whanui x Hohonu x Teitei) |
| Taumaha | 790 g |
10. Pūtāhui me te Tautoko
Mō ngā mōhiohio pūtāhui me te tautoko hangarau, tirohia ngā tuhinga i whakaratohia me tō hoko, whakapā atu rānei ki tō kaihokohoko. Puritia tō taunakitanga hoko mō ngā kereme pūtāhui katoa.
For further assistance, you may also visit the official Pronomic webpaetukutuku, whakapā atu ranei ki ta raatau tari ratonga kaihoko.


