1. Kupu Whakataki
Thank you for choosing the SMATRUL Smart Wall Light Switch. This device integrates advanced smart home technology, offering convenient control of your lighting through touch, mobile application, voice commands, and RF433 remote control. It features a modern design with a USB-C port for added utility and requires a neutral wire for installation. Please read this manual carefully before installation and operation to ensure proper use and safety.
This smart switch is designed to enhance your home automation experience, providing reliable performance and compatibility with popular smart home ecosystems.
2. Nga korero haumaru
Nga Whakatupato Haumaru Nui:
- Ko te whakaurunga me mahi e tetahi tohunga hiko, kia rite ranei ki nga tohu hiko o te rohe.
- Me whakaweto te hiko o te kaiwawao ara iahiko i mua i te tāutanga, i te mahi rānei i te pana.
- This device requires a neutral wire for operation. Ensure your electrical box has a neutral wire available.
- Kaua e tāuta me ngā ringa mākū, me te tū rānei i runga i te wai mākū, i te wai rānei.amp mata.
- The switch is designed for indoor use only.
- An isolation board is installed on the panel and circuit board to prevent short circuits and enhance safety. Do not attempt to remove or modify this component.
- Only connect to 2.4 GHz Wi-Fi networks. 5 GHz networks are not supported.
3. Ihirangi mokete
Manatokona kei roto katoa nga mea kei roto i to kete:
- 1 x SMATRUL Smart Touch Switch (6 Gang, White)
- 1 x Aratohu Kaiwhakamahi
4. Whakatakotoranga
| Āhuahira | Whakaahuatanga |
|---|---|
| Tauira | WIFI Switch 6 Gang (with USB C) |
| Whakauru Voltage | AC 110-240V, 50/60Hz |
| Te Mana Whakatau | 500W / Gang |
| Putanga USB-C | DC 5V/1A |
| Auau Ahokore | 2.4GHz Wi-Fi, RF433 |
| Aratau Mahi | ON-OFF |
| Momo Whakaoho | Paa |
| Rauemi Whakapā | V0 Flame Retardant PC+ABS |
| Hunga Hua | 4.72 x 2.83 x 1.51 inihi (12 x 7.2 x 3.8 cm) |
| Tiwhikete | CE, RoHS, FCC |
5. Tāutanga
5.1 Rarangi Arowhai i mua i te whakaurunga
- Confirm your electrical box has a neutral wire. This switch requires a neutral wire.
- Me whakarite kia 2.4 GHz tō whatunga Wi-Fi.
- Turn off power at the circuit breaker before proceeding.
5.2 Wiring Hoahoa
The SMATRUL Smart Wall Light Switch is designed to fit standard US electrical boxes, eliminating the need for additional modifications.

Tohutohu Waea:
- Identify the Live (L), Neutral (N), and Light (L1, L2, L3, L4, L5, L6) wires from your wall box.
- Connect the Live wire to the 'L' terminal on the switch.
- Connect the Neutral wire to the 'N' terminal on the switch.
- Connect the Light wires to the corresponding 'L1' through 'L6' terminals on the switch.
- Secure all wire connections firmly using the screw terminals.
- Carefully push the switch into the wall box and secure it with screws.
- Whakauruhia te maataki kanohi.
- Whakahokia te hiko i te kaaiti iahiko.
5.3 Adding Device to Smart Life App

To connect your smart switch to the Smart Life app:
- Tikiake i te taupānga 'Smart Life' mai i te Toa Taupānga, i te Toa Play rānei o Google.
- Rēhita, takiuru rānei ki tō pūkete Smart Life.
- Me whakarite kei te whakahohea te Wi-Fi me te Nihokikorangi o tō waea.
- In the app, tap the '+' icon in the upper right corner to add a device.
- Long press any button on the smart switch until the indicator lights flash rapidly, indicating pairing mode.
- The app will discover the device. Tap 'Add' to proceed.
- Follow the on-screen prompts to complete the networking process.
6. Mahi
6.1 Basic Touch Control
Each gang on the switch is a touch-sensitive button. Simply tap the desired button to turn the connected light ON or OFF.
6.2 Tūnga Maama Tohu

The indicator light on the switch provides visual feedback:
- Maama Whero: The connected light is ON.
- Blue Light / No Light: The connected light is OFF.
The backlight can be turned off through the Smart Life APP, which is useful for bedrooms or at night.
6.3 APP/Voice Control

Once connected to the Smart Life app, you can control the switch remotely from your smartphone or tablet. Additionally, by linking the Smart Life app to your smart gateway (e.g., Amazon Alexa, Google Home Assistant), you can use voice commands to control your lights.
- Mana Mamao: Turn lights on/off, set schedules, and manage settings from anywhere using the Smart Life app.
- Mana Reo: Integrate with Alexa or Google Home to control lights with simple voice commands (e.g., "Alexa, turn on living room light").
6.4 Multi-Time Settings

The Smart Life app allows you to set various timing functions for your switch:
- Whakawhiwhinga: Whakatakotoria he taima kia mate ai te rama i muri i tētahi wā kua whakaritea.
- Hōtaka: Program specific times for lights to turn on or off daily or on selected days.
- Porowhita: Set lights to cycle on and off at regular intervals.
- Tupurangi: Lights turn on/off randomly within a set period, useful for simulating occupancy.
- Inihi: Set the light to turn on for a brief period and then automatically turn off.
6.5 RF433 Remote Control (Optional)

This smart switch supports RF433 remote control for additional convenience. An RF433 remote control must be purchased separately.
Pairing Signal:
- Click any switch button 5 times rapidly; the indicator lights will flash.
- Within a few seconds, click the desired button on your RF433 remote control 2 times. The switch will confirm pairing.
Clearing Signal:
- Click any switch button 8 times rapidly; the indicator lights will flash.
- Within a few seconds, click the desired button on your RF433 remote control 2 times. The switch will confirm the signal has been cleared.
6.6 2-Way Multi-Control Association
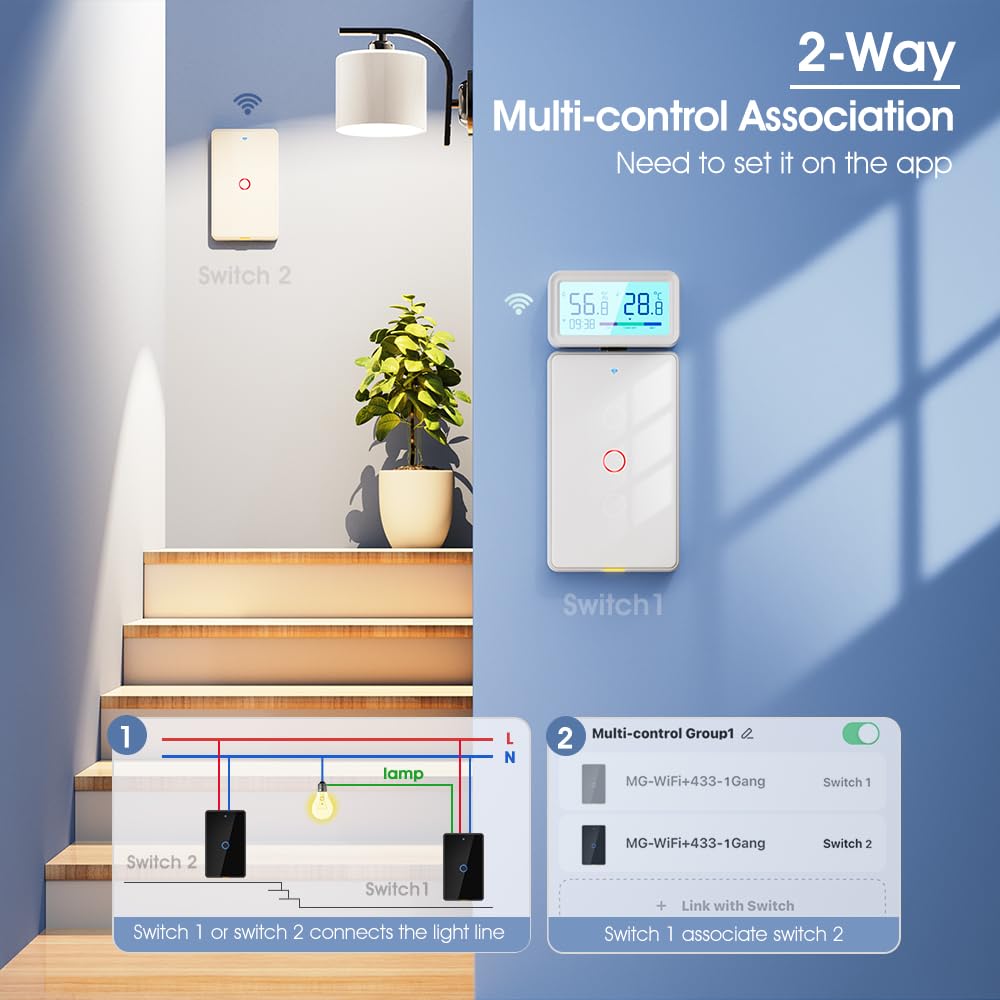
The switch supports 2-way multi-control association, allowing multiple smart switches to control the same light fixture. This feature needs to be set up within the Smart Life app.
Steps for Multi-Control Association:
- Ensure both smart switches are added to your Smart Life app.
- In the app, navigate to the settings of one of the switches.
- Look for an option like 'Multi-control Group' or 'Link with Switch'.
- Select the other smart switch you wish to associate with.
- Confirm the association. Now, either switch can control the designated light.
6.7 Power Off Memory Function
The switch features a power-off memory function. In the event of a power outage, the switch will return to its last known state (ON or OFF) once power is restored.
6.8 Tauranga USB-C
The integrated USB-C port provides a convenient 5V/1A output, compatible with various devices that use a Type-C port for charging or power, such as smartphones or small electronic accessories.
7. Tiaki
To ensure the longevity and proper functioning of your SMATRUL Smart Wall Light Switch:
- Clean the switch surface regularly with a soft, dry cloth. Do not use abrasive cleaners or solvents.
- Avoid exposing the switch to excessive moisture or extreme temperatures.
- Do not attempt to disassemble or repair the switch yourself. This will void the warranty and may pose safety risks.
- Ensure the electrical connections remain secure. If you notice any loose wiring, turn off power at the breaker and consult a qualified electrician.
8. Te Raru
Mena ka pāngia koe e ngā raruraru me tō pana atamai, tirohia ngā raruraru me ngā otinga e whai ake nei:
| Raruraru | Take pea | Rongoā |
|---|---|---|
| Kāore te pana e aro atu ki te pā. | No power; Incorrect wiring; Faulty switch. | Check circuit breaker. Verify wiring according to diagram. Contact support if issue persists. |
| Kaore e taea te hono ki Wi-Fi. | Incorrect Wi-Fi band (5GHz); Weak signal; Incorrect password; Switch not in pairing mode. | Ensure 2.4GHz Wi-Fi. Move router closer. Re-enter password. Long press switch to enter pairing mode. |
| Ko te whakahaere reo kaore e mahi. | Not linked to Alexa/Google Home; Device offline in app; Incorrect voice command. | Verify Smart Life app is linked to voice assistant. Check switch status in app. Use correct commands. |
| Ka kemo ngā rama, kāore rānei e tineia katoatia. | No neutral wire connected; Incompatible bulb type (e.g., some LEDs without neutral). | Ensure neutral wire is correctly connected. Try a different type of LED bulb or a traditional incandescent bulb to test. |
| RF433 remote not pairing. | Incorrect pairing sequence; Remote battery low; Out of range. | Follow pairing steps precisely. Replace remote battery. Ensure remote is within 100m range. |
If the problem persists after trying these solutions, please contact SMATRUL customer support for assistance.
9. Pūtāhui me te Tautoko
The SMATRUL Smart Wall Light Switch has passed CE, RoHS, and FCC certifications, ensuring its quality and safety. For warranty information and technical support, please refer to the documentation included with your purchase or visit the official SMATRUL website. You can also contact SMATRUL customer service directly for assistance with product inquiries, troubleshooting, or warranty claims.
Mōhiohio Whakapā: Please refer to the contact details provided on the product packaging or the official SMATRUL brand store on Amazon (SMATRUL Store).


