1. Kupu Whakataki
This manual provides detailed instructions for the installation, operation, and maintenance of your Stinger Audio MT-1000.1M 1-Channel Monoblock Marine Audio Subwoofer Amplifier. Please read this manual thoroughly before attempting installation or operation to ensure proper use and to prevent damage to the unit or your audio system. Keep this manual for future reference.
2. Hua Neke Atuview
The Stinger Audio MT-1000.1M is a high-efficiency Class-D monoblock amplifier designed for marine environments. It delivers 1000 Watts RMS of power, optimized for subwoofer applications. Its robust, water-resistant design ensures reliable performance in challenging conditions.
Āhuatanga matua:
- Digital Class-D Monoblock AmpKaiwhakaora: High efficiency and compact form factor.
- Hoahoa Kiato me te Pumau: Built for lasting reliability.
- Robust Unregulated Power Supplies: Designed for superior performance and efficiency.
- Advanced HEXFET Power MOSFET: Features reduced on-resistance, faster switching speeds, and enhanced reliability.
- Direct Insert Power and Speaker Terminals: Decreased resistance for higher power transfer and efficiency.
- Hoahoa Atete Wai: Ka tiaki i te amplifier against weather elements for uninterrupted performance.
- Bass Boost Q: Adjustable bass boost from 0dB to 12dB at a selected frequency.
- Remote Bass Knob Included: Flush-mount design for effortless bass level adjustment.

3. Nga korero haumaru
Kia mau tonu nga whakaritenga haumaru e whai ake nei:
- Disconnect the vehicle's negative battery terminal before any installation.
- Me whakarite kia tika te hononga whenua ki te anga o te waka.
- Whakamahia ngā waea ine tika mō ngā hononga hiko, whenua, me te kaikorero.
- Tāutahia te amplifier in a well-ventilated area, away from direct heat sources.
- A ape i te whakapuru i te amplifier in locations where it may be submerged in water, despite its water-resistant rating.
- Me toro atu ki tetahi kaitautauta ngaio mena kaore koe i te tino mohio mo tetahi waahanga o te tukanga whakauru.
4. He aha kei roto i te Pouaka
Manatokohia kei te noho nga mea katoa i mua i te tiimata o te whakaurunga:
- 1000 Watt Monoblock Amplifier (MT-1000.1M)
- Remote Level Control (Bass Knob)
- Whakaekea taputapu
- Pukapuka Tohutohu
5. Te Tautuhi Wae
Kia mohio koe ki te amplifier's controls and connections.

5.1 Control Panel (Input Side)

- POWER/PRT/CLIP Indicators: LEDs indicating power status, protection mode, and signal clipping.
- REMOTE Port: RJ11 connection for the included remote bass level control.
- KOREUTU (RCA): Audio input from your head unit or source.
- BRIDGE IN/OUT (RCA): For linking multiple ampkaikawe
- Mana GAIN: Adjusts the input sensitivity to match the output of your source unit.
- LPF (Low-Pass Filter) Control: Adjusts the upper frequency limit for the subwoofer. Range: 40Hz - 180Hz.
- SUBSONIC Filter: Removes ultra-low frequencies below the audible range to protect the subwoofer. Range: OFF - 50Hz.
- FREQ (Bass Boost Frequency) Control: Selects the center frequency for the bass boost. Range: 30Hz - 80Hz.
- BOOST (Bass Boost Level) Control: Adjusts the level of bass boost. Range: 0dB - 12dB.
5.2 Terminal Panel (Output Side)

- GND (Ground) Terminal: E hono ana ki te whenua o te anga o te waka.
- REM (Remote) Terminal: Connects to the remote turn-on lead from your source unit.
- +12V (Power) Terminal: Connects to the positive terminal of the vehicle's battery via an inline fuse.
- MONO OUTPUT (Speaker Terminals): Connects to your subwoofer(s). Minimum impedance 1 Ohm.
6. Tāutanga
Proper installation is crucial for optimal performance and safety. Ensure all connections are secure and correctly polarized.
6.1 Te Tauwhi Maunga
Choose a mounting location that is secure, provides adequate ventilation, and is protected from excessive moisture. While the amplifier is water-resistant, direct exposure to heavy water spray or submersion should be avoided.

6.2 Hononga Waea
- Hiko (B+): Connect a 4-gauge power cable from the +12V terminal of the amplifier directly to the positive terminal of the vehicle's battery. Install an appropriate inline fuse (100A recommended) within 18 inches of the battery.
- Papa (GND): Connect a 4-gauge ground cable from the GND terminal of the amplifier to a clean, bare metal point on the vehicle's chassis. Ensure a solid, low-resistance connection.
- Mamao (REM): Connect a 18-gauge remote turn-on wire from the REM terminal of the amplifier to the remote output of your head unit.
- RCA Tāuru: Connect RCA cables from the subwoofer output of your head unit to the INPUT RCA jacks on the ampkaikawe
- Putanga Kaikōrero: Connect your subwoofer(s) to the MONO OUTPUT terminals. Ensure the total impedance is not below 1 Ohm. Observe correct polarity (+ to + and - to -).
- Puta Pango Mamao: Connect the remote bass knob to the REMOTE port on the amplifier using the provided cable.
7. Mahi
After installation, follow these steps to configure and operate your ampkaikawe
7.1 Initial Setup and Gain Adjustment
- Turn the GAIN control on the amplifier to its minimum (counter-clockwise) position.
- Whakatakotoria te oro o tō pane oro ki te 75% o tōna taumata mōrahi.
- Play a dynamic piece of music with strong bass content.
- Slowly increase the GAIN control on the amplifier until you hear distortion, then back it off slightly until the sound is clear. The CLIP indicator should not illuminate continuously.
7.2 Crossover and Filter Settings
- LPF (Tatari-Pasiti): Adjust the LPF control to set the upper frequency limit for your subwoofer. A common starting point is 80Hz-100Hz, but this may vary depending on your subwoofer and other speakers in your system.
- SUBSONIC Filter: Set the SUBSONIC filter to protect your subwoofer from playing frequencies below its resonant frequency. A common setting is 25Hz-30Hz, or slightly below your subwoofer's tuning frequency if it's in a ported enclosure. If you have a sealed enclosure, you may set it to OFF or a very low frequency.
7.3 Whakanui Bass
- FREQ (Bass Boost Frequency): Select the frequency at which you want the bass boost to be centered. This is typically between 30Hz and 80Hz, depending on the desired effect.
- BOOST (Bass Boost Level): Adjust the level of boost from 0dB to 12dB. Use this sparingly to avoid distortion and potential damage to your subwoofer.
7.4 Poro Pāoro Mamao
The remote bass knob allows for convenient adjustment of the subwoofer output level from your listening position. It acts as a master volume for the subwoofer channel, allowing you to increase or decrease the bass intensity without affecting other ampnga tautuhinga riipene.
8. Tiaki
Ko te tiaki i nga wa katoa ka awhina i te roa me te mahi o to mahi ampkaikawe
- Te horoi: Ia wā horoia te amphe kakahu ngohengohe, maroke te taha o waho. A ape i te whakamahi i nga matū kino, i nga horoi horoi ranei.
- Taki Hononga: Annually inspect all power, ground, remote, and speaker connections for corrosion or looseness. Tighten as necessary.
- Whakahau: Me whakarite ko te ampKo nga tara whakamatao o lifier he kore e aukati kia pai ai te tohanga wera.
9. Te Raru
Mena ka pa ki a koe nga raru o to amphei āwhina i a koe, tirohia ngā raruraru me ngā otinga e whai ake nei.
| Raruraru | Take pea | Rongoā |
|---|---|---|
| Karekau he hiko / hiko kua Weto | Pupuhi te fiusi, korekore te waea hiko/whenua/mamao, kāore he tohu mamao. | Check inline fuse, verify all power connections, ensure head unit remote output is active. |
| Te rama tiaki e kā ana | Speaker short circuit, impedance too low, overheating, DC offset. | Check speaker wiring for shorts, verify speaker impedance, ensure adequate ventilation, disconnect speakers and test. |
| Kore Putanga Ororongo | Karekau he tohu whakauru, he he te whakatakotoranga whiwhinga, ka momotuhia nga waea korero. | Check RCA connections, adjust gain, verify speaker connections. |
| Oro Kopikopiko | Gain set too high, improper crossover settings, poor ground connection. | Reduce gain, adjust LPF/Subsonic filters, check ground wire for secure connection. |
10. Whakatakotoranga
Detailed technical specifications for the Stinger Audio MT-1000.1M ampkaikawe
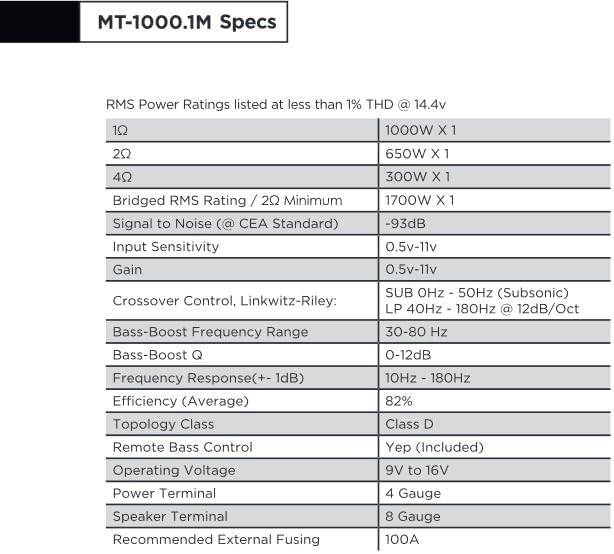
| Āhuahira | Whakatakotoranga |
|---|---|
| Mana RMS (1Ω) | 1000W x 1 |
| Mana RMS (2Ω) | 650W x 1 |
| Mana RMS (4Ω) | 300W x 1 |
| Bridged RMS Rating (2Ω Minimum) | 1700W x 1 |
| Signal to Noise (CEA Standard) | -93dB |
| Tairongo Whakauru | 0.5V - 11V |
| Whiwhi | 0.5V - 11V |
| Crossover Control (Linkwitz-Riley) | SUB 0Hz - 50Hz (Subsonic), LP 40Hz - 180Hz @ 12dB/Oct |
| Awhe Auautanga Bass-Boost | 30Hz - 80Hz |
| Pano-Whakanui Q | 0 - 12dB |
| Auautanga Whakautu (+/- 1dB) | 10Hz - 180Hz |
| Te kaha (Wawaenga) | 82% |
| Topology Class | Te akomanga D |
| Mana Paoro Mamao | Ae (Kei roto) |
| Mahinga Mahi Voltage | 9V ki te 16V |
| Te Whakamutunga Mana | 4 Maaka |
| Kauhau Tukuoro | 8 Maaka |
| Ko te Whakakotahitanga o waho e manakohia ana | 100A |
| Taumaha Tūemi | 6.14 pauna |
| Ahu mōkihi | 14.5 x 7.8 x 3.2 inihi |
| Te Ra Tuatahi Wātea | Maehe 13, 2024 |
| Kaihanga | Tuhinga o mua |
11. Pūtāhui me te Tautoko
11.1 Nga Korero Whakaputanga
The Stinger Audio MT-1000.1M ampka tae mai te riipene me te 1 Tau Rarangi from the date of purchase. Please retain your proof of purchase for warranty claims. The warranty covers manufacturing defects and workmanship under normal use. It does not cover damage caused by improper installation, accident, misuse, abuse, neglect, or unauthorized modification.
11.2 Tautoko Kiritaki
For technical assistance, troubleshooting, or warranty inquiries, please contact Stinger Audio customer support. You can find more information and contact details by visiting the official STINGER brand store:


