1. Kupu Whakataki
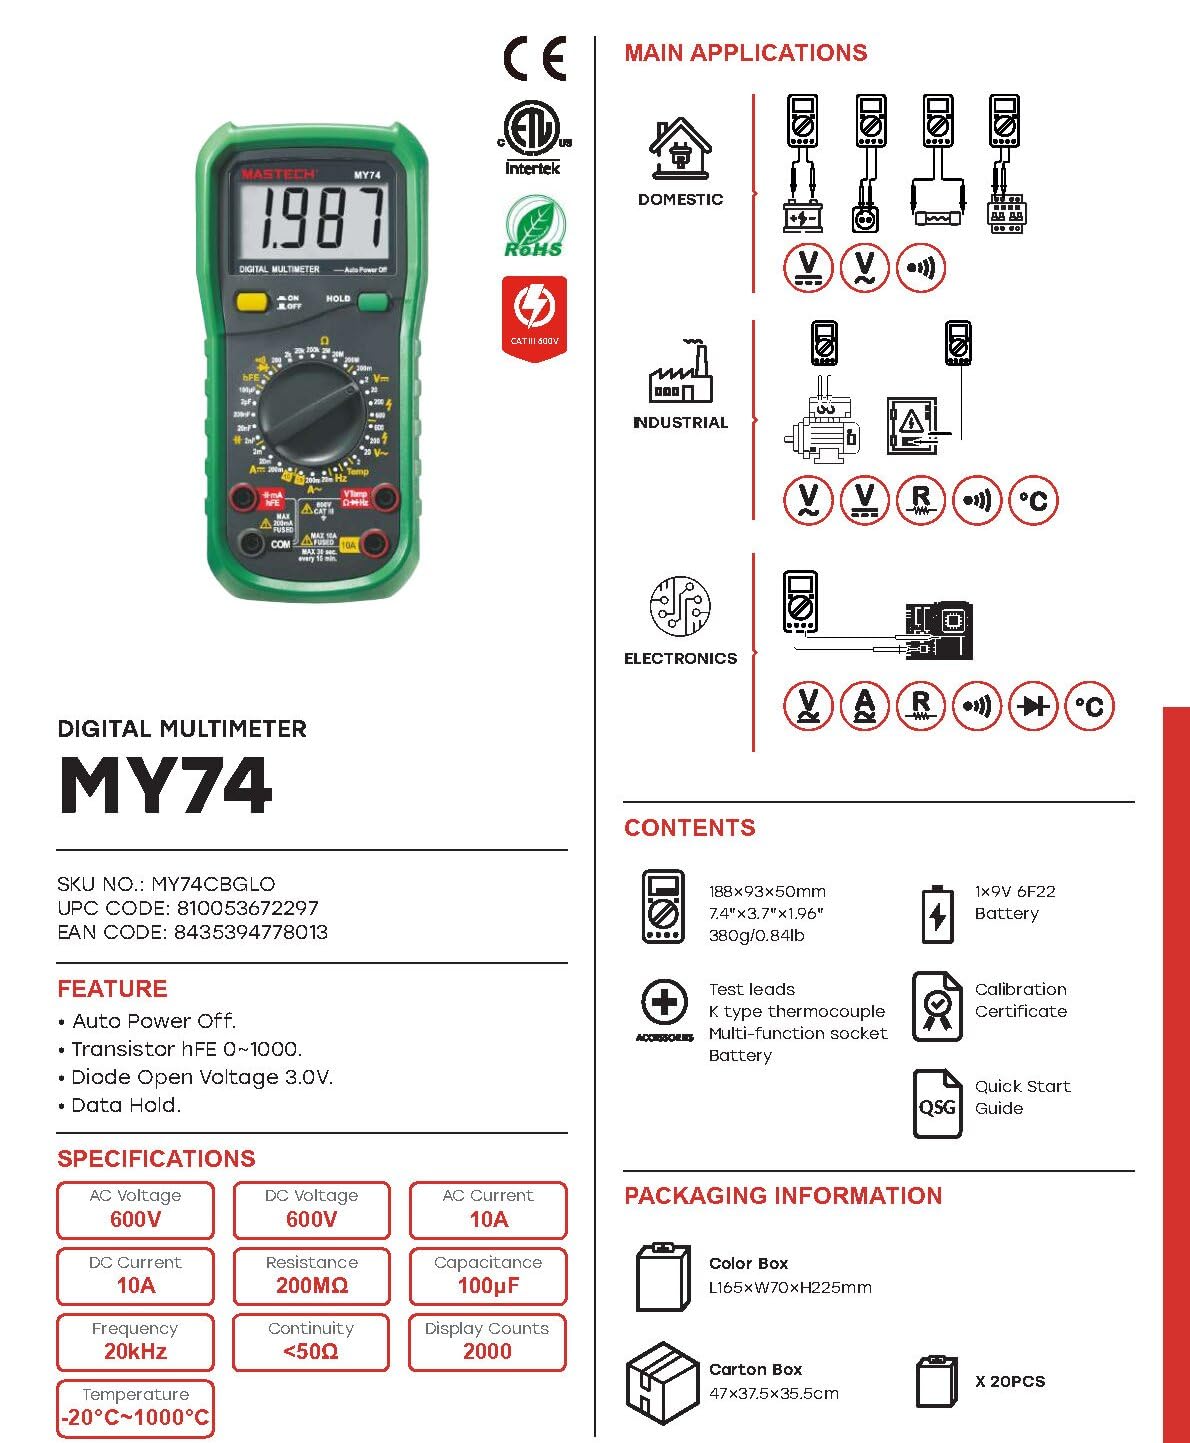
This manual provides detailed instructions for the safe and effective operation of your MASTECH MY74 Digital Multimeter. Please read this manual thoroughly before using the device and retain it for future reference. The MY74 is a compact, handheld digital multimeter designed for measuring AC/DC voltage, AC/DC current, resistance, capacitance, frequency, temperature, diode, continuity, and transistor hFE.
2. Nga korero haumaru
WHAKATŪPATO: Hei karo i te ru hiko, i te whara rānei, pānuihia, kia mārama hoki ki ngā mōhiohio haumaru katoa i mua i te whakamahi i tēnei mita maha.
- Always ensure the multimeter is in good working condition and free from damage.
- Kaua e tono nui ake i te reiti voltage, kua tohuhia ki te mita, i waenga i nga pito, i waenga ranei i tetahi tauranga me te whenua whenua.
- Kia tupato ki te mahi tahi me te voltagkei runga ake i te 30V AC RMS, te tihi 42V, te 60V DC ranei. Ko enei voltaghe morearea ohorere.
- Momotuhia nga arataki whakamatautau mai i te ara iahiko i mua i te huri i nga mahi.
- Do not use the meter if the battery cover is not properly closed.
- Whakakapia te pākahiko ina puta te tohu pākahiko iti.
- Adhere to the measurement category (CAT III 600V) for safe operation.
3. Hua Neke Atuview
The MASTECH MY74 Digital Multimeter features a clear display, a rotary function switch, and input jacks for test leads. Familiarize yourself with the components shown below.

Ko nga waahanga matua ko:
- Whakaaturanga LCD: E whakaatu ana i ngā pānui ine, ngā waeine, me ngā tohu mahi.
- Pātene Mahi Hurihuri: Tīpakohia te mahi ine e hiahiatia ana.
- Pātene ON/OFF: Ka whakakaha, ka weto ranei te taputapu.
- Pātene HOLD: Whakatio i te panui whakaatu onāianei.
- Ngā Jack Tāuru:
- COM: tauranga noa mo nga inenga katoa.
- VΩHz: Whakauru mo te voltage, te parenga, te auau, te kaha, te diode, me te inenga tonu.
- mAµA: Tāuru mō te miriampere me te moroitiampinenga o naianei.
- 10A: Tāuru mō te 10 Ampinenga o naianei.
4. Nga ahuatanga
The MASTECH MY74 Digital Multimeter offers the following key features:
- Whakaatu: 2000 tatau
- Mahi Whakaweto Aunoa
- Transistor hFE measurement (0~1000)
- Diode Tuwhera Voltage: 3.0v
- Continuity Buzzer: Activates below 50Ω
- Mahi Raraunga Pupuri
- Tohu Whakaaturanga Pūhiko Iti
5. Tatūnga
5.1 Tāuta Pūhiko
The MASTECH MY74 requires 2 LR44 batteries (included). To install or replace batteries:
- Me mohio kua whakawetohia te mita maha ka momotuhia nga arataki whakamatautau katoa.
- Rapua te wahanga pākahiko kei muri o te mita.
- Wewetehia te uhi o te wahanga pākahiko.
- Insert the batteries, observing correct polarity (+ and -).
- Whakakapia te uhi o te wahanga pākahiko ka mau ki te huri.
5.2 Te hono i nga kaiarahi Whakamātautau
Always connect the black test lead to the COM jack. Connect the red test lead to the appropriate input jack based on the measurement function:
- VΩHz: Mo te voltage, resistance, frequency, capacitance, diode, and continuity.
- mAµA: For current measurements up to 200mA.
- 10A: Mō ngā inenga o te iahiko tae atu ki te 10A.
6. Nga Tohutohu Whakahaere
Before taking any measurement, ensure the test leads are correctly connected and the rotary switch is set to the desired function.
6.1 DC Voltage Ine (V–)
- Connect the red test lead to the VΩHz jack and the black test lead to the COM jack.
- Whakatakotoria te pana hurihuri ki te DC Voltage e hiahiatia anatage awhe (hei tauira, 200mV, 2V, 20V, 200V, 600V).
- Honoa ngā taura whakamātautau kia whakarara ki te ara iahiko, ki te wāhanga rānei e whakamatautauria ana.
- Pānuihia te voltage uara kei runga i te whakaaturanga.
6.2 AC Voltage Ine (V∼)
- Connect the red test lead to the VΩHz jack and the black test lead to the COM jack.
- Tautuhia te huri hurihuri ki te Vol AC e hiahiatia anatage awhe (hei tauira, 2V, 20V, 200V, 750V).
- Connect the test leads in parallel to the AC circuit or component.
- Pānuihia te voltage uara kei runga i te whakaaturanga.
6.3 DC Current Measurement (A–)
CAUTION: Never connect the multimeter in parallel to a voltagpūtake i te wā e ine ana i te iahiko. Ka taea e tēnei te pupuhi i te fuse, te kino rānei i te mita.
- Honoa te mata whakamatautau pango ki te COM jack.
- For currents up to 200mA, connect the red test lead to the mAµA jack. For currents up to 10A, connect the red test lead to the 10A jack.
- Set the rotary switch to the appropriate DC Current range (e.g., 2mA, 20mA, 200mA, 10A).
- Whakatuwheratia te ara iahiko ka honoa te mita maha-maha ki te kawenga mā te raupapa.
- Pānuihia te uara o nāianei i te whakaaturanga.
6.4 AC Current Measurement (A∼)
CAUTION: Never connect the multimeter in parallel to a voltagpūtake i te wā e ine ana i te iahiko. Ka taea e tēnei te pupuhi i te fuse, te kino rānei i te mita.
- Honoa te mata whakamatautau pango ki te COM jack.
- For currents up to 200mA, connect the red test lead to the mAµA jack. For currents up to 10A, connect the red test lead to the 10A jack.
- Set the rotary switch to the appropriate AC Current range (e.g., 2mA, 20mA, 200mA, 10A).
- Whakatuwheratia te ara iahiko ka honoa te mita maha-maha ki te kawenga mā te raupapa.
- Pānuihia te uara o nāianei i te whakaaturanga.
6.5 Te Ine Ātete (Ω)
CAUTION: Ensure the circuit is de-energized and all capacitors are discharged before measuring resistance.
- Connect the red test lead to the VΩHz jack and the black test lead to the COM jack.
- Set the rotary switch to the desired Resistance range (e.g., 200Ω, 2kΩ, 20kΩ, 200kΩ, 2MΩ, 200MΩ).
- Honoa nga arataki whakamatautau puta noa i te waahanga hei ine.
- Panuihia te uara aukati kei runga i te whakaaturanga.
6.6 Whakamātautau Diode (→|–)
- Connect the red test lead to the VΩHz jack and the black test lead to the COM jack.
- Tautuhia te pana hurihuri ki te tūranga Whakamātautau Diode.
- Honoa te taura whakamātautau whero ki te anode me te taura whakamātautau pango ki te cathode o te diode.
- Ka whakaatuhia te rōrahi whakamua e te whakaaturangatage drop. Reverse the leads; the display should show "OL" (Open Loop) for a good diode.
6.7 Whakamātautau Tonu (♫)
- Connect the red test lead to the VΩHz jack and the black test lead to the COM jack.
- Set the rotary switch to the Continuity Test position.
- Honoa nga arataki whakamatautau puta noa i te ara iahiko, i te waahanga ranei.
- Mēnā he iti ake te ātete ki te 50Ω, ka tangi te oho, e tohu ana i te haere tonutanga.
6.8 Whakamātautau hFE Transistor
- Tautuhia te huri hurihuri ki te tuunga hFE.
- Insert the transistor's Emitter, Base, and Collector leads into the corresponding holes in the multi-function socket (NPN or PNP).
- Pānuihia te uara hFE i runga i te whakaaturanga.
6.9 Te Ine Unga (F)
CAUTION: Ensure the capacitor is fully discharged before measuring capacitance to avoid damage to the meter.
- Connect the red test lead to the VΩHz jack and the black test lead to the COM jack.
- Set the rotary switch to the Capacitance range (e.g., 2nF, 20nF, 200nF, 2µF, 20µF, 100µF).
- Honoa ngā taura whakamātautau puta noa i te pūnga.
- Panuihia te uara capacitance kei runga i te whakaaturanga.
6.10 Te Ine i te Auautanga (Hz)
- Connect the red test lead to the VΩHz jack and the black test lead to the COM jack.
- Set the rotary switch to the Frequency range (20kHz).
- Honoa ngā taura whakamātautau kia whakarara ki te pūtake tohu.
- Pānuihia te uara auau kei runga i te whakaaturanga.
6.11 Te Ine i te Pāmahana (°C/°F)
- Connect the K-type thermocouple to the VΩHz and COM jacks, observing polarity.
- Set the rotary switch to the Temperature range.
- Place the thermocouple probe at the point where temperature is to be measured.
- Pānuihia te uara pāmahana kei runga i te whakaaturanga.
7. Tiaki
7.1 Te horoi
Mukua te keehi me te panuiamp kakahu me te hopi horoi ngawari. Kaua e whakamahia he mea whakakoi, he mea whakarewa rānei. Me whakarite kia maroke rawa te mita i mua i te whakamahinga.
7.2 Whakakapinga Pūhiko
Tirohia te wāhanga 5.1 mō ngā tohutohu whakakapi pākahiko. Whakakapia ngā pākahiko i te wā tonu ka puta te tohu pākahiko iti kia tika ai ngā pānui.
7.3 Whakakapinga Puka
Ki te kore e mahi te mahi ine i te au, me whakakapi pea te fiusi. Tirohia ngā whakaritenga mō te momo fiusi me te whakatauranga tika. Me mahi anake te whakakapinga fiusi e ngā kaimahi whai tohu.
8. Te Raru
| Raruraru | Take pea | Rongoā |
|---|---|---|
| Kaore te mita i te hiko. | Nga pākahiko kua mate, kua he ranei te whakaurunga. | Tirohia te polarity pākahiko whakakapi ranei pākahiko. |
| "OL" (Te Uta Nui) kua whakaatuhia. | Measurement exceeds selected range or open circuit. | Select a higher range or check for open circuit. |
| Incorrect current reading. | Blown fuse or incorrect input jack. | Check fuse and ensure test lead is in the correct current input jack (mAµA or 10A). |
| Karekau he tangi haere tonu. | Resistance is too high or circuit is open. | Check the circuit for breaks. Ensure resistance is below 50Ω. |
9. Whakatakotoranga
Ko te ripanga e whai ake nei e whakaatu ana i nga korero hangarau mo te MASTECH MY74 Digital Multimeter.

| Mahi | Awhe | Whakatau | Tika |
|---|---|---|---|
| DC Voltage | 200mV/2V/20V/200V | 0.1mV/1mV/10mV/0.1V | ±(0.5%+2) |
| 600V | 1V | ±(0.8%+2) | |
| AC Voltage | 2V/20V/200V | 1mV/10mV/100mV | ±(0.8%+3) |
| 750V | 1V | ±(1.2%+3) | |
| DC Naianei | 2mA | 1µA | ±(0.8%+1) |
| 20mA | 10µA | ±(1.5%+1) | |
| 200mA | 0.1mA | ±(1.5%+1) | |
| 10A | 10mA | ±(2.0%+5) | |
| AC o nāianei | 20mA | 10µA | ±(1.0%+5) |
| 200mA | 0.1mA | ±(1.8%+5) | |
| 10A | 0.01A | ±(3.0%+7) | |
| Ātete | 200Ω | 0.1Ω | ±(0.8%+3) |
| 2kΩ/20kΩ/200kΩ/2MΩ | 1Ω/10Ω/100Ω/1kΩ | ±(0.8%+2) | |
| 20MΩ | 10kΩ | ±(1.0%+2) | |
| 200MΩ | 0.1MΩ | ±(6.0%+10) | |
| Diode Tuwhera Voltage | 3.0V | N/A | N/A |
| Te kaha | 2nF/20nF/200nF/2µF | 1pF/10pF/0.1nF/1nF | ±(4.0%+3) |
| 20µF | 10nF | ±(5.0%+3) | |
| 100µF | 0.1µF | ±(6.0%+10) | |
| Auautanga | 20kHz | 0.01kHz | ±(2.0%+5) |
| Te pāmahana | -20°C~0°C | 1°C | ±(5.0%+4) |
| 1°C~400°C | 1°C | ±(2.0%+3) | |
| 401°C~1000°C | 1°C | ±(2.0%+5) | |
| Transistor hFE | 0~1000 | N/A | N/A |
| Whakaatu | 2000 tatau | ||
| Whakaweto Aunoa | Ae | ||
| Whakaputanga Buzzer | <50Ω | ||
| Pupuri Raraunga | Ae | ||
| Whakaaturanga Pūhiko Iti | Ae | ||
| Puna Mana | 2 LR44 pākahiko (kei roto) | ||
| Hunga Hua | 16 x 9 x 5 cm | ||
| Taumaha Tūemi | 0.5 Kirokaramu | ||
| Whakatauranga Haumaru | CAT III 600V, CE, RoHS | ||
Note: Accuracy specifications are given for one year after calibration, at 18°C to 28°C (64°F to 82°F), with relative humidity up to 75%.
10. Pūtāhui me te Tautoko
MASTECH products are designed for reliability and performance. For warranty information and technical support, please refer to the documentation included with your purchase or visit the official MASTECH website. The EU Spare Part Availability Duration is 1 year.


