Kupu Whakataki
Thank you for choosing the Mastech MS8233D Digital Multimeter. This manual provides essential information for the safe and effective operation, maintenance, and troubleshooting of your device. Please read this manual thoroughly before use and keep it for future reference.
Nga korero haumaru
WHAKATŪPATO: Hei karo i te ru hiko, i ngā whara rānei, pānuihia, kia mārama hoki ki ngā mōhiohio haumaru katoa i mua i te whakamahinga o tēnei hua.
- Me whakarite kia tika te mahi me te awhe o te mita maha i mua i te inenga.
- Kaua e tono nui ake i te reiti voltage, as marked on the meter, between terminals or between any terminal and earth ground. The MS8233D has a Safety Rating of CATII 600V.
- Kia tupato ki te mahi tahi me te voltagkei runga ake i te 30V AC RMS, te tihi 42V, te 60V DC ranei. Ko taua voltaghe morearea ohorere.
- Keep your fingers behind the probe barriers during measurements.
- Do not use the meter if it is damaged or if the case is open. Inspect the meter and test leads before use.
- Whakakapihia te pākahiko ina puta te tohu iti o te pākahiko kia tika ai nga panui.
- Kaua e whakahaerehia te mita i roto i ngā taiao pahū hau, kohu, puehu rānei.
Nga waahanga matua
The Mastech MS8233D Digital Multimeter offers a range of functionalities for various electrical measurements:
- Whakaatu: 2000 counts for precise readings.
- Awhe: Auto and Manual Ranging capabilities.
- Whakamatau Whakatautau: Features a Diode Open Voltage o 1.5v.
- Whakamātautau Tonu: Audible buzzer for resistance less than 60Ω.
- Pupuri Raraunga: Freezes the displayed reading for convenience.
- Whakaweto Aunoa: Ka tiaki i te roa o te pākahiko.
- Kore-whakapiri Voltage Rapu (NCV): For identifying live wires without direct contact.
- Inenga Morahi: Records the highest value measured.
- Whakaatu Maama Whakamuri: Mo te kitea i roto i nga ahuatanga iti-marama.
- Whakaaturanga Pūhiko Iti: Indicates when battery replacement is needed.
- Tuku Hiko: Operates on 1x 9V 6F22 Battery.
- Tiwhikete: RoHS rite.
- Whakatauranga Haumaru: CATII 600V.
Whakaahua 1: Mua view of the Mastech MS8233D Digital Multimeter, highlighting the display, rotary function switch, and input terminals.
Ka mutu te huaview me nga Waehanga
The MS8233D multimeter is designed for ease of use and durability. Familiarize yourself with its main parts:

Whakaatu 2: Neke Atuview of the MS8233D Digital Multimeter, illustrating its physical dimensions, power supply, and typical applications in domestic, industrial, and electronics settings.
- Whakaaturanga LCD: E whakaatu ana i ngā pānui ine, ngā waeine, me ngā tohu mahi.
- Function Rotary Switch: Used to select the desired measurement function (e.g., ACV, DCV, Resistance, Diode, Continuity, Temperature, NCV).
- Ngā Jack Tāuru: Terminals for connecting test leads.
- COM Jack: Pūwhakauru noa (kino) mō ngā inenga katoa.
- Tūhono VΩmA: tauranga whakauru pai mo voltage, resistance, diode, continuity, and small current measurements.
- 10A Jack: Positive input terminal for high current (up to 10A) measurements.
- Pātene Mahi: For features like Data Hold, Backlight, and Range selection.
Tatūnga
Tāuta Pūhiko
The MS8233D requires one 9V 6F22 battery for operation. To install or replace the battery:
- Ensure the multimeter is turned off and disconnect all test leads from the input terminals.
- Kimihia te uhi o te wahanga pākahiko kei muri o te mita.
- Use a screwdriver to loosen the screw(s) on the battery cover and remove the cover.
- Connect the new 9V battery to the battery clips, observing the correct polarity.
- Whakatakotoria te pākahiko ki roto i te wāhanga ka whakahokia te taupoki, me te whakau ki te/ngā tīwiri.
Tuhipoka: The meter includes a low battery indicator. Replace the battery promptly when this indicator appears to maintain measurement accuracy.
Nga Tohutohu Whakahaere
Before making any measurement, ensure the test leads are properly connected and the function switch is set to the desired range.
Te Ine DC Voltage (DCV)
- Whakauruhia te taura whakamātautau whero ki te hononga VΩmA me te taura whakamātautau pango ki te hononga COM.
- Set the rotary switch to the desired DCV range (e.g., 200mV, 2V, 20V, 200V, 600V). If unsure, start with the highest range or use auto-ranging if available.
- Tūhonohia ngā porotiti whakamātautau puta noa i te wāhanga, i te ara iahiko rānei hei ine, me te tirotiro anō i te polarity.
- Pānuihia te voltage uara i runga i te whakaaturanga LCD.
Te Ine AC Voltage (ACV)
- Whakauruhia te taura whakamātautau whero ki te hononga VΩmA me te taura whakamātautau pango ki te hononga COM.
- Set the rotary switch to the desired ACV range (e.g., 2V, 20V, 200V, 600V).
- Tūhonohia ngā porotiti whakamātautau puta noa i te wāhanga, i te ara iahiko rānei hei ine.
- Pānuihia te voltage uara i runga i te whakaaturanga LCD.
Measuring DC/AC Current (DCA/ACA)
CAUTION: Never connect the meter in parallel to a voltagpūtake e ine ana i te iahiko. Ka kino pea tēnei i te mita me te ara iahiko.
- For currents up to 200mA, insert the red test lead into the VΩmA jack. For currents up to 10A, insert the red test lead into the 10A jack. Insert the black test lead into the COM jack.
- Set the rotary switch to the desired DC or AC current range (e.g., 200µA, 2000µA, 20mA, 200mA, 10A).
- Whakatuwheratia te ara iahiko ki te ine i te ia me te hono i te mita i roto i te raupapa me te uta.
- Pānuihia te uara o nāianei i runga i te whakaaturanga LCD.
Measuring Resistance (Ω)
- Whakauruhia te taura whakamātautau whero ki te hononga VΩmA me te taura whakamātautau pango ki te hononga COM.
- Set the rotary switch to the desired Resistance range (e.g., 200Ω, 2kΩ, 20kΩ, 200kΩ, 2MΩ, 20MΩ).
- Me mohio kua whakakorehia te hiko, te waahanga ranei i mua i te ine i te parenga.
- Honoa ngā pūwero whakamātautau puta noa i te wāhanga.
- Pānuihia te uara ātete i runga i te mata LCD.
Whakamatau Diode
- Whakauruhia te taura whakamātautau whero ki te hononga VΩmA me te taura whakamātautau pango ki te hononga COM.
- Set the rotary switch to the Diode symbol (usually shared with Continuity).
- Honoa te ine whero ki te anode me te ine pango ki te cathode o te diode.
- Ka whakaatuhia te rōrahi whakamua e te whakaaturangatage drop. Reverse the probes; the display should show 'OL' (Open Loop) for a good diode.
Whakamātautau Tonu
- Whakauruhia te taura whakamātautau whero ki te hononga VΩmA me te taura whakamātautau pango ki te hononga COM.
- Set the rotary switch to the Continuity symbol (usually shared with Diode).
- Honoa ngā probe whakamātautau puta noa i te ara iahiko, i te wāhanga rānei.
- If the resistance is below approximately 60Ω, the buzzer will sound, indicating continuity. The display will also show the resistance value.
Kore-Whakapā Voltage (NCV) Rapunga
- Set the rotary switch to the NCV function.
- Move the top part of the meter (NCV sensor area) close to the conductor suspected of having AC voltage.
- The meter will emit an audible beep and the NCV indicator will light up if AC voltagka kitea e.
Mahi Mahinga Raraunga
Pēhia te pātene 'PUPURI' hei whakatio i te pānui o nāianei kei te mata. Pēhia anō hei tuku i te pātene pupuri me te tīmata anō i ngā inenga ora.
Mahi Whakamarama
Press the 'LIGHT' button to turn on the display backlight. Press it again to turn it off. The backlight may automatically turn off after a short period to conserve battery.
Te tiaki
Te horoi
Horoia te pouaka o te mita ki te pānuitangaamp he kakahu me te horoi ngawari. Kaua e whakamahi i te abrasive me te whakarewa. Me whakarite kua maroke katoa te mita i mua i te whakamahi.
Whakakapinga Pūhiko
Refer to the 'Battery Installation' section under 'Setup' for instructions on replacing the 9V battery. Always replace the battery when the low battery indicator is displayed to ensure accurate readings and proper operation.
Whakakapinga Fuse
The MS8233D is equipped with internal fuses to protect against overcurrent. If the current measurement function stops working, the fuse may need replacement. Fuse replacement should only be performed by qualified personnel. Use only fuses of the specified type and rating (e.g., F200mA/250V for mA range, F10A/250V for 10A range).
Raparongoā
| Raruraru | Take pea | Rongoā |
|---|---|---|
| Kaore he whakaaturanga, he whakaaturanga atarua ranei | Kua mate, iti ranei te pākahiko | Whakakapihia te papahiko 9V. |
| Ko nga korero e he ana | Incorrect function/range selected; poor test lead connection; low battery | Verify function and range; check test lead connections; replace battery. |
| Ko te inenga o naianei kaore e mahi | Ka pupuhihia | Replace the appropriate fuse (refer to Maintenance section). |
| 'OL' (Overload) displayed | Kua hipa te ine i te whānuitanga kua tohua; he ara iahiko tuwhera (mō te haere tonu/ātete) | Kōwhiria he awhe teitei ake; tirohia mēnā he ara iahiko tuwhera. |
| Kāore he pī tonu | Resistance too high; open circuit | Check for continuity; ensure resistance is below 60Ω. |
Whakatakotoranga
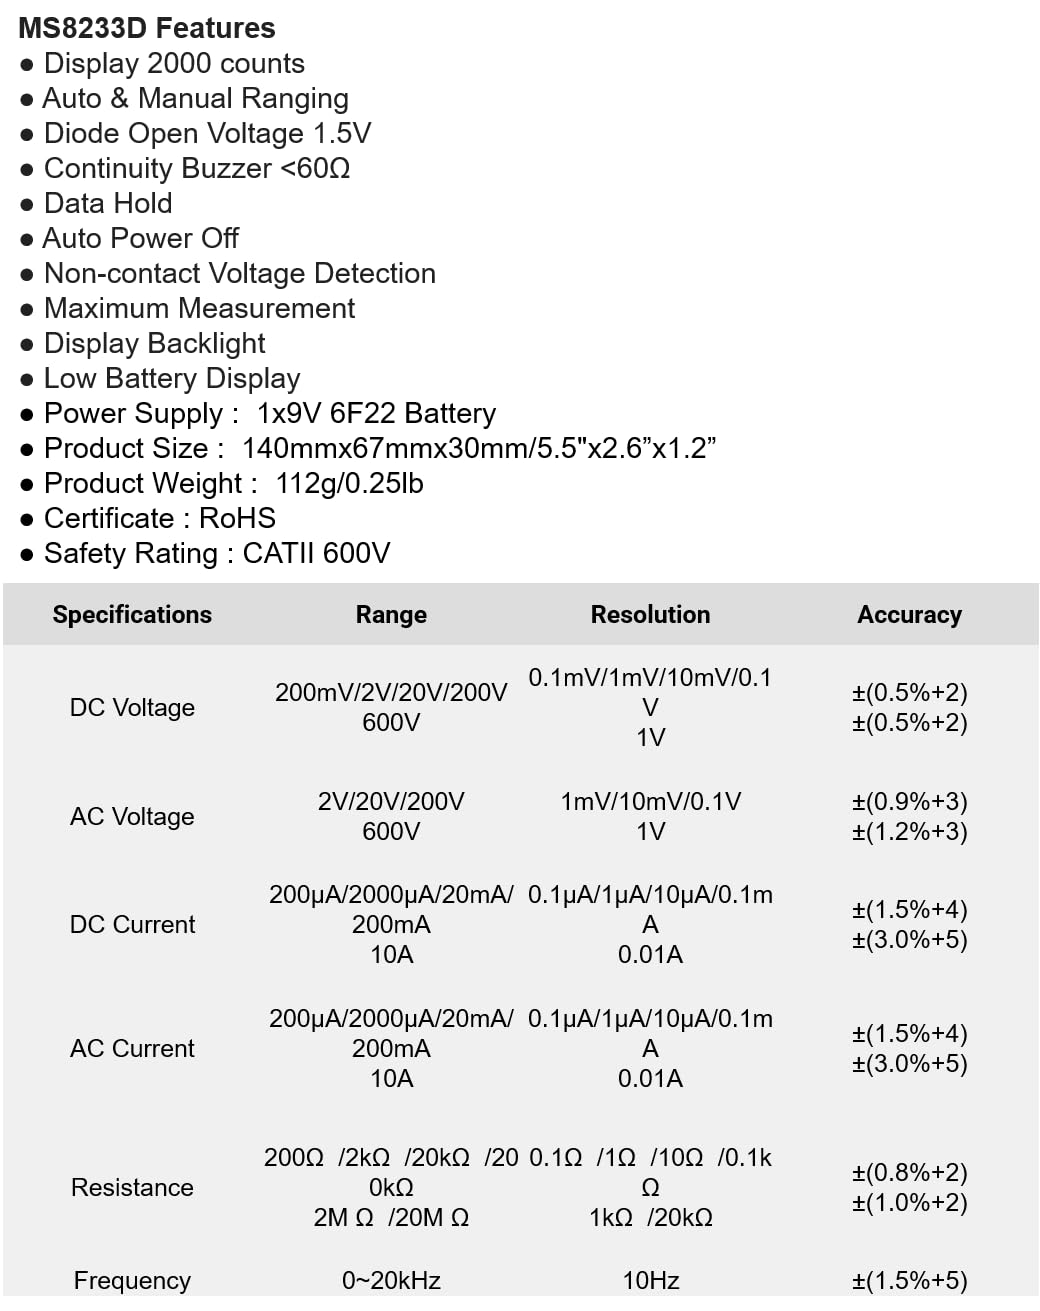
The following table details the measurement ranges, resolutions, and accuracies for the Mastech MS8233D Digital Multimeter:

Figure 3: Comprehensive specifications for the MS8233D, outlining measurement capabilities and precision.
| Āhuahira | Whakatakotoranga |
|---|---|
| Whakaatu | 2000 tatau |
| DC Voltage | 200mV / 2V / 20V / 200V / 600V |
| AC Voltage | 2V / 20V / 200V / 600V |
| DC Naianei | 200µA / 2000µA / 20mA / 200mA / 10A |
| AC o nāianei | 200µA / 2000µA / 20mA / 200mA / 10A |
| Ātete | 200Ω / 2kΩ / 20kΩ / 200kΩ / 2MΩ / 20MΩ |
| Auautanga | 0-20kHz |
| Diode Tuwhera Voltage | 1.5V |
| Whakaputanga Buzzer | <60Ω |
| Tuku Hiko | 1x Pūhiko 9V 6F22 |
| Hunga Hua | 140mm x 67mm x 30mm (5.5" x 2.6" x 1.2") |
| Taumaha Hua | 112g (0.25lb) |
| Whakatauranga Haumaru | CATII 600V |
| Tiwhikete | CE, RoHS |
Pūtāhui me te Tautoko
Mō ngā mōhiohio pūtāhui me te tautoko hangarau, tirohia ngā tuhinga i whakaratohia me tō hoko, whakapā atu rānei ki te kaihoko/kaihanga. Puritia tō rīhiti hoko hei taunakitanga hoko mō ngā kereme pūtāhui katoa.


