1. Kupu Whakataki
Thank you for choosing the i-aplus LED Nightstand. This nightstand is designed to provide functional storage and ambient lighting for your bedroom or living space. Featuring two spacious drawers, a convenient charging station, and customizable LED lighting, this unit combines modern design with practical utility. Please read this manual thoroughly before assembly and use to ensure proper installation and safe operation.
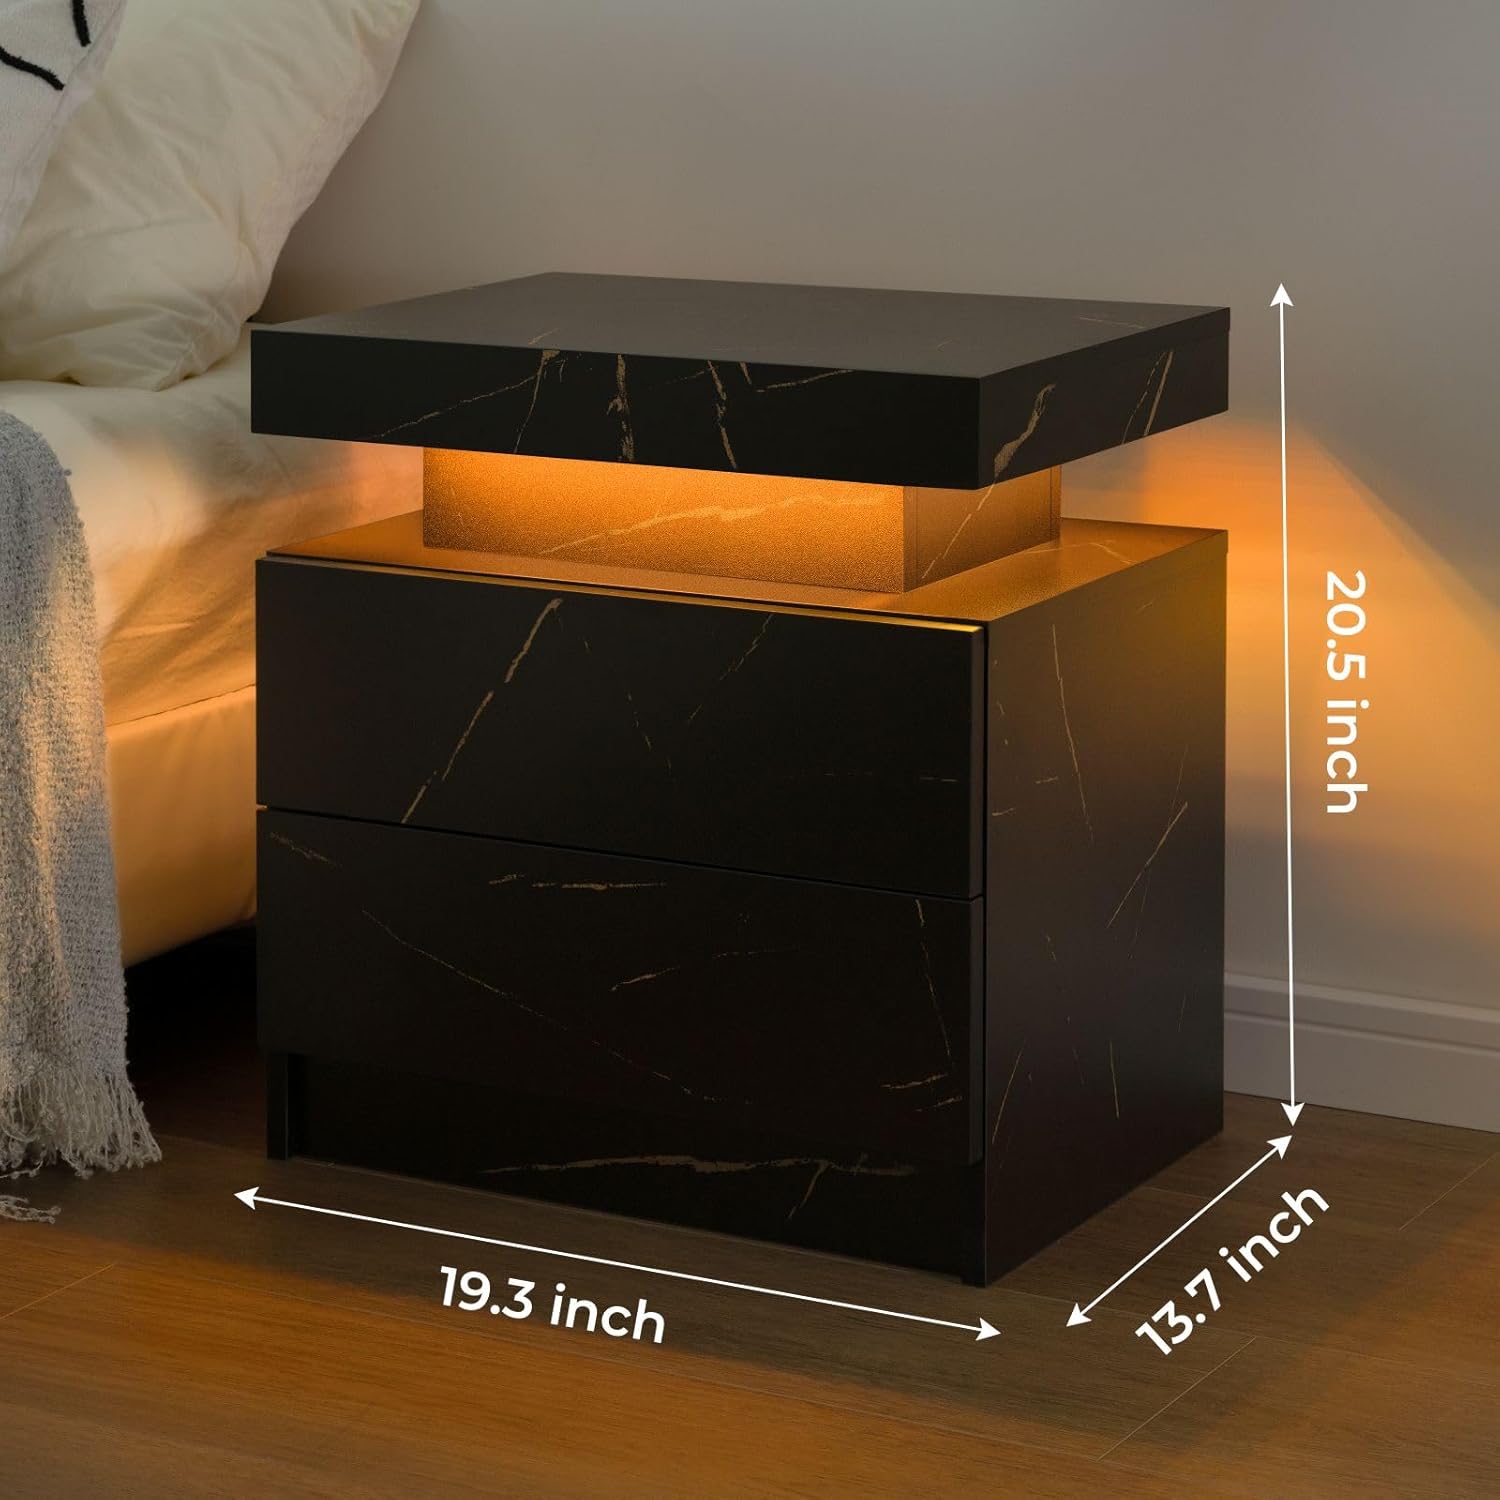
The i-aplus LED Nightstand provides both functional storage and ambient lighting.
2. Nga korero haumaru
- Raukaha Taumaha: Do not exceed the maximum weight recommendation of 50 pounds on the top surface.
- Pūmautanga: Ensure all fasteners are securely tightened during assembly to prevent wobbling or instability.
- Puranga: For added safety, especially in homes with children or pets, consider anchoring the nightstand to the wall using appropriate hardware (not included).
- Haumaru Hiko: Only use the integrated charging station with compatible devices. Do not overload the power sockets. Keep liquids away from electrical components.
- Huihuinga: Follow all assembly instructions carefully. It is recommended that two people assemble this unit.
3. Ihirangi mokete
Before beginning assembly, verify that all parts and hardware listed below are present and undamaged. If any parts are missing or damaged, please contact customer support.
Paewhiri Rakau
- A (Top Panel)
- A2 (Bottom Panel)
- B (Side Panel)
- C (Side Panel)
- D (Back Panel)
- E (Drawer Side)
- F (Drawer Side)
- G (Drawer Front)
- H (Drawer Back)
- I (Drawer Bottom)
- J (Drawer Front)
- K (Drawer Back)
- L (Drawer Bottom)
- L2 (Drawer Side)
- M (Drawer Side)
- N (Drawer Bottom)
Nga taputapu me nga taputapu
- Guide Rails (x4)
- Cam Bolts (x64)
- Cam Locks (x64)
- Nga Pouaka Rakau (x18)
- Tīwiri (x20)
- Kakau (x2)
- Plastic Caps (x4)
- Pukapuka Arataki
- Installation Tool (Screwdriver)
4. Tatūnga me te Runanga
Follow these step-by-step instructions for assembling your i-aplus LED Nightstand. It is recommended to have a second person assist with assembly.
Aratohu Ataata Huihuinga
Official HNEBC Nightstand Installation Video (Duration: 10:13)
Nga Tohutohu-a-Taahiraa
- Prepare Panels: Carefully remove the protective film from all panels before installation to avoid difficult removal later.
- Attach Cam Bolts: Screw cam bolts (1) into panels A and A2 as indicated in the diagram.
- Install Guide Rails: Pull out the guide rail sections and screw them onto panels A and A2 using screws (4).
- Huihuia nga Paewhiri Taha: Attach side panels B and C to panel A using cam locks (2) and wooden dowels (3).
- Āpiti Paewhiri Whakamuri: Secure back panels D to the assembled structure using cam locks (2).
- Complete Main Frame: Attach panel A2 to the structure, securing it with cam locks (2) and cam bolts (1).
- Huihuia nga Kaituhi: For each drawer, attach the side panels (L, L2, M, N) to the front (G) and back (H) panels using cam bolts (1) and cam locks (2). Slide the drawer bottom (I) into the grooves.
- Tāpirihia ngā Kākahu Pouaka: Secure the handles (5) to the front of each drawer using the provided screws.
- Tāuta Kaiutuutu: Carefully align the drawer rails with the guide rails on the nightstand frame and slide the drawers into place until they click securely.
- Nga Pa Whakamutunga: Insert plastic caps (6) into any visible screw holes for a clean finish.
5. Nga Tohutohu Whakahaere
5.1. Rarama LED
The i-aplus LED Nightstand features integrated LED lighting with 16 RGB colors to enhance your room's ambiance.

The LED lighting offers multiple colors and control options.
- Mana: Use the included remote control or a compatible mobile application to manage the LED lights.
- Tīpakonga Tae: Choose from 16 different RGB colors to match your mood or decor.
- Whakaritenga Tirohanga: Adjust the brightness level of the lights to your preference.
- Aratau: Explore various lighting modes, including static colors, dynamic changes, and music rhythm mode (if supported by the app).
- Matawā: Utilize the timer switch feature to set specific operating times for the lights.
5.2. Teihana Whakatau
The nightstand includes a built-in charging station located within the top sliding compartment for convenient access to power.
- Uru: Gently slide the top panel of the nightstand to reveal the charging station.
- Tauranga: The charging station is equipped with 2 USB ports and 2 standard power sockets.
- Whakamahinga: Plug in your electronic devices such as phones, tablets, or laptops for charging.
- Whakawhiti Kaha: Use the integrated power switch to turn the charging station on or off as needed.
6. Tiaki
- Te horoi: To clean the nightstand, wipe surfaces with a soft, damp cloth. Avoid using harsh chemicals or abrasive cleaners that may damage the finish.
- Maringi: Promptly wipe up any spills to prevent staining, as the material is not stain-resistant.
- Tiaki Kaituku: Periodically check drawer slides for smooth operation. If needed, clean any dust or debris from the tracks.

Mukua nga papa ki te panuiamp kakahu mo te horoi.
7. Te Raru
- Nga Rarama LED Kaore e Mahi:
- Check if the power cable for the LED lights is securely plugged into a working outlet.
- Ensure the remote control battery is functional.
- If using a mobile app, verify Bluetooth connection and app settings.
- Karekau nga Kaiutuutu e retireti maeneene:
- Inspect the drawer slides for any obstructions or debris.
- Ensure all screws attaching the slides to the drawer and frame are tight.
- Verify that the drawers are correctly aligned on their tracks.
- Nightstand is Wobbly:
- Check and tighten all cam bolts and screws throughout the entire assembly.
- Me whakarite te tuunga o te po ki runga i te mata papatahi.
8. Whakatakotoranga
| Āhuahira | Taipitopito |
|---|---|
| Waitohu | i-apiti |
| Ingoa Tauira | A02 |
| Rahi Hua (D x W x H) | 16"D x 19"W x 24"H |
| Taumaha Tūemi | 34 Pauna |
| Tohunga Taumaha Morahi | 50 Pauna |
| Rauemi Tāpare | Te rakau |
| Momo Rawa Runga | Rakau Hangaia |
| Tuhinga o nga Kaitoi | 2 |
| Te maha o nga whata | 1 |
| Tae | Koura Pango |
| Rauemi Kakau | Metal or Alloy Steel |
| Huihuinga e hiahiatia ana | Ae |
| Te maha o nga tangata mo te Huihuinga | 2 |
| Nga Tohutohu Tiaki Hua | Horoia me Damp kakahu |
9. Pūtāhui me te Tautoko
For warranty information or customer support, please refer to the documentation included with your purchase or contact the retailer directly. Keep your proof of purchase for any warranty claims.


