1. Kupu Whakataki
This manual provides detailed instructions for the setup, operation, and maintenance of your Xech Solaris Plus Digital Wall Clock, Mars edition. This innovative clock features a pristine glass panel, a bright LED display, and a unique Mars-inspired design, offering clear visibility of time, date, day of the week, and temperature.

Mua view of the Xech Solaris Plus Digital Wall Clock, showcasing its Mars-themed design and clear LED display for time, date, and temperature.
2. He aha kei roto i te Pouaka
Tena koa tirohia kei roto nga waahanga katoa i roto i te kete:
- 1 x Solaris Plus Wall Clock
- 1 x 3 meter Male to Female USB Extension Cable
- 1 x Waea Hiko USB (1.5 mita)
- 1 x 5V2A Adaptor

The complete set of accessories provided with the Solaris Plus clock, including the 5V2A adapter, 3m USB Male to Female Extension Cable, and the standard USB power cable.
3. Tohutohu Tatūnga
3.1 Hononga Hiko
- Connect the smaller end of the USB Power Cable to the USB port on the back of the Solaris Plus clock.
- Connect the larger end of the USB Power Cable to the provided 5V2A Adaptor.
- Plug the 5V2A Adaptor into a standard electrical outlet.
- If additional reach is required, use the 3-meter Male to Female USB Extension Cable between the USB Power Cable and the adaptor.
3.2 Kōwhiringa Whakaeke
The Solaris Plus clock offers both wall-mount and tabletop placement options.

This image illustrates the versatile mounting options for the Solaris Plus clock, showing it both securely mounted on a wall and elegantly positioned on a tabletop.
Maunga Maunga:
- Locate the keyhole slot on the back of the clock.
- Securely install a screw (not included) into your desired wall location, ensuring it can support the clock's weight (approximately 1.7 kg).
- Align the keyhole slot with the screw head and gently slide the clock down to secure it.
Maunga Ripanga:
- Insert the provided tabletop stands into the designated slots on the bottom rear of the clock.
- Ensure the stands are firmly seated to provide stable support.
- Place the clock on a flat, stable surface.

Taipitopito view of the clock's rear, illustrating the integrated wall mount hole for hanging and the slots for attaching the tabletop stand.
4. Nga Tohutohu Whakahaere
4.1 Te whakatu i te Karaka
The clock features three control buttons (A, B, C) located on the back for adjustments.
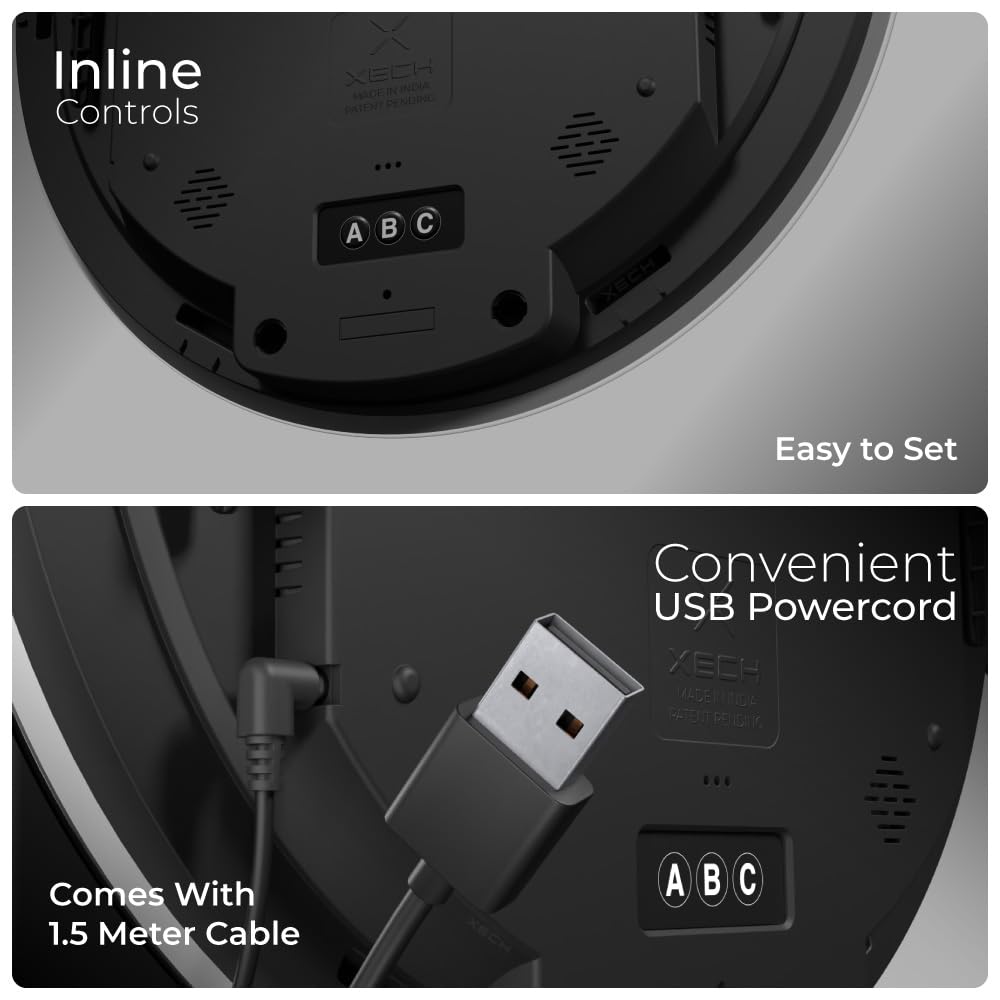
A close-up of the clock's rear panel, highlighting the three control buttons (A, B, C) for settings and the convenient USB power input.
- Tautuhinga Uru: Press and hold button 'A' to enter setting mode. The first adjustable parameter will begin to flash.
- Navigating Parameters: Press button 'A' repeatedly to cycle through different settings (e.g., Time, Date, Year, 12/24-hour format, Temperature Unit).
- Whakarite Uara: Use button 'B' to decrease the value and button 'C' to increase the value of the flashing parameter.
- Tautuhinga Tiaki: Once all adjustments are made, press button 'A' again until the display stops flashing to exit setting mode and save your changes.
4.2 Whakaaturanga Whakaaturanga
The Solaris Plus clock displays the following information:
- Wā Mamati: Displays current time in either 12-hour or 24-hour format.
- Te Rā o te Wiki: Indicates the current day (MON, TUE, WED, THU, FRI, SAT, SUN).
- Maramataka: Shows the date in MM/DD format.
- Te pāmahana: Displays the ambient temperature in Celsius or Fahrenheit.

This image labels the various information displayed on the clock face: digital time, day of the week, calendar (month/day), and temperature in Celsius.
4.3 Temporal Memory
The Solaris Plus clock is equipped with a temporal memory function. In the event of a power outage, the clock will intelligently remember the last set time and date, minimizing the need for re-setting once power is restored. Note that this feature requires a brief internal battery (not user-replaceable) to maintain memory, but the clock itself requires continuous USB power for display and full functionality.

The clock's bright LED display ensures clear visibility of time, date, and temperature, whether in a well-lit room or during nighttime hours.
5. Whakatakotoranga
| Āhuahira | Taipitopito |
|---|---|
| Waitohu | Xech |
| Tau tauira | SOLARIS PLUS |
| Momo Whakaatu | Arahina Mamati |
| Kāhua | Mars |
| Nga waahanga motuhake | Calendar Display, Illuminated, Large Display, Silent Clock, Temperature Display, Temporal Memory |
| Hunga Hua | 31.5W x 31.5H Henimita |
| Puna Mana | Waea Hiko (Whakahiko USB) |
| Rauemi | Glass, Acrylonitrile Butadiene Styrene (ABS) |
| Taumaha Tūemi | 1.7 kg |
| Mahinga Mahi Voltage | 5V |
| Awhe Mahi | -20°C ki te 50°C |
6. Tiaki
- Te horoi: Whakamahia he ngohengohe, maroke, paku ranei damp cloth to clean the glass panel and body of the clock. Avoid abrasive cleaners or solvents, as they may damage the surface.
- Turanga: Ensure the clock is placed in a stable location, away from direct sunlight, extreme temperatures, and high humidity to prevent damage and ensure accurate temperature readings.
- Mana: Always use the provided 5V2A adaptor and USB cables for optimal performance and to prevent electrical issues.
7. Te Raru
| Raruraru | Take pea | Rongoā |
|---|---|---|
| Kua weto te whakaaturanga karaka. | Karekau he hiko. | Check if the USB cable is securely connected and the power adapter is plugged into a working outlet. Ensure the power source is active. |
| Time/Date is incorrect after power interruption. | Temporal memory may not have saved or was reset. | Manually reset the time and date using the control buttons on the back of the clock as per Section 4.1. |
| Te āhua nei kāore i te tika te pānui pāmahana. | Clock is exposed to direct heat/cold sources or placed in a poorly ventilated area. | Relocate the clock to an area with stable ambient temperature, away from windows, vents, or appliances that generate heat/cold. Allow some time for the sensor to adjust. |
| Kare e aro mai nga paatene. | Hapa rorohiko rangitahi. | Unplug the clock from the power source, wait 10 seconds, and then plug it back in. Try operating the buttons again. |
8. Pūtāhui me te Tautoko
Your Xech Solaris Plus Digital Wall Clock comes with a 1-Tau Pūtāhui from the date of purchase, covering manufacturing defects. Please retain your purchase receipt for warranty claims.
For technical assistance, troubleshooting, or warranty inquiries, please contact XECH Technologies Pvt Ltd customer care:
- Tiaki Kiritaki: +91 88288 44466
- Kaihanga: XECH Technologies Pvt Ltd, MIDC, Andheri East, India.


